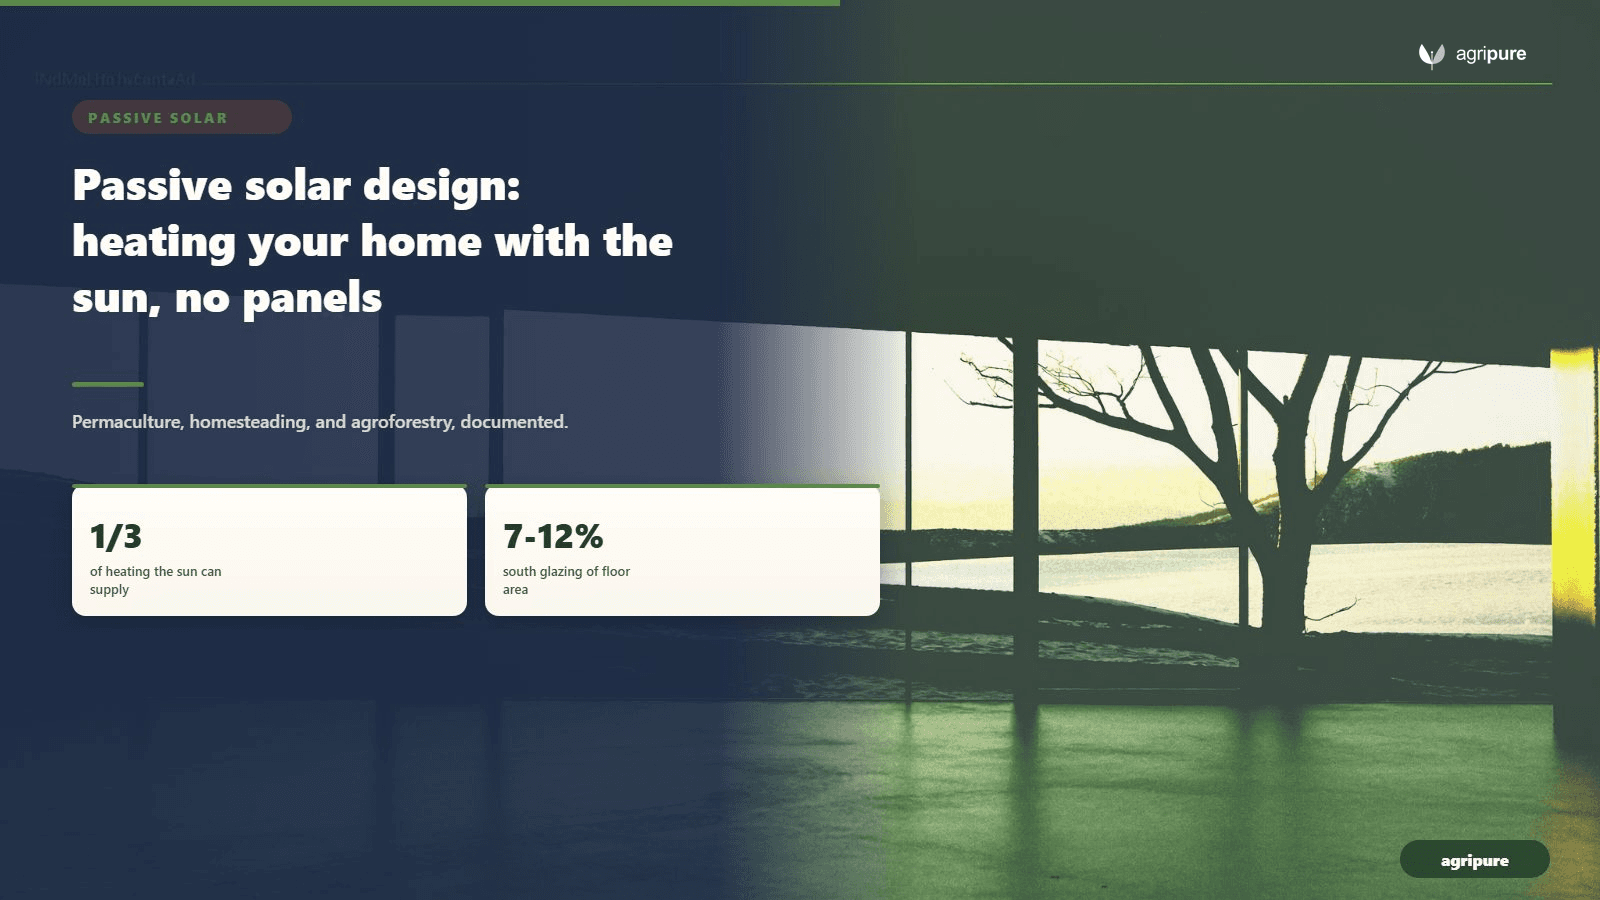
Passive solar design: heating your home with the sun, no panels
A house does not need a single photovoltaic module to run on sunlight. Orient it correctly, glaze the south wall, give it a concrete floor to soak up the heat, and shade the glass in summer, and the building itself becomes the collector. University of Oregon building scientist Alexandra Rempel and colleagues estimate that this approach — direct solar heating through good design — could supply about a third of the space heating a typical household needs in a year. That is the promise of passive solar design, and it is also where most attempts go wrong. Get the orientation, glass, and mass out of balance and you do not get a warm house in January; you get a greenhouse that bakes in October and bleeds heat at 3 a.m. This guide walks the design honestly, with the numbers builders actually use.
What passive solar design actually is
The cleanest way to define passive solar design is by what it does not have. There are no pumps, no fans, no controllers, and no panels. The building’s orientation, materials, and glazing do the work, moving heat by the three natural mechanisms the U.S. Department of Energy names: conduction, convection, and radiation. That is the line between the two families of solar building. Active solar uses mechanical and electrical gear — rooftop collectors, pumps, fans, or photovoltaic cells — to gather and move energy. If you want the active side of the story, our explainer on how a solar panel turns photons into power covers it. Passive solar uses none of that hardware; the house is the machine.
That distinction matters for cost and durability. A passive system has almost nothing to break, because there is almost nothing in it that moves. The tradeoff is that you mostly buy passive solar at design time. It is far cheaper to point a house south and pour the right floor while you are building than to bolt performance on afterward — which is why passive solar belongs in the same early conversation as where home energy upgrades actually move the needle. A passive house is not a gadget you install. It is a set of decisions about geometry you mostly make once.
| Passive solar | Active solar | |
|---|---|---|
| Moves heat with | Conduction, convection, radiation | Pumps, fans, collectors, PV |
| Moving parts | Effectively none | Several |
| When you pay for it | Design and build stage | Equipment purchase, any time |
| Main failure mode | Overheating from bad balance | Component wear and repair |
The five elements that make it work
Underneath every passive solar building, the Department of Energy describes the same five elements working together. Skip one and the system stumbles. The aperture is the glass; the absorber and thermal mass are the storage; distribution spreads the heat; and control keeps the whole thing from cooking you in summer. The pairing that decides comfort is aperture plus mass.
| Element | What it is | The job it does |
|---|---|---|
| Aperture | South-facing glazing | Lets winter sunlight into the house |
| Absorber | The hard, dark surface the sun strikes | Takes in solar heat at the surface |
| Thermal mass | Concrete, brick, stone, tile, or water behind that surface | Stores the heat and releases it slowly |
| Distribution | Conduction, convection, radiation | Moves stored heat through the rooms |
| Control | Overhangs, shading, vents | Blocks summer sun, manages overheating |
The pairing to hold in your head is aperture plus mass. Glass without mass overheats the room by midday and goes cold by midnight, because there is nothing to bank the heat in. Mass without glass is just a cold slab. The DOE puts the control element plainly: properly sized roof overhangs can provide shade to vertical south windows during summer months. Get those five working in concert and the house holds a steady temperature; get them out of balance and you will feel every swing. One of the cheapest control tools is not built at all — a row of deciduous shade trees on the south and west drops its leaves to let winter sun through and leafs out to block the summer glare.
Let living shade do part of the work
Deciduous trees on the south and west are seasonal control you grow rather than build — leafed-out shade in summer, bare branches for winter sun.
Orientation and how much south-facing glass
Before any glass goes in, the house has to face the sun. This is the one decision that costs nothing on a new build and is nearly impossible to fix later, so it is worth getting exactly right. Two numbers govern it: how tightly the house points south, and how much of the floor area the south glass adds up to.
Point the long wall within 15 degrees of south
The Department of Energy’s rule for the aperture is that solar-collecting windows should face within 30 degrees of true south and stay unshaded during the heating season from 9 a.m. to 3 p.m. Green Built Alliance tightens that for the building itself: site the home so the longest wall faces within 15 degrees, plus or minus, of true south. True south, not magnetic south — the difference can be more than 10 degrees depending on where you are, so check magnetic declination for your site. The tighter you hold orientation, the more of the winter day your glass is actually collecting.
Size the glass to the floor, not the wall
The most common beginner mistake is glazing the whole south wall and calling it solar. Too much glass turns the house into an oven on sunny days and a heat sink at night. The sourced ratios are tied to floor area, not wall area:
- Sun-tempered (no added mass): south glazing should be no more than 7% of floor area. This is the safe entry point — it captures useful winter sun without demanding a special floor.
- Direct-gain passive solar (with mass): south glazing of 7 to 12% of floor area, paired with thermal mass to bank the extra heat.
For a 1,500-square-foot home, that 7% baseline is about 105 square feet of south glass; pushing to 12% means roughly 180 square feet, and every foot above the 7% line has to be matched with mass. Cross 12% and you are usually buying summer overheating and winter night losses, not comfort.
Thermal mass: what it is and how much you need
Thermal mass is the flywheel of a passive solar house. It is dense material that soaks up solar heat during the day and releases it slowly after sunset, smoothing the temperature swing that bare glass would create. The DOE lists the usual materials — concrete, brick, stone, and tile — and notes that the same mass works in reverse during the cooling season, absorbing heat from warm indoor air.

Concrete, masonry, or water
Most homes use a 4-inch concrete slab or a masonry feature wall as their mass, placed where winter sun lands on it directly. Water stores noticeably more heat per cubic foot than concrete, which is why water-wall and water-tube systems exist, but concrete and tile win on durability and on simply being part of the structure you were going to pour anyway. Peer-reviewed building-science work, including a study by A.K. Athienitis in the journal Solar Energy, confirms that an exposed thermal-mass floor can store daytime gain and release it into the evening to flatten the indoor temperature curve.
The 3-to-6 rule
Here is the number that keeps a direct-gain house comfortable. Per Green Built Alliance, for each square foot of glass above 7% of floor area, add 3 to 6 square feet of 4-inch-thick masonry as thermal mass. The mass has to be in the sun’s path or it cannot do its job — a slab hidden under carpet and furniture is wasted. Thickness matters too: most materials stop gaining useful storage past about 4 inches, because heat does not conduct deep enough to matter on a daily cycle. So the target is broad, sun-struck, and roughly 4 inches deep, not a thick block tucked in a corner.
Sizing the overhang to block summer sun, admit winter sun
The whole trick of seasonal comfort lives in one piece of geometry: the roof overhang. The summer sun rides high in the sky and the winter sun stays low, so a horizontal overhang of the right depth can shade the glass in July and step out of the way in January. The DOE calls this the control element, and it is the difference between a passive solar house and a sunroom you cannot use half the year.

Draw the two sun angles
The method is geometric, not guesswork. You draw the south wall to scale, draw the high summer sun angle up from the bottom of the glass, and extend the overhang until it intersects that line — that shades the window at the summer peak. Then you draw the low winter sun angle and confirm it slips under the overhang to strike the floor. As a rough starting point, Green Built Alliance suggests about a 2-foot-wide overhang within two feet of the top of an average window, but the exact figure depends on your latitude. The same overhang behaves differently at 33 degrees north in Phoenix than at 44 degrees north in Vermont.
- Pick your latitude. Summer and winter sun angles are set by it; everything downstream follows.
- Draw it to scale. Sketch the wall, the glass, and the two solar angles before you commit to a depth.
- Accept the compromise. A fixed overhang cannot be perfect in both seasons — an overhang long enough to block late-August sun also blocks the matching low sun in late February.
- Add adjustable shade. Deciduous trees, awnings, or exterior shades cover the shoulder seasons a fixed overhang gets wrong.
Why a fixed overhang is only part of the answer
That last point is the honest one. Because the sun retraces its spring angles in fall, a fixed overhang tuned to block September heat will also dim your March sun, when you may still want it. This is exactly where living shade earns its place in the design — a row of deciduous trees adjusts itself to the season in a way no fixed roofline can.
Direct gain, Trombe wall, or sunspace
The DOE groups passive solar heating into three approaches, and they trade simplicity against control. Most homes pick one as the backbone and borrow from the others. The differences come down to where the heat is stored and how long it takes to reach you.
| Approach | How heat is collected | Best for |
|---|---|---|
| Direct gain | Sun strikes mass floors and walls inside the living space | Simplest builds; whole-room heating |
| Indirect gain (Trombe wall) | A masonry wall behind south glass stores heat, then radiates it inward | Evening heat; quieter, glare-free rooms |
| Isolated gain (sunspace) | A separate sun-facing room collects heat, shared on demand | Retrofits; living space plus heat |
Direct gain
Direct gain is the most common and the most forgiving to build: sunlight enters through south-facing windows and strikes the masonry floor or walls, which absorb and store the heat. The whole room is the collector. The catch is comfort — too much glass and not enough mass, and the same room that is pleasant at 2 p.m. is uncomfortable by evening.
Indirect gain (the Trombe wall)
An indirect-gain or Trombe wall puts the thermal storage between the south glass and the room. Sun heats a dark masonry wall just inside the glazing; the wall stores the heat and radiates it into the living space hours later. The DOE gives the timing in a clean number: heat travels through a masonry wall at about one inch per hour, so heat absorbed on the outside of an 8-inch concrete wall at noon reaches the interior around 8 p.m. That built-in delay is the feature — it shifts solar heat into the cold evening, and it keeps direct glare and big temperature swings out of the room.
Isolated gain (the sunspace)
An isolated-gain system is a sunspace or attached greenhouse that can be closed off from the house with doors and operable windows. It collects heat in its own glazed room, and you share that heat with the house when you want it and shut it out when you do not. Because it is a separate room, a sunspace is the approach that adapts best to an existing home.

Windows, passive cooling, and climate
Passive solar is a glass problem as much as a geometry problem, and the spec that matters most on the south wall is the solar heat gain coefficient (SHGC) — the fraction of solar radiation a window lets through. The DOE is direct about it: a product with a high SHGC is more effective at collecting solar heat in winter, while a low SHGC is better at cutting summer cooling loads. For a heating-led passive solar house, that means you want high-SHGC glass on the south aperture and lower-SHGC glass on the east and west, where summer sun is harsh and hard to shade.
Reading the window label
Two numbers on the NFRC label drive the decision. SHGC governs solar heat in; U-factor governs heat loss, and the DOE notes that the lower the U-factor, the more efficient the window at holding warmth inside. The pairing you want on a cold-climate south wall is high SHGC with a low U-factor — glass that welcomes the sun and resists losing it back out on a freezing night. A passive (not solar-control) low-e coating is built for exactly this: it lets short-wave solar in while reflecting long-wave heat back into the room.
Cooling without a compressor
Passive design is not only about winter. A well-designed passive solar home also delivers summer comfort, and the DOE points to nighttime ventilation as a core tool: flush the day’s heat out after dark, let the thermal mass coast cool through the next afternoon. Pair that with the summer-blocking overhang, shaded east and west glass, and good insulation, and the same mass that warms the house in January steadies it in July. For a small build where every move counts, those same principles scale down to powering a small footprint without an oversized cooling system.
Build the envelope before you buy hardware
Passive design, insulation, and the right glass come first; tools and kit come after. See what pairs with a low-load home.
New build versus retrofit: what is realistic
Passive solar rewards new construction, because orientation and a structural slab are nearly free at design time and expensive to add later. On a new build you can hit the orientation, glazing, and mass numbers above as a coordinated set. That is the ideal, and it is a natural fit for anyone cutting the cord on bought power where every kilowatt-hour of avoided heating load counts.
Retrofitting an existing house is more limited, but not hopeless. The DOE flags a few moves that work on a standing home:
- Add a sunspace. An isolated-gain sunroom can be attached to an existing south wall and closed off when not wanted.
- Add water thermal storage. Water mass can go into an existing home if the structure can carry the weight — it is denser heat storage than masonry.
- Improve the glass and shading. Swapping south windows for high-SHGC, low-e units and adding overhangs or shades captures part of the benefit.
- Start with an energy audit. The DOE advises a home energy audit first, so you fix air leaks and insulation before chasing solar gain.
Climate steers all of it. The 7-to-12% glazing range and the 3-to-6 mass ratio are starting points for sunny, cold-winter regions; a cloudy maritime climate collects less winter sun, and a hot-summer zone leans harder on shading and night cooling. The five elements stay the same — you simply weight them toward heating or cooling for your site. For the broader owner-builder approach, passive solar slots neatly into the modern homesteader’s toolkit of low-maintenance, build-once systems.
The takeaway
Passive solar design is not a product you buy; it is a sequence of decisions you mostly make once, in this order. Face the long wall within 15 degrees of true south. Hold the south glazing to about 7% of floor area, or up to 12% if you add mass. Match every extra foot of glass with 3 to 6 square feet of 4-inch masonry placed in the sun. Size a roughly 2-foot overhang to the high summer sun, and let deciduous trees handle the shoulder seasons. Choose high-SHGC, low-e glass for the south, and flush heat out with night ventilation in summer. Do that and the building runs on sunlight with no moving parts to fail — the quiet third of your heating bill that the sun pays, the way good design has always made it.
Frequently asked questions
What is passive solar design in simple terms?
Passive solar design uses a building’s orientation, windows, and materials to capture, store, and release the sun’s heat without any mechanical equipment. There are no panels, pumps, or fans — the house itself is the collector, moving heat by conduction, convection, and radiation. It is the opposite of active solar, which relies on hardware like pumps, fans, and photovoltaic cells.
What is the difference between active and passive solar?
Active solar uses mechanical and electrical components — rooftop collectors, pumps, fans, or PV cells — to gather and distribute energy. Passive solar uses none of that; it relies on the building’s shape, orientation, glazing, and thermal mass. Passive systems have almost nothing to break and are paid for mostly at design time, while active systems are equipment you buy and maintain.
How much south-facing glass should a passive solar house have?
For a sun-tempered house with no added thermal mass, south-facing glazing should be no more than about 7% of the floor area. For a direct-gain passive solar house with thermal mass, 7 to 12% of floor area is the range. Every square foot of glass above 7% should be balanced with 3 to 6 square feet of 4-inch-thick masonry, or the house will overheat by day and lose that heat at night.
How much thermal mass do I need?
The common rule is 3 to 6 square feet of 4-inch-thick masonry for each square foot of south glass above 7% of floor area. The mass must sit in the direct path of winter sun to work, and roughly 4 inches is the effective thickness — heat does not conduct deep enough on a daily cycle to make thicker mass worthwhile. Concrete, brick, stone, tile, and water all qualify.
How do I size a roof overhang for passive solar?
Draw the south wall to scale, then draw the high summer sun angle for your latitude up from the bottom of the window and extend the overhang to meet it, which shades the glass in summer. Confirm the low winter sun angle slips under the overhang to reach the floor. A roughly 2-foot overhang within two feet of the window top is a typical starting point, but a fixed overhang cannot be perfect in both seasons, so deciduous trees or adjustable shades cover the shoulder months.
Can you retrofit passive solar into an existing house?
Partly. You cannot easily change a finished house’s orientation, but you can add an isolated-gain sunspace to a south wall, add water thermal storage if the structure can carry the weight, and swap south windows for high-SHGC, low-e units with added shading. The Department of Energy recommends starting with a home energy audit to seal leaks and add insulation before chasing solar gain.
References
- U.S. Department of Energy, Energy Saver. “Passive Solar Homes.” energy.gov
- U.S. Department of Energy, Energy Saver. “Energy Performance Ratings for Windows, Doors, and Skylights.” energy.gov
- Green Built Alliance. “Checklist: A primer for passive solar.” greenbuilt.org
- University of Oregon. “Passive solar could furnish a third of home heating needs.” uoregon.edu
- Athienitis, A.K. “Investigation of thermal performance of a passive solar building with floor radiant heating.” Solar Energy (1997). doi.org
- Brown, C. & Beausoleil-Morrison, I. “Experimental performance of a full-scale solar thermal system designed to meet residential heating demands with passive solar energy.” Solar Energy (2023). doi.org