Turning a fish tank into an aquaponics garden
“The fish feed the plants, the plants clean the water — the whole thing runs on a loop you build once and mostly watch.”
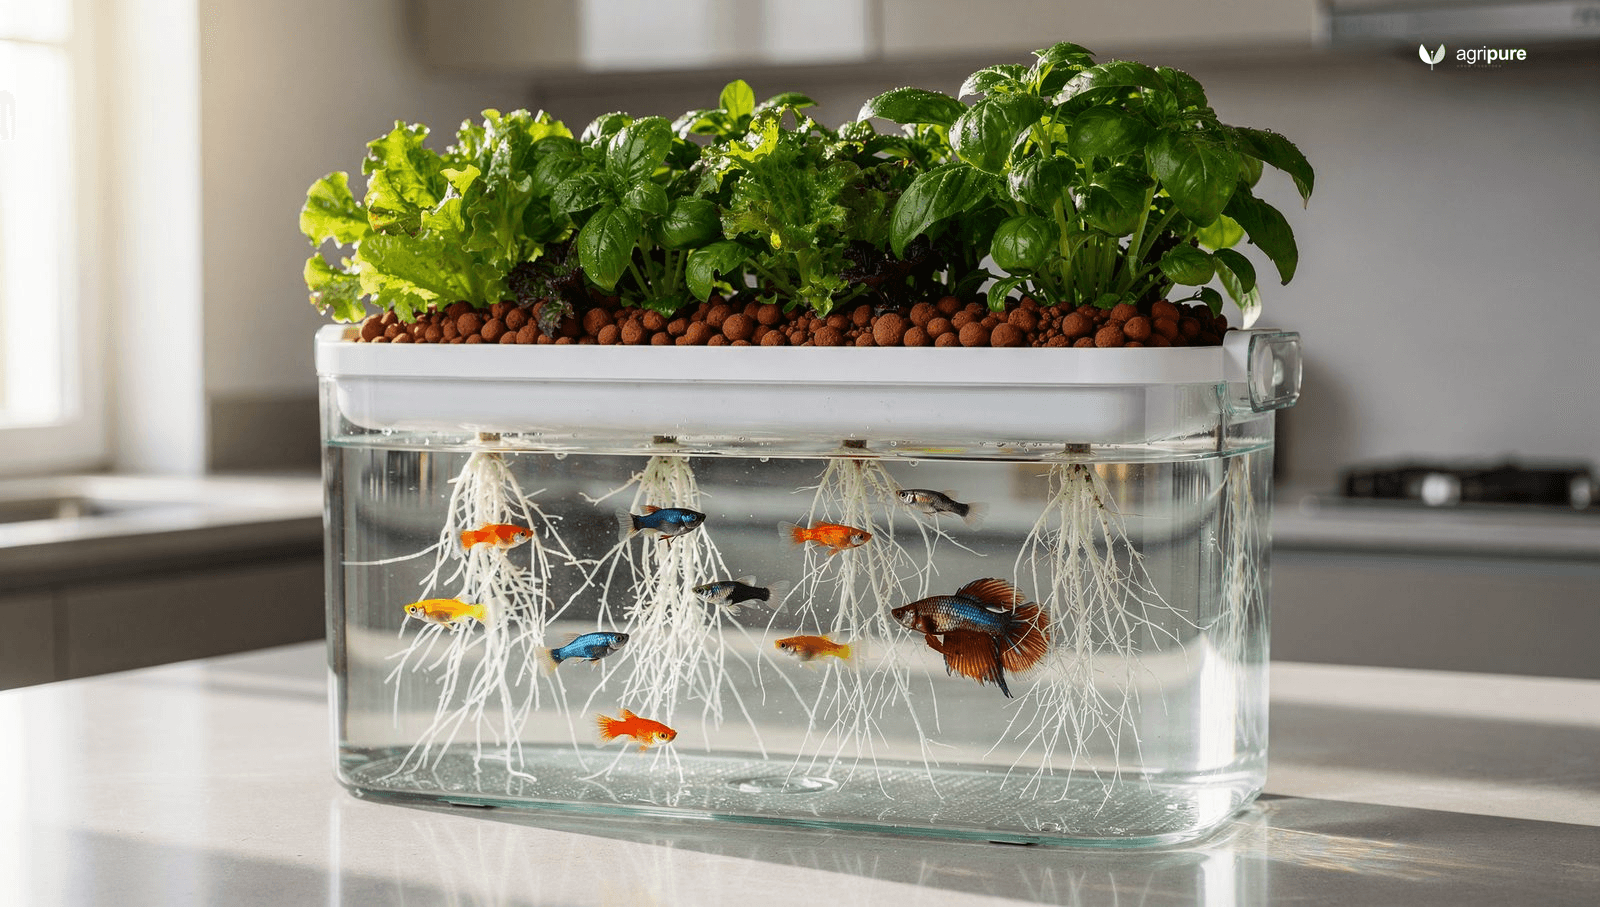
If you own an aquarium, you are already most of the way to growing food. The same water that cycles through a fish tank carries dissolved nitrogen compounds — the end products of fish digestion — that leafy greens and herbs will absorb greedily. Add a tray of growing medium on top, a small pump to lift water into it, and you have an aquaponics system: a closed loop in which fish and plants sustain each other, with you providing feed and nothing much else.
This approach — aquarium aquaponics, sometimes called desktop aquaponics — is the gentlest entry point into a farming method that scales from a 10-gallon betta tank on a windowsill to commercial greenhouses growing tilapia and basil side by side. The stocking densities are low, the investment is modest (a complete beginner setup runs $80–$150), and the payoff is fresh herbs or lettuce harvested a few feet from wherever you eat them.
This guide covers everything needed to convert a fish tank into a working aquaponics garden: how the nitrogen loop works, which fish suit small systems, which plants thrive in grow-bed media, how to cycle the system before adding fish, and what to watch for week by week once the system is running. The goal is a system you understand well enough to troubleshoot — not one you follow blindly until something dies.
How the nitrogen loop works
Aquaponics runs on one biological process that aquarium keepers call the nitrogen cycle. Every step in that cycle has a concrete actor, a measurable output, and a testable limit — which makes it far less mysterious than it sounds on first encounter.
Fish excrete ammonia (NH₃) continuously through their gills and waste. Ammonia is toxic to fish at concentrations above about 3 ppm and to bacteria at high pH. Left unaddressed, it kills the tank. In a healthy system, however, two families of bacteria handle it in sequence. Nitrosomonas bacteria oxidize ammonia into nitrite (NO₂⁻), which is itself toxic at concentrations above 1 ppm. Nitrobacter bacteria then convert nitrite into nitrate (NO₃⁻) — a compound that is far less toxic and, crucially, is the primary nitrogen source that plant roots consume. The plants strip nitrates from the water; the filtered water returns to the fish tank. The loop is complete.
New Mexico State University Extension describes the target chemistry this way: total ammonia nitrogen below 1 ppm, nitrite at or below 1 ppm, and nitrate in the range of 5–150 ppm. Nitrate above 150 ppm is a signal that plants are not keeping up with fish production — either the tank is overstocked or the grow bed is too small.
Two other parameters govern the whole system. pH should sit between 6.8 and 7.0 — slightly acidic to neutral — because both bacterial nitrification and plant nutrient uptake are optimal in that narrow band, and because pH controls how much of the ammonia pool exists in its more toxic un-ionized form. Dissolved oxygen must stay above 5 ppm: nitrifying bacteria are aerobic, and they slow dramatically in a poorly aerated tank. An air stone or air pump is not optional — it is part of the life-support system.

Choosing the right tank size
The most common beginner mistake in desktop aquaponics is starting too small. A 5-gallon tank is technically workable, but water chemistry in a small volume swings fast — a single missed feeding or a warm afternoon can push ammonia into dangerous territory before you have time to respond. A 10–20 gallon aquarium is the practical sweet spot for a first system: large enough to buffer sudden chemistry changes, small enough to fit on a sturdy shelf or countertop, and inexpensive enough that a used tank from a garage sale or pet shop brings the upfront cost down considerably.
The grow bed — the tray of media where plants root — should roughly match the fish tank in volume. Go Green Aquaponics puts the standard recommendation as a 1:1 ratio: if your tank holds 20 gallons, aim for about 20 gallons of grow bed media. As a practical shorthand, expect to support one to two square feet of growing surface for every 10 gallons of fish tank water. A 20-gallon tank therefore gives you two to four square feet of grow space — enough for six to eight lettuce plants or a row of basil and mint.
Weight matters more than most people anticipate. A gallon of water weighs about 8.3 pounds, and wet grow media adds more. A 20-gallon system fully loaded can weigh 200 pounds or more once the grow bed is saturated. Verify that your shelf or counter can carry that load before you fill anything up.
| Tank size | Grow bed area | Fish (small ornamentals) | Approximate startup cost |
|---|---|---|---|
| 5 gallons | 0.5–1 sq ft | 1 betta or 3–4 guppies | $50–$80 |
| 10 gallons | 1–2 sq ft | 1 betta or 6–8 guppies | $70–$110 |
| 20 gallons | 2–4 sq ft | 8–12 guppies or 2–3 danios | $100–$150 |
| 40 gallons | 4–8 sq ft | 15–20 small fish or 3–5 goldfish | $180–$280 |
The best fish for a small aquaponics tank
Not every aquarium fish works in an aquaponics setup. The ideal candidates are hardy, tolerant of the water chemistry swings that come with a young system, and sized to match the tank. Edibility is secondary at this scale — desktop aquaponics is an ornamental-fish system, not a fish farm, and the harvest is herbs and greens, not tilapia fillets.

Betta fish are the classic solo-system fish. One betta can live comfortably in a 5-gallon aquaponics tank with gentle water flow — bettas dislike strong currents, so keep pump output low or redirect the return flow against the glass rather than across open water. Bettas prefer 75–80°F and will need a heater in most North American homes. They are territorial, so keep only one male per tank. They pair especially well with basil and mint, which thrive in the warm, nutrient-rich water a betta produces.
Guppies are colorful, adaptable, and productive waste generators for their size. A colony of six to eight guppies in a 10-gallon tank can drive a respectable nitrogen load. Their main risk is prolific reproduction — a pair of guppies becomes a tank of 30 within a few months if you do not manage the population. Keep all males, or be prepared to rehome fry.
White cloud mountain minnows are worth choosing if you want to avoid buying a heater. They tolerate temperatures as low as 60°F and as high as 72°F — a range that covers most indoor spaces without heating. They are schooling fish, so keep at least six. Their lower ammonia output suits the modest bioload of a 10–15 gallon system, and they pair naturally with cooler-weather crops like spinach, chives, and kale.
Zebra danios are nearly indestructible. They handle a wide pH range, tolerate fluctuations in temperature, and eat almost anything. They need horizontal swimming room, so a 20-gallon tank with a longer footprint suits them better than a tall show tank. They grow to about two inches and do well in schools of six or more.
Fish to avoid at this scale: goldfish produce two to three times the waste of comparably sized ornamentals and can push ammonia beyond what a small grow bed absorbs; large cichlids are territorial and grow quickly; common plecos frequently top 12 inches and need far more space than any desktop system can offer.
Grow media and plant selection
Clay pebbles (expanded clay aggregate, sold under brand names like Hydroton or LECA) are the best grow media for most desktop aquaponics builds. They are lightweight, pH-neutral, and porous — each pebble is riddled with micro-channels that give nitrifying bacteria an enormous surface area to colonize. A grow bed of clay pebbles holds three roles simultaneously: physical root support, bacterial biofilter, and mechanical filter for solids. Rinse them thoroughly before use — fresh clay pebbles carry a fine dust that clouds the water and can briefly spike pH.
Pea gravel works as a lower-cost alternative but is considerably heavier and provides less surface area per volume. If using gravel, run the vinegar test before buying: drop a splash of white vinegar on the gravel sample — if it fizzes, the gravel contains calcium carbonate and will steadily raise your pH into a range that stresses fish and locks out plant nutrients. Stick with pH-neutral river rock or aquarium-grade pea gravel.
Plant selection at the desktop scale comes down to one principle: grow what the nutrient level can support. A fish tank stocked with ornamentals produces a modest, steady nitrogen load — ideal for leafy greens and herbs that want consistent moderate feeding, and insufficient for heavy-feeding fruiting crops like tomatoes or peppers, which need calcium, magnesium, and phosphorus that a fish-only system does not deliver in adequate quantities.
- Lettuce — grows fast, tolerates a wide temperature range, and can be harvested cut-and-come-again. Best choice for beginners who want edible results within four to six weeks of planting.
- Basil — thrives in warm water (above 72°F) and pairs naturally with betta and guppy tanks. Pinch flower heads to extend production.
- Mint — vigorous and forgiving; its roots adapt well to flood-and-drain media beds. Contain it to one section of the grow bed or it will crowd out neighbors.
- Spinach — suits cooler systems (white cloud minnow tanks); bolts in warm water, so match it to the fish temperature.
- Watercress — loves aquatic environments and high moisture; one of the best-adapted crops for aquaponics media beds.
- Chives — low-maintenance perennial herb; slow to establish but productive once rooted.
Start seeds in rockwool cubes or a small propagation tray and transplant seedlings into the grow bed once they have their first true leaves. Direct-seeding into a media bed works but risks seeds washing into crevices where they cannot germinate evenly. For a faster start, buy herb seedlings from a nursery, rinse all soil from the roots under lukewarm water, and nestle the bare roots into the clay pebbles. The plant may sulk for a week while it adjusts, then usually takes off. For more detail on starting plants from seed before transplanting into any system, see the seed starting for beginners guide.
Building the system: a beginner setup
A functional desktop aquaponics system has five components: a fish tank, a grow bed, a water pump, an air pump, and grow media. Everything else — timers, bell siphons, additional filtration — is optional refinement.

The pump circuit. A small submersible pump sits in the fish tank and lifts water up to the grow bed through vinyl tubing. For a 20-gallon tank, a pump rated for 100–200 GPH (gallons per hour) at a 12–18-inch lift provides enough flow. The water floods the grow bed, filters through the media, and drains back into the tank by gravity through a return pipe or standpipe. A simple overflow standpipe — a PVC pipe with a cap that sits 2–3 inches below the media surface — keeps the bed at a constant flood level. A bell siphon creates automatic flood-and-drain cycles without a timer, but for a beginner’s first build, a constant-flood setup is simpler and more forgiving.
The air pump. An aquarium air pump with an air stone running continuously in the fish tank keeps dissolved oxygen above the 5 ppm minimum that fish and nitrifying bacteria require. Size the air pump to the tank — most pump packaging specifies the maximum aquarium volume it handles. Do not skip this component in the interest of cost: oxygen depletion is the most common cause of overnight fish death in new aquaponics systems.
Parts and approximate costs for a 20-gallon build from scratch:
- 20-gallon aquarium (new or used): $20–$40
- Plastic storage tote for grow bed (16–22 quart): $8–$14
- Submersible water pump (100–200 GPH): $20–$35
- Aquarium air pump + air stone + tubing: $15–$25
- Clay pebbles (10–15 liters): $15–$25
- Vinyl tubing (3–4 feet): $3–$5
- PVC standpipe (1/2-inch, cut to height): $3–$5
- pH test kit: $10–$25
- Aquarium thermometer: $5–$8
- Total: approximately $99–$182
The grow bed sits on top of the fish tank — use a wooden frame, a shelf bracket, or a sturdy rack that spans the tank opening. Verify the support structure can hold the saturated weight before filling. Drill a return-drain hole near the bottom of the storage tote, fit it with a bulkhead fitting, and run a short PVC elbow down into the fish tank. That hole is where gravity sends the water back after it percolates through the media.
Cycling the system before adding fish
Cycling is the one step beginners most often skip, and skipping it kills fish. The term refers to establishing the colonies of nitrifying bacteria — Nitrosomonas and Nitrobacter — that will process ammonia before it reaches toxic levels. Those bacteria do not exist in a brand-new system. You have to grow them, and that takes time.
The fishless cycle is the safest method. Fill the tank and grow bed, run the pump and air stone, and add a nitrogen source without adding any fish. Two approaches work:
- Fish food method: Add a small pinch of fish food every day for a week. As it decomposes, it releases ammonia. Test the water with an aquarium test kit (a four-in-one kit covering ammonia, nitrite, nitrate, and pH costs about $20 and is an ongoing necessity). Ammonia will climb first — to 2–4 ppm — then fall as Nitrosomonas bacteria establish. Nitrite will then climb and fall as Nitrobacter bacteria establish. Nitrates will build steadily.
- Pure ammonia method: Add a few drops of pure ammonia (unscented, no surfactants — check the label) to reach 2–4 ppm. This is faster and more controllable than the fish-food method.
The cycle is complete when ammonia reads zero, nitrite reads zero, and nitrate is measurably present — typically between two and six weeks. That is the point at which the system can safely handle fish waste. Adding fish before ammonia and nitrite return to zero is not a shortcut; it is a way to kill fish and restart the cycle from scratch.
Temperature matters during cycling. Nitrifying bacteria work fastest between 77°F and 86°F. At 65°F their activity drops by 50%; at 40°F it stops entirely. If your home is cool, warm the tank to 75–78°F during cycling even if the fish you plan to keep prefer cooler water — then slowly lower the temperature once the bacteria are established. Avoid chlorinated tap water throughout: chlorine kills the bacteria you are trying to grow. Use dechlorinated water (let tap water sit 24 hours, or use a sodium thiosulfate dechlorinator from the pet shop).
For a broader understanding of how this system connects to closed-loop food production, the aquaponics systems overview covers the nitrogen cycle in the context of larger media-bed, raft, and NFT designs.
Daily and weekly maintenance
A well-cycled desktop aquaponics system requires less daily effort than a conventional aquarium, because the plants handle a large portion of the water-cleaning work. That does not mean it runs without attention. The tasks below keep the system stable and catch problems before they cascade.
Daily (takes two to three minutes):
- Feed the fish once or twice — only what they consume in two to three minutes. Uneaten food decays and spikes ammonia.
- Glance at the fish for unusual behavior (surface gasping, lethargy, clamped fins). Any of these signals an oxygen or chemistry problem.
- Check that the pump is running and water is flowing into the grow bed.
Weekly (takes ten to fifteen minutes):
- Test water chemistry: ammonia, nitrite, nitrate, and pH. A $20 liquid test kit is more accurate than paper strips, which read unreliably in the nutrient-rich water of an aquaponics system.
- Top off the tank with dechlorinated water. Evaporation and plant transpiration remove water steadily — a 20-gallon tank may lose two to three gallons a week in a warm room.
- Inspect plant roots for browning or slime. Healthy aquaponics roots are white or pale tan. Brown roots signal low oxygen; slimy roots can indicate bacterial or fungal infection from standing water.
- Harvest outer lettuce leaves or pinch basil tips to encourage continued growth.
Common problems and fixes:
- Ammonia spike: Reduce feeding immediately; check that the pump is running; verify air stone is producing visible bubbles. A spike in an established system usually means overfeeding or a dead fish decomposing in the tank.
- pH drift downward: Nitrification naturally acidifies the system over time. A teaspoon of agricultural limestone (calcium carbonate) or potassium bicarbonate dissolved in water raises pH gradually. Add slowly — rapid pH swings stress fish more than a low reading.
- Cloudy water: Usually a bacterial bloom during cycling or after overfeeding. Continue running the system; it typically clears within a week without intervention.
- Poor plant growth: If plants are yellow and slow despite visible nitrates, the problem is usually iron or potassium deficiency. A small dose of chelated iron (aquaponics-safe formulation) and a half-teaspoon of potassium sulfate per 10 gallons addresses the most common deficiencies.
Aquaponics shares its closed-loop philosophy with permaculture’s core principle of stacking functions — each element serving multiple roles. The fish tank heats the grow bed air in winter, the plants shade the water surface in summer, and the bacteria do work that neither fish nor plants could accomplish alone. For that broader context, the permaculture gardening guide explains how the same logic applies at garden and farm scale. And for those who want soil-free growing without the fish component, the DIY hydroponic systems guide covers Kratky, DWC, and NFT builds you can construct for a similar budget.
Scaling up and what comes next
A desktop system that runs stably for three to four months is proof of concept for something larger. The nitrogen cycle you have mastered at 20 gallons works identically at 200 gallons — the math scales up proportionally, and the same water chemistry targets apply. The main differences at scale are the cost of fish (tilapia at $2–$5 per fingerling versus guppies at $0.50–$1.50 each), the need for more robust mechanical filtration to handle solids before they clog the grow bed, and the addition of fruiting crops like tomatoes and peppers, which become practical when the fish bioload is large enough to sustain their higher nitrogen demand.
If the system eventually outgrows a countertop, the aquaponics-system overview covers three design types — media bed, deep water culture (raft), and nutrient film technique (NFT) — and how each suits different crops and space configurations. A 100-gallon media-bed system in a spare bedroom or basement is a reasonable next step, capable of producing meaningful quantities of salad greens and herbs year-round. The food forest article offers a contrasting vision of abundance through soil-based perennial systems — useful as a reminder that aquaponics and outdoor growing are complementary, not competing.
For most people, though, the desktop system is not a stepping stone — it is the destination. A glass tank on the kitchen counter growing its own basil and cleaning its own water, animated by a dozen guppies or a single extravagant betta, is a working ecosystem that cost less than a restaurant dinner and earns its keep in fresh herbs every week. Start with one plant you actually cook with. Let the nitrogen cycle run its course. Then add a second plant, and a third, and pay attention to what the water chemistry tells you. That is the whole practice — and it is enough.
References
- Important Water Quality Parameters in Aquaponics Systems — New Mexico State University Extension
- Nitrification and Maintenance in Media Bed Aquaponics — Oklahoma State University Extension
- Understanding the Fishless Cycle in Aquaponics: Using Fish Food or Ammonia — AquaSprouts
- Overview and Cost of a Small-Scale Aquaponic Build — Ohio State University Extension (Ohioline)
- The Best Fish for Desktop Aquaponics Systems — Go Green Aquaponics
- What Is a Media Bed Aquaponics System? — Go Green Aquaponics
- The Fish-to-Plant Ratio in Aquaponics — Go Green Aquaponics
- Build a Mini Aquaponic System for Home or School — The Aquaponic Source
- The Effects of Water Temperature in Aquaponics — Go Green Aquaponics