Canning potatoes: pressure-canned and pantry-ready
“Potatoes are the humblest crop in the garden and the most quietly dangerous in the jar — skip the pressure canner once and you hand Clostridium botulinum every advantage it needs.”
Every year, American homesteaders fill pressure canners with garden potatoes and walk away with a pantry shelf that could last 12 months without a refrigerator. Done right, a 20-pound bag of waxy red-skin or round-white potatoes yields seven quarts of fork-tender cubes that slide into soups, hash, and potato salad straight from the jar. Done wrong — using a water-bath canner because it is faster or because grandma did it — and the outcome can be catastrophic. A 2015 outbreak in Ohio traced to water-bath processed potatoes hospitalized 29 people and killed one.
The rule is short: potatoes are a low-acid vegetable and must be pressure-canned. That single sentence is the whole safety architecture. Everything else in this guide — variety selection, blanching time, jar packing, processing pressure — hangs off it. The National Center for Home Food Preservation (NCHFP) and the USDA have tested and published the timing, and this article follows those numbers exactly, with no improvisation.
This is a practical step-by-step for homesteaders who want to turn a potato harvest into shelf-stable pantry stock. We cover which varieties hold up in the jar, how to prepare and pack them, the pressure and time your canner needs by altitude, and how to read a jar after processing so you know what is safe and what to discard. We also link to the fermenting and root-cellaring alternatives for anyone who wants to compare methods before committing to a canner load.
Why potatoes must be pressure-canned — the science in plain language
Clostridium botulinum is a soil bacterium whose spores live on the surface of raw vegetables, including freshly dug potatoes. Under the right conditions — low acid, low oxygen, moderate warmth — those spores germinate and produce botulinum toxin, one of the most lethal substances known. A sealed jar of home-canned food is exactly the anaerobic environment C. botulinum needs.
The critical threshold is temperature. Boiling water at sea level reaches 212°F (100°C), which kills the vegetative bacteria but not the spores. Spores can survive hours at a full boil. To destroy them, you need sustained heat at 240°F to 250°F (115°C to 121°C) — temperatures only achievable inside a pressure canner. A water-bath canner, no matter how long it runs, physically cannot exceed 212°F at sea level. At altitude it runs even cooler. This is not a matter of technique or tradition; it is thermodynamics.
The CDC states it directly: “Low-acid foods are the most common sources of botulism linked to home canning. Home-canned vegetables are the leading cause of botulism outbreaks in the United States.” Potatoes sit at a pH of roughly 5.6 to 6.0 — well above the 4.6 threshold that separates safe (high-acid) from unsafe (low-acid) for water-bath processing. The safety line is drawn there for a reason, and no amount of added acid changes the math for a dense, starchy potato cube.
One more point from the CDC worth repeating: botulinum toxin cannot be seen, smelled, or tasted. A contaminated jar looks, smells, and tastes normal until it does not. This is why the NCHFP also recommends boiling home-canned low-acid vegetables for 10 minutes (plus one additional minute per 1,000 feet of elevation) before eating — not because pressure canning is uncertain, but as a second layer against any processing error.

Choosing the right potato variety
Not every potato survives the pressure canning process in recognizable form. The heat and time required to make potatoes shelf-stable will overcook a starchy variety into mush. The NCHFP guidance is to select “small to medium-size mature potatoes of ideal quality for cooking,” and the variety matters as much as the size.
Waxy varieties hold their cell structure under heat. Red-skin potatoes (Red Pontiac, Norland) and round-white varieties (Kennebec, Atlantic) are the two workhorses for home canning. New potatoes — thin-skinned, harvested before full maturity — also can well when they are one to two inches in diameter; their firmer flesh tolerates pressure processing without collapsing. These are the varieties the NCHFP tested its processing times against.
Russet Burbank and Russet Norkotah are the common Idaho-type potatoes sold by the bag in most supermarkets. They are excellent for baking and frying, but their high starch content means they absorb liquid, turn floury, and fall apart in the jar. Avoid them for canning. Yukon Gold, popular in home gardens for its buttery flavor, similarly falls apart when subjected to pressure processing — the texture that makes it good roasted makes it fragile under prolonged heat.
For homesteaders growing potatoes specifically to can, the practical picks are: Red Pontiac (wide availability, consistent waxy flesh, stores well), Kennebec (high yield, neutral flavor that works in any dish from the jar), and All Blue or Purple Majesty for novelty — the color fades to grayish-purple in the jar but the texture holds. All three pair naturally with a solid growing plan that focuses on hilling and proper curing before harvest.
| Variety | Type | Cans well? | Notes |
|---|---|---|---|
| Red Pontiac | Waxy | Yes | Holds shape well; mild flavor takes seasoning from the dish |
| Kennebec | Waxy–all-purpose | Yes | High yield; neutral base for soups and hash |
| Round White | Waxy | Yes | Classic new-potato size; good whole-packed in pints |
| Russet Burbank | Starchy | No | Absorbs liquid, turns floury, falls apart |
| Yukon Gold | Moderately starchy | No | Collapses under pressure processing |
| All Blue / Purple Majesty | Waxy | Yes | Color fades; texture holds; novelty value in the jar |
Equipment you need before you start
The most important item is a pressure canner — not a pressure cooker. Consumer-grade pressure cookers are designed to cook food quickly at a given pressure, not to hold a calibrated, sustained pressure long enough for safe home food preservation. The NCHFP is explicit: pressure cookers are not recommended for home canning, because their smaller size makes it difficult to maintain steady pressure and their gauges are not calibrated for canning accuracy.
A standard pressure canner holds at least four quart jars. The two main types are:
- Dial-gauge canner — reads pressure in pounds per square inch (psi) on a fixed dial. Accurate when new; the dial must be tested annually at your county cooperative extension office, since a dial that reads 2 lb high means you are processing at lower pressure than you think. Many extension offices test gauges for free in spring.
- Weighted-gauge canner — uses a weighted regulator that jiggles when the correct pressure is reached (typically 5, 10, or 15 lb settings). No calibration needed. Adjust for altitude by switching from the 10 lb to the 15 lb weight if you are above 1,000 feet.
Beyond the canner, you need: standard canning jars (Ball, Kerr, Bernardin — no recycled commercial jars), new two-piece lids each time, a jar lifter, a wide-mouth funnel, a bubble remover or thin plastic spatula, a clean damp cloth for wiping rims, and a canning rack to keep jars off the canner bottom.
For a broader orientation to the process before diving into potatoes specifically, the home canning guide covers equipment, jar prep, and general safety principles in detail. Reading it first, especially if you are new to pressure canning, will shorten your learning curve on canning day.
Step-by-step: how to pressure can potatoes
This procedure follows the NCHFP tested recipe exactly. Do not substitute ingredient quantities, vary blanching times, or add thickeners — any change invalidates the tested heat-penetration data the processing time is based on.

Quantities
Plan on 20 lb of raw potatoes per seven-quart canner load, or 13 lb for nine pints. A 50-pound bag yields 18 to 22 quarts finished. Potatoes lose weight during peeling and blanching — expect roughly two and a half to three pounds of raw potatoes per finished quart jar.
Preparation
- Wash potatoes under cold running water before peeling to avoid dragging surface soil onto the cut flesh.
- Peel completely. The NCHFP processing times were developed for peeled potatoes. Skins carry a higher bacterial load, and unpeeled potatoes have not been independently lab-tested for heat penetration.
- Cut or sort. For cubes, cut into half-inch pieces — uniform size matters for even heat penetration. For whole packs, select potatoes one to two inches in diameter only. Larger potatoes do not heat through reliably in the tested time.
- Hold in ascorbic acid solution. Dissolve 1,000 mg of ascorbic acid (or one Fruit-Fresh packet per the package instructions) in one gallon of cold water. Drop cut potatoes in immediately to prevent browning. Do not skip this step — oxidized potatoes turn gray in the jar.
- Blanch. Drain the potatoes and blanch in a pot of fresh boiling water: two minutes for cubes, 10 minutes for whole small potatoes. Blanching drives out air from cell spaces, which reduces floating in the jar and improves texture. Drain well after blanching.
- Discard the blanching water. This is non-negotiable in the NCHFP procedure. Blanching water carries potato starch — using it to fill jars creates gel-like liquid and may affect heat penetration.
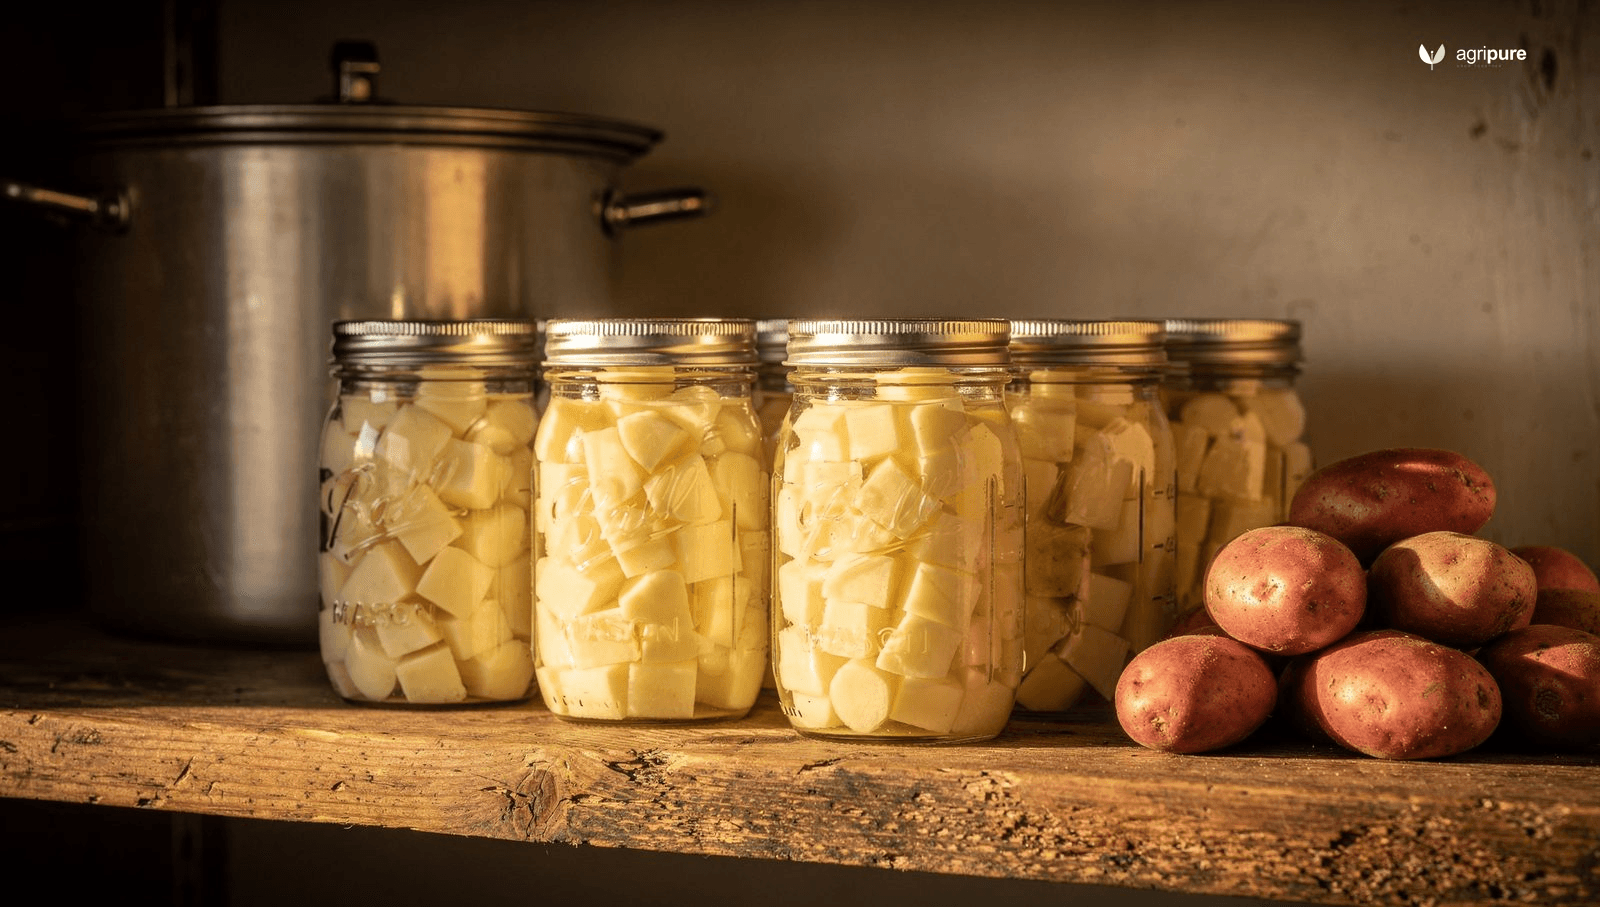
Packing the jars
- Prepare jars: wash in hot soapy water or run through a dishwasher, then keep hot until filling. Keep the water in your canner simmering so jars do not crack from temperature shock.
- Pack hot drained potatoes into hot jars. For cubes, pack reasonably firmly but not compressed. For whole potatoes, arrange snugly.
- Add one teaspoon of canning salt per quart (half a teaspoon per pint) if desired. Salt is flavoring only — it does not affect safety or sealing.
- Ladle fresh boiling water over the potatoes, leaving exactly one inch of headspace from the top of the liquid to the bottom of the lid. Cover all potato surfaces with water.
- Remove bubbles with a thin plastic spatula or bubble remover. Run it around the inner edge of the jar and press gently on the potatoes to release trapped air. Recheck headspace and add boiling water if it has dropped below one inch.
- Wipe the jar rim with a clean, damp cloth. Any residue — even a single drop of starchy water — can prevent the lid from sealing.
- Apply the lid and screw band finger-tight. Do not overtighten; air must be able to escape during processing.
Processing
- Place the canning rack in the pressure canner. Add two to three inches of hot water (check your canner manual — some models specify more). Place filled jars on the rack using a jar lifter.
- Lock the lid. Leave the vent pipe open or the petcock open. Heat on medium-high until steam flows steadily for 10 minutes. This exhausts air from the canner — if you skip it, the temperature inside will not match the pressure reading.
- Close the vent or place the weighted gauge over the petcock. Let pressure build.
- When the target pressure is reached (see altitude table below), start your timer.
- Pints: 35 minutes. Quarts: 40 minutes.
- Maintain steady pressure throughout. If pressure drops below target, bring it back up and restart the timer from zero.
- When time is up, turn off the heat. Do not rush cooling. Let the canner depressurize naturally — this takes 30 to 45 minutes. Do not run it under cold water or tilt it.
- When the gauge reads zero (dial-gauge) or the weight no longer jiggles (weighted-gauge), wait an additional 10 minutes before opening the lid. Open the lid away from you — steam will still escape.
- Remove jars with a jar lifter and set on a folded towel, two inches apart. Do not tilt jars. Do not retighten the bands. Leave undisturbed for 12 to 24 hours.
Altitude adjustment table
| Altitude | Dial-gauge pressure | Weighted-gauge pressure | Process time (pints) | Process time (quarts) |
|---|---|---|---|---|
| 0–2,000 ft | 11 lb | 10 lb | 35 min | 40 min |
| 2,001–4,000 ft | 12 lb | 15 lb | 35 min | 40 min |
| 4,001–6,000 ft | 13 lb | 15 lb | 35 min | 40 min |
| 6,001–8,000 ft | 14 lb | 15 lb | 35 min | 40 min |
Source: NCHFP / USDA Complete Guide to Home Canning. Processing time does not change with altitude — only the pressure setting does.
Checking seals and storing your jars
After 12 to 24 hours, check every jar. Press the center of the lid — it should be concave and solid, with no give. A lid that flexes up and down has not sealed. You can also tap the lid with a metal spoon: a sealed lid rings with a clear, high note; an unsealed one sounds dull and hollow. Remove the screw band gently and try to lift the lid with your fingertips — a good seal will not budge.
Any jar that did not seal within 24 hours should go into the refrigerator and be used within three to five days. Do not re-process a failed seal — the quality degrades and the safety margin of the tested time has already been used.
Store sealed jars in a cool, dark place — a root cellar, basement shelf, or pantry cabinet away from heat and light. The NCHFP recommends removing screw bands before storage; bands left on can corrode, creating a false sense of security if the seal later fails. Label each jar with the contents and the date before shelving.
Shelf life: 12 to 18 months for best quality. The potatoes remain safe as long as the vacuum seal holds, but texture, color, and flavor decline after 18 months. A 50-pound bag of garden potatoes processed in late September will carry you comfortably through to the following harvest, which is the practical goal.
Before eating any home-canned low-acid food, boil the contents for 10 minutes at sea level (add one minute per 1,000 feet of altitude). Pour the jar’s liquid into a pot, add the potatoes, and bring to a rolling boil. This step does not indicate a problem with your canning — it is a USDA-recommended safety layer that destroys any toxin that might be present from a processing error you cannot detect by sight or smell.

Troubleshooting: what went wrong and whether it matters
Even experienced canners run into cosmetic issues. Here is how to read the most common ones.
Cloudy liquid in the jar
The most common complaint with canned potatoes. Potato starch naturally leaches into the packing water during processing — the cloudiness is nearly always harmless. It happens more with starchier potato varieties and more vigorously with older potatoes. You can minimize it by using soft or filtered water (minerals in hard water add their own haze) and pure canning salt rather than iodized table salt, whose anti-caking agents cloud liquid. That said, cloudiness can also signal spoilage — check the lid seal, look for any off odor when opening, and discard if either is questionable.
Siphoning (liquid loss during processing)
Siphoning means liquid has escaped past the lid during processing, leaving the potatoes partially exposed in the jar. It is caused by pressure fluctuation during processing, inadequate headspace, or removing jars from the canner before they have equalized. The fix: maintain steady pressure throughout the processing time, leave exactly one inch of headspace, and always wait 10 minutes after the gauge reads zero before opening the canner lid. A jar with siphoning is still safe if the lid sealed — but exposed potatoes at the liquid line may discolor. Use those jars first. If more than half the liquid has siphoned out, the jar should be refrigerated and used within a few days.
Lid did not seal
Usually caused by food residue or a nick on the jar rim preventing the gasket from forming a vacuum. Wipe the rim with a clean, damp cloth every time before applying the lid. Check jar rims visually and by feel before filling — a single chip or crack on the rim means that jar goes into the recycling bin, not the canner. Overtightening the band before processing can also prevent sealing: finger-tight is the correct term, and it means “snug without strain.”
Potatoes turned gray or dark
Gray discoloration is usually oxidation — the potatoes were not held in ascorbic acid solution long enough before blanching, or they sat too long between blanching and packing. It is a quality problem, not a safety problem. Prevent it by cutting directly into ascorbic acid water and packing jars promptly after blanching. Potatoes stored below 45°F before canning can also discolor — bring cold-stored potatoes to room temperature for a day or two before processing.
Soft, mushy texture
Most often a variety problem — Russets and Yukon Gold break down under pressure. Switch to waxy varieties. Over-blanching before packing also contributes: stick to two minutes for cubes and 10 minutes for whole potatoes.
What to cook with canned potatoes
Canned potatoes are already fully cooked — they need heating through, not cooking from scratch. That speed is the whole point. Open a quart jar and you have two to three cups of ready-to-go potatoes that can be in a pan in 60 seconds.
The texture is softer than raw-cooked potatoes, which shapes how they perform. They mash well — drain, heat, and mash with butter and cream for a result indistinguishable from freshly boiled potatoes. They fry well in cast iron when dried and seared at high heat, producing a crisp crust on a tender interior. They hold together in soups and stews because they are already cooked through, so add them in the last 10 minutes to avoid over-softening. They work well in potato salad — drain, chill, and dress; no boiling required.
For homesteaders who are also working on fermented foods and pickles, canned potatoes pair naturally as a pantry companion to fermented vegetables — the acid sides (sauerkraut, kimchi, pickled peppers) provide contrast to the starchy neutral base potatoes offer in a meal. And for anyone weighing whether to can potatoes at all, it is worth comparing the method against root cellaring, which requires no canning equipment and keeps potatoes in usable condition for four to six months in the right space.
If you can green beans alongside your potatoes, the logic is identical — low acid, pressure only, NCHFP timing — and a good read on canning green beans safely will reinforce the same principles covered here. The home canning guide is the hub for both.
The short version
Canning potatoes is one of the more forgiving pressure-canning projects — the prep is simple, the processing times are modest, and a 20-pound bag turns into a shelf that works for a year. The single rule that makes it safe is the one you cannot bend: pressure canning, always, for every batch. Water-bath canning potatoes is not a shortcut. It is a route to a jar that looks fine and is not.
Follow the NCHFP procedure, use waxy varieties, blanch in fresh water, fill with fresh boiling water, process at the correct pressure for your altitude, and let the canner depressurize on its own time. Do that and you have a pantry staple that costs roughly what a bag of potatoes costs — which, at a homestead scale, is a very good deal.
Frequently asked questions
Can you water-bath can potatoes?
No. Potatoes are a low-acid food (pH around 5.6–6.0) and must be pressure-canned. A water-bath canner cannot exceed 212°F at sea level, which is not hot enough to destroy Clostridium botulinum spores. A 2015 outbreak linked to water-bath canned potatoes hospitalized 29 people and killed one.
How long do home-canned potatoes last?
Best quality within 12 to 18 months when stored in a cool, dark place. Properly sealed jars remain safe beyond 18 months, but texture and flavor decline. Label every jar with the date and use the oldest first.
Can you can mashed potatoes?
No. Mashed potatoes are too dense for heat to penetrate uniformly during processing, and no tested recipe exists for them. The NCHFP explicitly states: do not can mashed potatoes, creamed potato soup, or mushy overcooked potatoes that settle to the bottom of the jar.
Why is my canned potato liquid cloudy?
Almost always potato starch, which is harmless. Using pure canning salt (not iodized table salt) and soft or filtered water reduces cloudiness. If the jar also has an off odor or a failed seal, discard it.
What potato varieties are best for canning?
Waxy varieties: Red Pontiac, Kennebec, round whites, and new potatoes one to two inches in diameter. Avoid Russets and Yukon Gold — both become mushy and absorb liquid unpredictably under pressure processing.
References
- Potatoes, White – Cubed or Whole — National Center for Home Food Preservation (NCHFP / University of Georgia)
- Home-Canned Foods — Botulism Prevention — Centers for Disease Control and Prevention (CDC)
- Canning Potatoes — Penn State Extension
- Clostridium botulinum & Botulism — USDA Food Safety and Inspection Service (FSIS)
- Equipment and Methods Not Recommended for Home Canning — National Center for Home Food Preservation
- Food Preservation and Canning Troubleshooting Guide — University of Minnesota Extension