How to grow potatoes: in ground, bags, and towers
Potatoes are the most forgiving crop in the garden — but only if you understand the one rule: keep those developing tubers in darkness, and the plant will pay you back ten to one.
A single seed potato the size of a golf ball, dropped into loose soil in April, can return 10 to 20 full-sized tubers by August. That math is why potatoes remain the backbone of the self-sufficient kitchen garden — and why the learning curve is shorter than almost any other staple crop. The techniques in this guide apply whether you have a long in-ground row, a 15-gallon grow bag on a concrete patio, or a raised bed in a tight backyard.
The fundamentals are simple: buy certified disease-free seed potatoes, chit them to wake them up, plant into loose well-drained soil once temperatures are right, hill the plants repeatedly to keep tubers covered, and time the harvest to your goal — tender new potatoes or firm storage tubers. The pests and diseases that trip people up are predictable and manageable once you know what to look for.
This guide walks through every step, from choosing varieties and chitting through planting, hilling, harvest, curing, and months-long storage. The numbers throughout come from university Cooperative Extension sources, so you can trust the spacing, temperatures, and timing.
Choosing your varieties
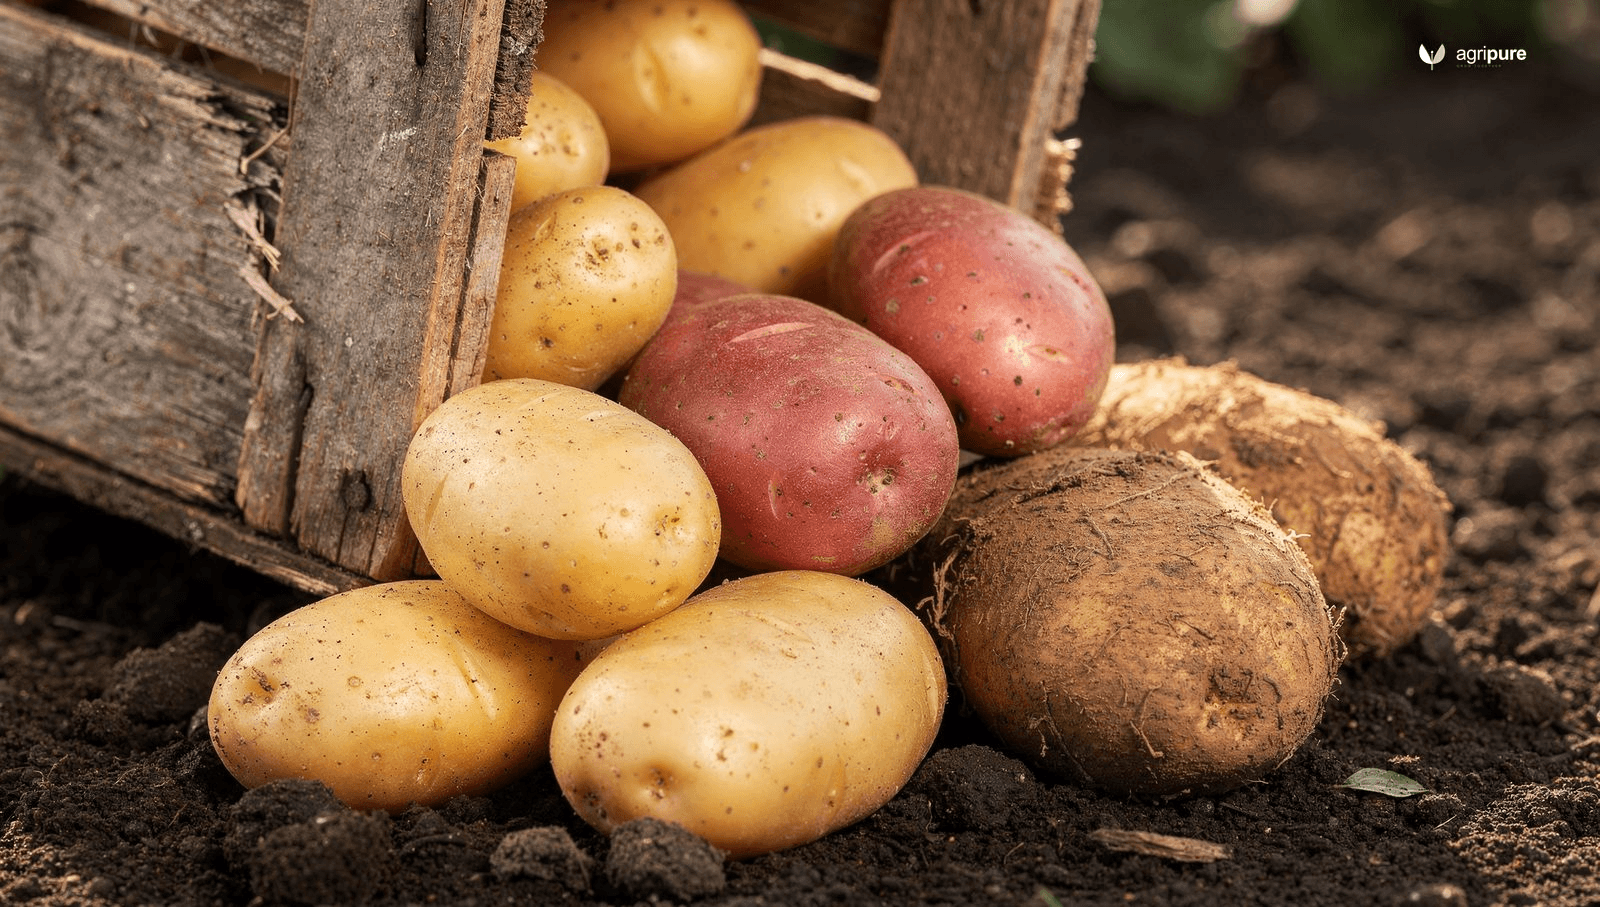
The first decision is not which variety to plant — it is which type of potato you need in the kitchen. University extension services divide potato varieties into three categories by flesh texture, and the maturity timeline divides them further into early, mid-season, and late.
Flesh texture governs how the potato cooks. Dry, high-starch varieties like russets — Russet Norkotah and Goldrush are two widely grown types — are best for baking, frying, and mashing. Waxy, low-starch types like Red Norland and Red Pontiac hold their shape when boiled, making them the right pick for potato salad and soups. All-purpose varieties like Yukon Gold sit in the middle: enough starch for a decent mash, enough wax to stay together in a soup pot. Specialty types — blue, purple, and fingerling potatoes — tend toward the waxy end.
Maturity timeline governs when you harvest and how long the plant needs in the ground. Early varieties like Red Norland and Superior are ready in 60–80 days and are the go-to pick for new potatoes. Mid-season types like Goldrush mature around 80–100 days. Late varieties — Katahdin, Kennebec, Red Pontiac — need 100–120 days and are the best keepers for long-term storage. Iowa State University Extension recommends growing both early and late varieties to spread harvests across the season.
| Type | Best use | Example varieties | Days to maturity |
|---|---|---|---|
| Russet (dry/mealy) | Baking, frying, mashing | Russet Norkotah, Goldrush | 85–110 |
| Waxy (moist) | Boiling, salads, soups | Red Norland, Red Pontiac | 60–110 |
| All-purpose | Everything | Yukon Gold, Superior | 70–90 |
| Specialty | Roasting, novelty | Purple Majesty, Russian Banana fingerling | 70–100 |
Always buy certified seed potatoes from a reputable supplier, not supermarket potatoes. Grocery-store potatoes may be treated with sprout inhibitors, and more importantly, they carry no disease certification. Certified seed stock is inspected for the viruses and soil-borne pathogens that can wipe out a planting before you notice anything is wrong.
Chitting seed potatoes before planting
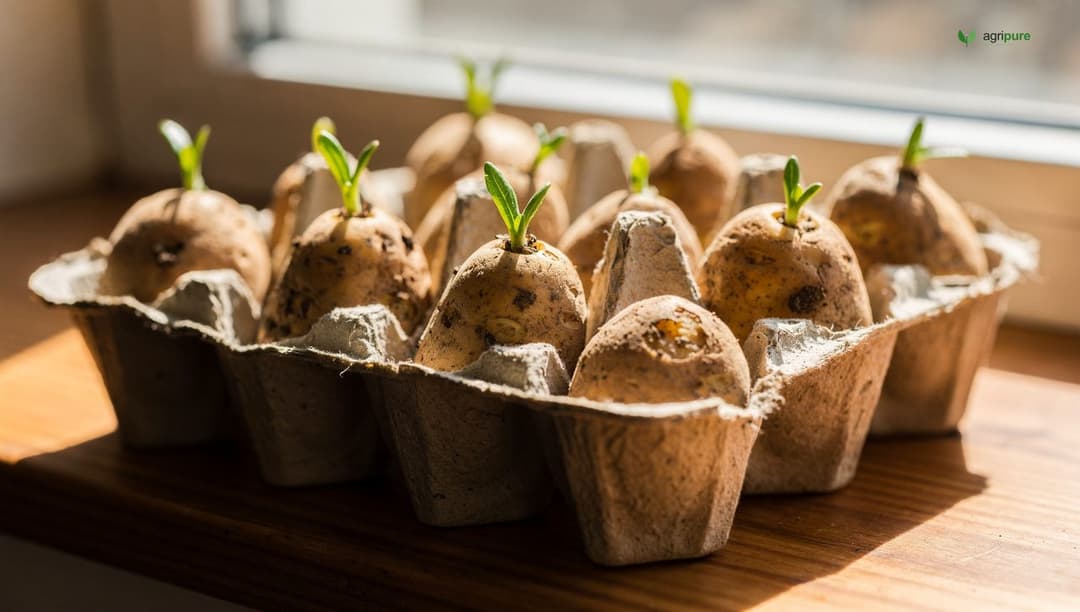
Chitting is the practice of pre-sprouting seed potatoes before planting — exposing them to light and moderate warmth so they develop short, sturdy green shoots. It is optional, but it gives your plants a head start that can push the harvest two weeks earlier, which matters a lot when you are racing the heat of early summer or a shortened northern growing season.
Utah State University Extension recommends chitting about six weeks before your planned planting date. Place seed potatoes in a single layer — an egg carton works perfectly — with the eyes (the dimpled end with the most buds) facing upward. Keep them at around 70°F in diffuse light, not direct sun. The goal is sprouts about one inch long at planting time. If sprouts get leggy and pale, they are getting too much warmth and not enough light; move them to a brighter, slightly cooler spot.
Seed potatoes smaller than 1½ inches across can go in the ground whole. Larger ones should be cut into pieces, each with at least one or two eyes. After cutting, let the pieces sit at 60–70°F for two to three days to let the cut surface form a corky callus — this reduces the risk of rot after planting. USU Extension notes that properly chitted seed pieces sprout faster and more uniformly than un-sprouted cuts.
Soil, sun, and planting timing
Potatoes are not fussy about soil as long as it drains well. They want loose, slightly acidic ground — pH 6.0 to 6.5 is ideal — with enough organic matter to hold moisture between waterings without sitting wet. Sandy loam or well-amended raised-bed soil is close to perfect. Heavy clay benefits from a generous application of organic mulch worked in before planting, or from choosing a container or grow-bag approach instead.
One soil-pH note worth knowing: potato scab, a disfiguring but not dangerous disease, is far more common above pH 5.8. University of Maryland Extension notes that reducing soil pH to 4.8–5.8 substantially cuts scab risk. This is the one crop where a mildly acidic soil is a genuine advantage, not just a default preference.
Timing. Plant as soon as soil temperature reaches at least 45–50°F — typically two to three weeks before your last expected frost. The soil does not need to be warm; it needs to be unfrozen and workable. Potatoes tolerate a light frost on the foliage, especially early in the season, but a hard freeze will damage emerged shoots. University of Maryland Extension lists the minimum soil temperature as 45°F; USU Extension says 50°F. The practical answer: once the soil is workable and you can work comfortably in a light jacket, you can plant.
Full sun. Six to eight hours of direct sunlight daily. Shaded plants produce smaller crops — there are no meaningful workarounds.
Spacing. In a traditional row, plant seed pieces 10–12 inches apart, 3–5 inches deep, in rows spaced 30–36 inches apart. The wider row spacing is not wasted space — it is the room you need for hilling. Tighter row spacing is possible in raised beds, but go no narrower than 24 inches between rows or you will run out of room to mound soil. In a square-foot garden, potatoes are a poor fit for the traditional grid; use a single wide row across the bed instead.
Hilling: the step most growers underdo
Hilling is the defining technique of potato growing — and the one most often skipped or done only once. It is simple in principle: as the plant grows, you mound soil or compost up around the stems, burying several inches of new growth each time. The buried stem produces additional stolons, and each stolon can set new tubers. More hilling, within reason, means more potatoes. It also keeps developing tubers out of the light, which prevents greening. Green potato flesh contains solanine, a mildly toxic compound; any green portions should be cut away and discarded before cooking.
The basic schedule: hill the first time when stems are 8–12 inches tall, burying roughly the bottom third of the plant. Repeat once or twice as the plant grows, aiming for a total hill height of 6–8 inches above the original soil surface. Stop when the plant flowers — that signals tuber development is underway and the root zone should not be disturbed further.
You do not have to use soil. A thick layer of straw mulch works well as a hill material, keeps the soil cool and moist, and makes harvest dramatically easier — you pull the mulch aside and the potatoes are sitting right there. The straw method works best in dry climates or with varieties that need minimal soil compaction to size up properly.
Watering during the growing season. Potatoes need consistent moisture — one to two inches per week, from rain or irrigation. The critical window is during tuber bulking, roughly six to ten weeks after emergence. An even water supply during this period prevents hollow heart (a cavity that forms inside large tubers) and growth cracks. Avoid wetting the foliage: use drip irrigation or soaker hoses where possible, and water in the morning so any splash on leaves dries quickly. Wet foliage at night is an invitation to late blight.
Fertilizing. Potatoes are moderately heavy feeders. Before planting, work a balanced granular fertilizer — 10-10-10 at 1 to 2 pounds per 100 square feet — into the bed. At six weeks after emergence, side-dress with additional nitrogen: about half a pound of a nitrogen-heavy fertilizer (such as 21-0-0) per 100 square feet. Iowa State University Extension cautions against heavy organic matter applications at planting time, as high-nitrogen organic inputs increase scab risk.
Growing potatoes in bags and containers
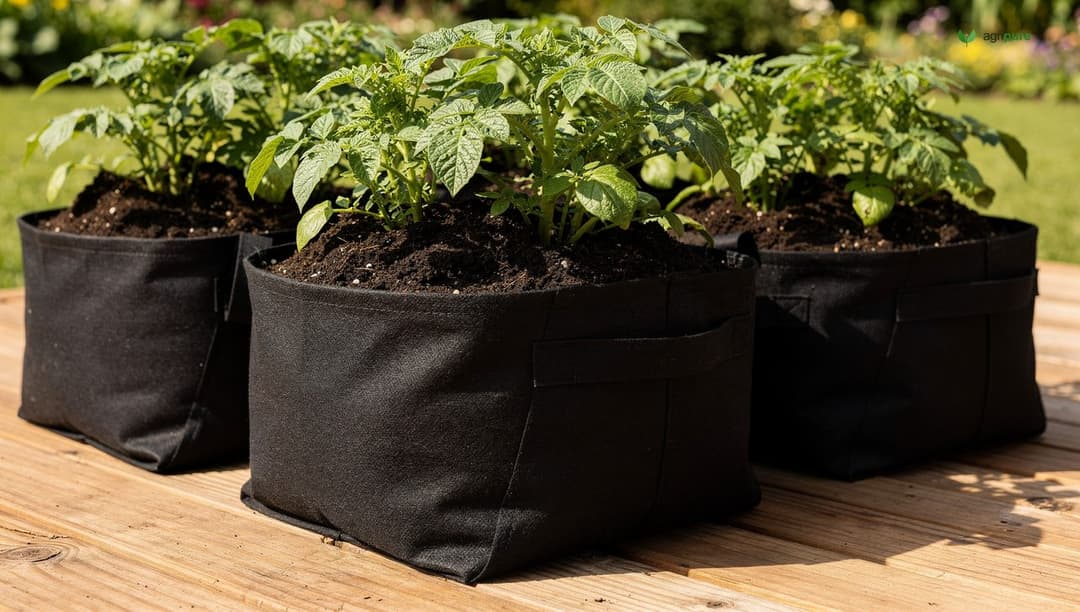
If in-ground rows are not an option — rented property, a concrete balcony, thin topsoil — grow bags and large containers are a genuine solution, not a compromise. The yield per square foot is lower than an in-ground row, but the method is straightforward and requires no digging.
What to use. UC ANR Master Gardener Program recommends bags or containers that are at least 12 inches tall, opaque, and have drainage holes. Fabric grow bags in the 7- to 15-gallon range are the most popular choice: they breathe, drain, and resist overheating. Dark-colored bags absorb more heat, which helps in cool spring climates but can stress roots in a hot summer. Food-grade plastic pots, old sacks, and five-gallon buckets (two per plant) also work.
The roll-down method. Fold the top of the grow bag down to create a 4–6 inch cuff. Fill with 4 inches of a mix of sandy loam, potting compost, and granular 5-10-5 or 10-10-5 fertilizer. Place seed potatoes 6 inches apart, eyes up, and cover with 3 more inches of the same mix. Water thoroughly. As plants grow to 8 inches, unroll the cuff slightly and add 4 inches of soil to bury the bottom third of the stems — this is hilling in a bag. Repeat until the soil reaches the top. Stop hilling once blossoms appear. UC ANR Master Gardeners note that layering multiple rows of seed potatoes in a single bag does not increase yield — the plants compete and produce small, under-sized tubers.
Harvesting from bags. When foliage dies back, empty the entire bag into a wheelbarrow and sort through the soil by hand. Expect 7 to 13 lbs per bag under good conditions.
A note on potato towers. The idea of a tall cage filled with layers of straw and soil, each layer theoretically producing more potatoes, is widely shared online. Multiple extension sources — including University of Maryland Extension — have noted that towers do not usually deliver on the promise. The core issue is that potato plants have a fixed number of stolon-producing nodes on the stem, and stacking them higher does not multiply tubers linearly. Grow bags with the roll-down method are the better choice for space-limited growing.
Common pests and diseases
Two problems account for the majority of potato failures in home gardens: Colorado potato beetle and late blight. Know both well enough to catch them early.
Colorado potato beetle
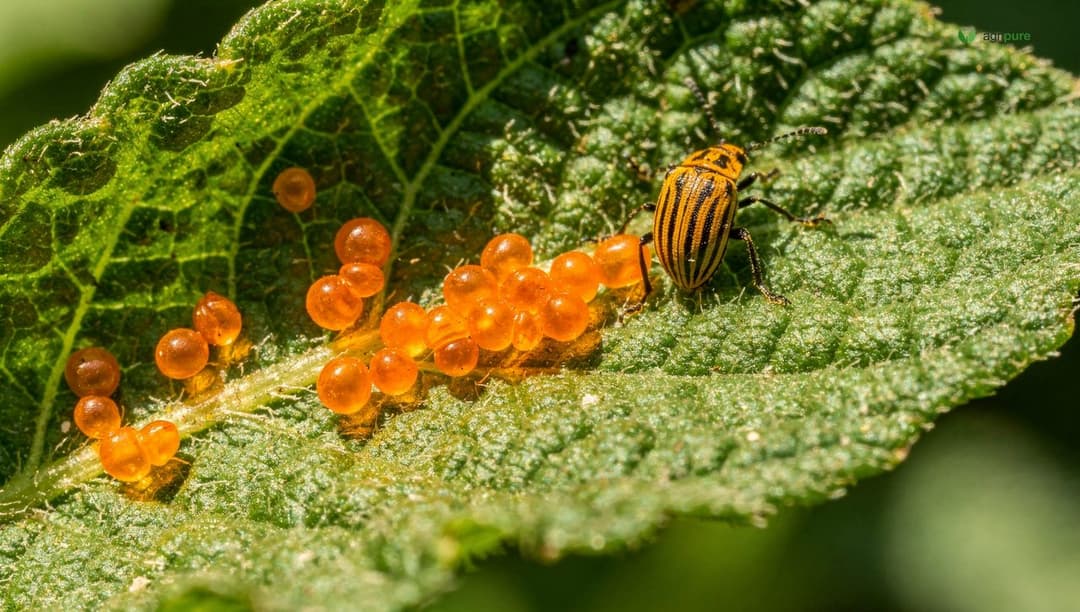
The Colorado potato beetle overwinters in the soil and emerges in spring to feed on potato foliage. Adults are roundish, yellowish-orange beetles with 10 black stripes across the wing covers — hard to miss. Females lay clusters of bright orange eggs on the undersides of leaves. Penn State Extension warns that an unmanaged population can completely defoliate potato vines in a matter of days, severely reducing yield.
Scout weekly from the moment shoots emerge. Turn over leaves and check the undersides. Crush egg masses on sight — each cluster you destroy is hundreds of larvae you will never deal with. Larvae and adults can be hand-picked into a jar of soapy water. For heavier infestations, floating row covers applied at planting provide a physical barrier; remove them when temperatures rise or when the plant needs pollination. If you reach for a pesticide, rotate modes of action to slow resistance development; Bt (Bacillus thuringiensis var. tenebrionis) and neem oil are effective options when applied to small, young larvae.
Late blight
Late blight — caused by the oomycete Phytophthora infestans, the same organism behind the Irish Potato Famine — is the most destructive disease potatoes face. It thrives in cool, humid conditions: temperatures of 60–80°F with persistent moisture on the foliage. Symptoms appear first as dark, water-soaked spots on leaves that expand rapidly; on the undersides you may see white, fluffy sporulation in humid conditions.
Prevention is the only practical strategy for home gardeners. Plant in a site with good air circulation. Use drip irrigation or soaker hoses rather than overhead sprinklers, and water in the morning so foliage dries before evening. University of Minnesota Extension recommends planting resistant varieties where they are available in your region. Remove and destroy any infected plant material promptly — do not compost it. If late blight has been a problem in your area in prior seasons, a copper-based fungicide applied protectively (before infection) can reduce pressure.
Potato scab and other issues
Common scab produces rough, corky patches on tuber skin. It is cosmetic and does not affect eating quality, but it makes storage potatoes look poor. The primary preventions: keep soil pH below 5.8 at planting time, avoid fresh manure or heavy lime applications before planting, ensure consistent soil moisture during tuber initiation, and plant resistant varieties. Early blight — a fungal disease distinct from late blight — causes circular brown spots with target-ring patterns on older leaves; good air circulation and a mid-season fungicide application control it.
Crop rotation is the single most important long-term investment. Keep potatoes and other Solanaceae (tomatoes, peppers, eggplant) out of the same ground for at least three years to break soilborne pest and disease cycles. Pair potatoes with companion plants like horseradish at bed corners, which some growers report deters Colorado potato beetles, though the evidence for this specific claim remains anecdotal.
Harvesting new potatoes and storage tubers
The potato plant signals its intentions clearly if you know what to watch. New potatoes and storage potatoes are harvested at different times and in different ways.
New potatoes are small, thin-skinned tubers harvested while the plant is still actively growing. Iowa State University Extension puts the marker at tubers exceeding 1.5 inches in diameter, which typically occurs 6–8 weeks after planting — often right as the plant is beginning to flower. To harvest without pulling the whole plant, reach under the soil at the edge of the hill and feel for tubers, removing the largest while leaving smaller ones to continue growing. New potatoes have a delicate skin and do not store long; plan to eat them within a week or two.
Storage potatoes need the plant to finish its cycle completely. Wait until the foliage yellows and collapses — do not accelerate this by cutting the vines. Once foliage has died, wait an additional two weeks before digging. During this time, the skin “sets”: it thickens and firms up, which is essential for storage. Test the skin by pressing your thumb against a tuber; if the skin slides off easily, wait longer. If it holds, the potato is ready.
Dig on a dry, warm day using a garden fork. Start 12 inches from the plant crown to avoid spearing tubers, then work inward. Lay the potatoes on the soil surface to dry for one to two hours, then move them out of direct sun. Avoid washing them until you are ready to cook — water on the skin invites rot in storage.
Expected yields: Penn State Extension reports 20–30 lbs per 10-foot row for typical home garden conditions. USU Extension puts the figure higher at 75–100 lbs per 100 feet of row — about the same range from a different starting point. Container growers should expect 7–13 lbs per 15-gallon bag.
Curing and long-term storage
Curing is a short period of warm, humid rest that heals any nicks and cuts from harvest and thickens the skin for storage. Skip it and your stored potatoes will rot from the wounds. Do it right and a late-season harvest can sit in the basement until March or April.
After harvest, spread potatoes in a single layer in a dark, well-ventilated space — a garage corner, a basement room, or a covered porch works. The target is 50–60°F and high humidity (85–90%). Most sources recommend two weeks, though the USU Extension guide suggests two to three weeks. During curing, handle the tubers gently — bruises are invisible externally but become rot entry points in storage.
For long-term storage, move cured potatoes to a cool, dark location. The target temperature range is 40–50°F at 90% relative humidity. Many gardeners use an unheated basement corner in a ventilated wooden crate, slatted bin, or paper sacks — never plastic, which traps moisture. Penn State Extension reports that properly cured and stored potatoes can hold quality for seven to eight months under ideal conditions.
- Never store potatoes near apples or other ethylene-producing fruit — ethylene accelerates sprouting.
- Inspect stored potatoes monthly and remove any that show soft spots or rot; one rotting potato spreads to its neighbors quickly.
- Do not refrigerate potatoes intended for long storage — temperatures below 40°F convert starch to sugar, which causes off-flavors and produces acrylamide when the potato is fried or roasted.
- Discard any potato with extensive green coloration — solanine concentrates in green tissue and is not destroyed by cooking.
- Seed saving: set aside a handful of small, healthy tubers from your best plants as next season’s seed stock. Store them separately at 40–45°F and chit them in late winter.
Potatoes are one of the few crops that justify a dedicated storage space — a root cellar, a cool garage corner, or an insulated box in an unheated shed. The investment in root-cellaring infrastructure pays itself back across every storage crop you grow.
Frequently asked questions
When should I plant potatoes?
Plant when soil temperature reaches at least 45–50°F, typically two to three weeks before your last expected frost date. In most of the northern US and Canada, that is late March to mid-April. In warmer climates (zones 8–10), a fall planting — putting seed potatoes in the ground in August or September for a winter-through-spring harvest — is often more productive than a spring planting.
What is chitting and do I have to do it?
Chitting is pre-sprouting seed potatoes in a cool, bright location before planting. It is optional but gives plants a head start that can push harvest two weeks earlier. Place seed potatoes eyes-up in an egg carton at about 70°F with diffuse light for four to six weeks before your planned planting date. Sprouts should be about one inch long at planting.
How many times should I hill potatoes?
Hill two to three times during the growing season. The first hilling happens when stems reach 8–12 inches tall; the last should be before flowering begins. Each hilling buries the bottom third of the stem, which encourages additional stolons and tuber formation. Total hill height should reach 6–8 inches above the original soil surface.
Why do my potatoes have green patches?
Green patches form when tubers are exposed to light, which triggers solanine production. This is why hilling is critical — it keeps tubers underground and in darkness. Cut away and discard all green flesh before eating; do not peel around it. Prevent greening in storage by keeping potatoes in complete darkness.
Can I grow potatoes in a grow bag?
Yes. Use a fabric bag of at least 12 inches in height and 7–15 gallon capacity with good drainage. Start with 4 inches of growing mix, add seed potatoes, cover, and hill by adding more mix each time the plant reaches 8 inches. Stop hilling at flowering. Expect 7–13 lbs per bag. The old “potato tower” method — stacking multiple layers of seed potatoes in a tall cage — does not reliably increase yield and is not recommended by extension services.
References
- Growing potatoes in home gardens — University of Minnesota Extension
- How to grow potatoes in your garden — Utah State University Extension
- Growing potatoes in a home garden — University of Maryland Extension
- Growing potatoes in the home garden — Iowa State University Extension
- Potatoes in the garden and the kitchen — Penn State Extension
- Growing potatoes in grow bags — UC ANR Master Gardener Program, Contra Costa
- Protect potato yields by managing Colorado potato beetles — Penn State Extension
- Late blight of tomato and potato — University of Minnesota Extension