Key takeaways
- Winter sowing uses repurposed containers like one-gallon milk jugs to create mini-greenhouses, protecting seeds from harsh winter conditions.
- This method allows for earlier seed starting, often 6-8 weeks before traditional indoor methods, particularly beneficial in USDA zones 5-7.
- Seeds experience natural temperature fluctuations, leading to stronger, more cold-hardy seedlings that require no hardening off.
- Suitable crops include many cold-hardy annuals, perennials, and some vegetables like brassicas, leafy greens, and root crops.
- Proper drainage, adequate ventilation, and a high-quality seed-starting mix all matter for success in winter sowing setups.
- Transplanting winter-sown seedlings into the garden is straightforward once the soil warms to 45-50°F and the danger of hard frost has passed.
Quick answer: Winter sowing is a method of starting seeds outdoors in repurposed containers during colder months, typically December through March. This creates mini-greenhouses that expose seeds to natural temperature fluctuations, leading to earlier germination and hardier seedlings without needing hardening off.
In regions like the Pacific Northwest or the Upper Midwest, gardeners often face a short growing season, making early seed starting a critical step for a productive harvest. Winter sowing offers a practical solution, allowing you to get a head start on your garden by planting seeds outdoors in repurposed containers during the colder months. This method mimics nature’s own cycle, providing a protective microclimate that encourages germination when conditions are just right. For instance, in USDA zone 6, winter sowing can start seeds up to eight weeks earlier than traditional indoor methods, and the seedlings are sturdy by spring.
This approach reduces the need for expensive grow lights and heated mats, saving home growers hundreds of dollars on electricity and equipment. By utilizing materials like one-gallon milk jugs, gardeners create miniature greenhouses that shield delicate seeds from extreme winter temperatures, often as low as 10°F, while exposing them to natural light and temperature fluctuations. This process results in seedlings that are naturally hardened off and ready for the garden, often outperforming their indoor-started counterparts in resilience and vigor.
what is winter sowing and why does it work?
These takeaways points carry into this section, too.
Winter sowing is a straightforward method of starting seeds outdoors during the colder months, typically from December through March in most temperate US zones. It involves planting seeds in miniature greenhouses made from repurposed plastic containers, such as one-gallon milk jugs, and leaving them outside to experience natural winter conditions. This technique capitalizes on the natural cycles of cold stratification and temperature fluctuations, which are essential for germinating many types of seeds. For example, some winter wheat varieties show initial growth 168 days after sowing, demonstrating the long, cold periods many plants require. This method is particularly effective for seeds that benefit from a period of cold, known as cold stratification, which naturally breaks dormancy and prepares them for vigorous growth. The consistent exposure to the elements, from freezing nights to thawing days, signals to the seed that the time is right to germinate.
the natural advantage of cold and light
The primary benefit of winter sowing is the production of hardy, self-sufficient seedlings. Unlike indoor-started plants that require a gradual hardening-off period, winter-sown seedlings are accustomed to outdoor conditions from day one. They experience natural light cycles, varying temperatures, and real precipitation, which builds their resilience. This natural exposure is particularly beneficial for crops like winter rape hybrids, where sowing dates significantly influence winter hardiness [4]. The protective container shields seeds and young sprouts from harsh winds and heavy snow, while still allowing sunlight and moisture to penetrate. This method can extend the effective growing season by several weeks, especially in colder climates like USDA zone 4 or 5, where spring can be slow to arrive. Gardeners often observe a 30% to 50% higher survival rate for winter-sown plants compared to those started indoors.
- no hardening off required for seedlings
- reduced risk of damping-off disease
- stronger root development from natural conditions
- significant savings on electricity and equipment
- earlier harvests for many cool-season crops
choosing your containers and preparing your setup
That work on what is winter sets up what follows here.
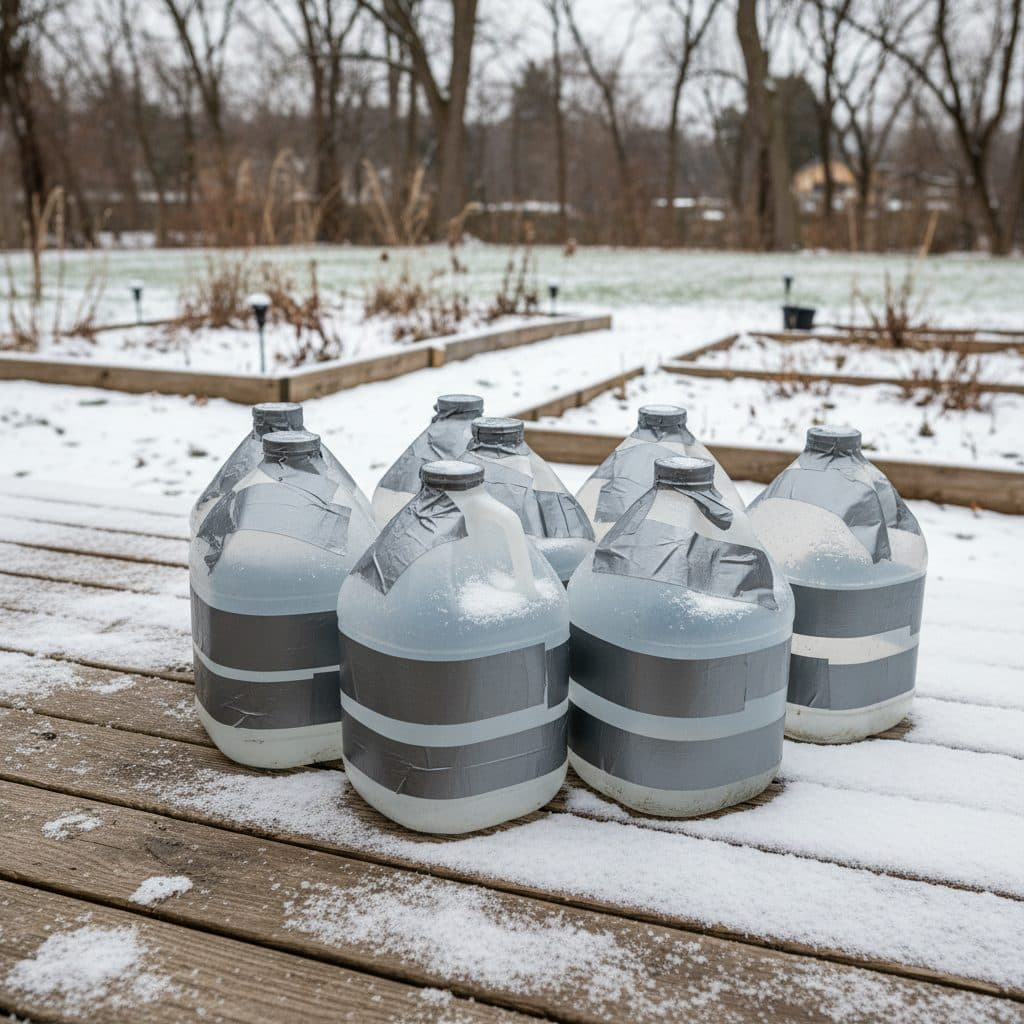
The success of winter sowing largely depends on selecting appropriate containers and preparing them correctly. The most common choice is a one-gallon translucent plastic jug, such as a milk or water jug, due to its availability and ideal size. These containers act as mini-greenhouses, creating a stable microclimate while allowing sunlight to penetrate. You will need at least six drainage holes, each about one-quarter inch in diameter, drilled or cut into the bottom of the jug to prevent waterlogging. Without adequate drainage, seeds can rot, especially during periods of heavy rain or snowmelt, which can amount to 1-2 inches of water per week in some areas like the Pacific Northwest. Labeling your containers clearly with the plant name and sowing date using a permanent marker is also essential. This helps you track what you’ve planted and when, preventing confusion later when dozens of green shoots emerge.
preparing your mini-greenhouse
To prepare a jug, cut it horizontally around its circumference, leaving about one inch intact below the handle to create a hinge. This allows you to open the jug like a clamshell for planting and watering. Fill the bottom half with 4-6 inches of a high-quality, sterile seed-starting mix. A good mix should be light, well-draining, and retain moisture, often containing peat moss, perlite, and vermiculite in a 1:1:1 ratio. Avoid using garden soil, as it can compact, harbor pathogens, and drain poorly, leading to a 50% reduction in germination rates [3]. After sowing your seeds, water the soil thoroughly until water drains from the bottom holes. Then, seal the jug securely with strong duct tape around the cut seam to ensure a tight closure that will protect the seeds from wildlife and maintain humidity. Place your labeled containers in a location that receives consistent sunlight, such as a south-facing wall or open area in your garden, where they won’t be easily disturbed by animals or strong winds. You can find suitable trays for these jugs, like a 24-Cell Seedling Propagation Tray with Dome, to keep them organized. A single one-gallon jug can comfortably hold 10-15 smaller seedlings, or 3-5 larger ones, maximizing your garden space efficiency.
- one-gallon milk or water jugs
- clamshell-style clear plastic containers
- two-liter soda bottles (cut in half)
- large clear plastic storage bins
- takeout containers with clear lids
selecting the right seeds and timing your planting
This builds directly on choosing containers and.
Not all seeds are suitable for winter sowing; the most successful candidates are those that benefit from cold stratification or are naturally cold-hardy. This includes many perennials, hardy annuals, and cool-season vegetables. Seeds requiring a period of cold to break dormancy, such as coneflowers, milkweed, and many native wildflowers, thrive with this method. Vegetables like kale, lettuce, spinach, broccoli, and cabbage also perform exceptionally well. In contrast, heat-loving plants like tomatoes, peppers, and basil (which need consistent temperatures above 60°F to germinate) are generally not good choices for winter sowing in most US regions, though peppers can be started indoors and transplanted later, as discussed in How to grow peppers.
optimal planting windows by zone
The ideal planting time for winter sowing varies significantly by USDA Hardiness Zone. In colder zones, like USDA zone 3 or 4, you can start planting as early as December or January. For USDA zones 5-7, January through February is often the sweet spot. Further south, in zones 8-9, late January through March is more appropriate to ensure seeds receive enough chill hours without germinating too early into a sudden warm spell. For example, winter mustard sowing rates are determined by factors including the optimal sowing period, which can vary by several weeks across different climates [1]. The goal is to plant when temperatures are consistently low, but not so low that the soil completely freezes for extended periods, preventing any moisture absorption. Aim for daytime temperatures consistently below 45°F for best results, allowing for several weeks of cold exposure. For example, the optimal sowing period for winter wheat in the Loess Tablelands in East Gansu Province was determined through analysis, and regional climate data mattered for successful crop establishment [2]. This principle applies directly to US gardeners; understanding your local microclimate and historical frost dates matters most. You can also refer to resources like Seed starting for beginners for general timing guidance, but always prioritize your local conditions. Planting too early in a warm spell can lead to premature germination and subsequent death if a hard freeze returns, while planting too late might miss the necessary cold period.
- perennials: coneflower, columbine, milkweed
- hardy annuals: snapdragons, calendula, bachelor’s buttons
- cool-season vegetables: kale, spinach, lettuce, broccoli
- herbs: parsley, cilantro, chives
- native wildflowers: black-eyed Susan, aster, goldenrod
care and transplanting for strong seedlings
Those selecting right seeds habits matter here as well.
Once your seeds are sown and sealed in their mini-greenhouses, the care required is minimal. Place your containers in a sunny outdoor location where they will receive at least six hours of direct sunlight daily. A south-facing spot against a wall or fence in a USDA zone 6 garden can provide additional warmth. The natural precipitation will typically provide enough moisture, but if you experience a prolonged dry spell without snow or rain for two weeks or more, check the soil moisture. If it feels dry to the touch, add a small amount of water through the drainage holes or by briefly opening the jug. Avoid overwatering, which can lead to fungal issues like damping-off, a common problem that can wipe out 30% or more of indoor seedlings. As spring progresses, monitor the temperatures. Once daytime temperatures consistently stay above 50°F and night temperatures are above 30°F, you can begin to open the jugs during the day to increase air circulation and further acclimate the seedlings. Remember to close them again at night if there’s still a risk of frost. This gradual opening process helps prevent excessive heat buildup inside the jugs, which can scorch tender young plants if temperatures inside reach 80°F or higher on a sunny day.
when and how to transplant
As spring approaches and temperatures consistently rise above 40°F, you will notice seedlings emerging. Once the danger of hard frost has passed and the seedlings have developed at least two sets of true leaves, they are ready for transplanting. In many US regions, this typically occurs from late April to early June. Because winter-sown seedlings are already acclimated to outdoor conditions, they do not require the traditional hardening-off process that indoor-started plants need, saving you 7-10 days of gradual exposure. To transplant, open the jug, gently remove the entire block of soil, and separate the seedlings. Plant them into your garden beds at the same depth they were growing in the jug, spacing them according to their mature size. For example, celery, a plant that can be started indoors and then transplanted, requires careful handling to ensure a long, tender harvest, as detailed in How to grow celery. Water them in thoroughly after planting, providing about one gallon of water per square foot of new planting area.
- monitor soil moisture during dry spells
- ensure adequate sunlight exposure (6+ hours daily)
- protect from strong winds in exposed areas
- label containers clearly with seed type and date
- remove tape and open jugs as temperatures warm
Comparing winter sowing to traditional indoor seed starting
Feature | Winter Sowing | Traditional Indoor Starting |
|---|---|---|
Equipment Needed | Repurposed plastic jugs, seed-starting mix, duct tape (cost: ~$5-10) | Grow lights, heat mats, trays, fan (cost: ~$100-300) |
Hardening Off | Not required; seedlings are naturally acclimated | Required for 7-10 days to prevent shock |
Seedling Strength | Strong, cold-hardy root systems | Often leggy, less resilient to outdoor conditions |
Germination Timing | Natural, occurs when conditions are optimal (e.g., 40-55°F) | Controlled by artificial heat and light |
Pest/Disease Risk | Lower risk of damping-off and indoor pests | Higher risk of damping-off and fungus gnats |
Season Extension | Can start 6-8 weeks earlier in USDA zone 6 | Limited by indoor space and light availability |
Early Start: Winter sowing can advance your planting schedule by 6-8 weeks in USDA zones 5-7, leading to earlier harvests.
Cost Savings: Gardeners can save over $100 on equipment by using repurposed materials instead of grow lights and heat mats.
Survival Rate: Winter-sown plants often show a 30-50% higher survival rate after transplanting compared to indoor-started seedlings.
Soil Depth: Ensure your seed-starting mix is at least 4 inches deep in your containers for adequate root development.
Frequently asked questions
What kind of seeds are best for winter sowing?
The best seeds for winter sowing are those that require cold stratification or are naturally cold-hardy. This includes many perennials like coneflowers, hardy annuals such as snapdragons, and cool-season vegetables like kale and spinach. Avoid heat-loving plants like tomatoes, which need consistent temperatures above 60°F to germinate successfully.
When is the best time to start winter sowing?
The optimal timing depends on your USDA Hardiness Zone. In colder zones (3-4), you can start as early as December or January. For zones 5-7, January through February is ideal. In warmer zones (8-9), late January to March is more appropriate, aiming for a period of consistent cold temperatures below 45°F.
Do I need to water my winter sowing containers?
Generally, natural precipitation like rain and snow provides sufficient moisture. However, if you experience a prolonged dry spell, two weeks or more without significant moisture, it’s wise to check the soil. If it feels dry, add a small amount of water, perhaps one-quarter cup per jug, to prevent the seeds from drying out.
How many seeds should I plant in each jug?
The number of seeds depends on the plant’s mature size and germination rate. For smaller plants like lettuce or spinach, you can sow 10-15 seeds per jug. For larger plants like broccoli or cabbage, sow 3-5 seeds, planning to thin them later. Always check the seed packet for specific recommendations.
What kind of soil should I use for winter sowing?
Use a high-quality, sterile seed-starting mix that is light, well-draining, and retains moisture. A mix containing peat moss, perlite, and vermiculite in a 1:1:1 ratio works well. Avoid using heavy garden soil, which can compact and hinder germination, potentially reducing success rates by 50%.
References
- Phytosanitary condition of winter mustard sowing at different sowing rates (2025). Phytosanitary condition of winter mustard sowing at different sowing rates.
- Analysis on Suitable Sowing Period of Winter Wheat in the Loess Tablelands in East Gansu Province (2010). Analysis on Suitable Sowing Period of Winter Wheat in the Loess Tablelands in East Gansu Province.
- THE EFFECT OF PRE-SOWING TILLAGE ON SOWING QUALITIES OF WINTER WHEAT (2022). THE EFFECT OF PRE-SOWING TILLAGE ON SOWING QUALITIES OF WINTER WHEAT.
- Influence of sowing dates and norms on winter hardiness of winter rape (Brassica napus L.) hybrids (2024). Influence of sowing dates and norms on winter hardiness of winter rape (Brassica napus L.) hybrids.
- Growth and Yield Response of Facultative Wheat to Winter Sowing, Freezing Sowing and Spring Sowing at Different Seeding Rates (2006). Growth and Yield Response of Facultative Wheat to Winter Sowing, Freezing Sowing and Spring Sowing at Different Seeding Rates.