
Rainwater Harvesting: Reduce Irrigation in USDA Zone 7

Key takeaways
- A 1,000 sq ft roof can yield 620 gallons of water per inch of rain, significantly supplementing irrigation.
- Properly sized systems, matching roof area to storage capacity and water demand, are essential for efficiency.
- First-flush diverters are crucial for water quality, removing initial contaminants from the roof surface.
- Gutters must be correctly installed and maintained to effectively channel rainwater to storage containers.
- Integrating harvested rainwater with passive irrigation methods like ollas or wicking beds maximizes water use.
- Regular maintenance, including cleaning and mosquito prevention, ensures system longevity and water safety.
In regions like the arid Southwest, where water scarcity is a constant concern, or even in the humid Southeast where summer droughts can stress gardens, rainwater harvesting offers a practical solution for growers. Many homeowners in areas such as the Pacific Northwest or the Southeast can collect thousands of gallons annually, significantly reducing reliance on municipal water [5].
By capturing precipitation from your roof, you can reduce your reliance on municipal water, lower utility bills, and provide your plants with naturally soft, chlorine-free water. This article will walk you through the practical steps of setting up an effective rainwater harvesting system, from sizing your storage to maintaining water quality, ensuring your garden thrives even when the tap runs dry.
Why capture the rain?
For many US growers, the idea of collecting rainwater isn’t just about being thrifty; it’s about resilience and providing better water for plants. Municipal water often contains chlorine or chloramines, which can negatively impact beneficial soil microbes. Rainwater, on the other hand, is naturally soft and free of these chemicals. Its pH is typically between 5.5 and 6.5, making it slightly acidic and beneficial for many plants, especially those that prefer a lower pH, like blueberries or azaleas [4].
The tangible benefits for your homestead
Beyond water quality, the financial savings are real. The average US household uses about 90 gallons of water per day for outdoor irrigation during peak summer months [0]. By offsetting even a portion of this demand with collected rainwater, you can see a noticeable drop in your utility bills. Rainwater harvesting can reduce **municipal water demand** by 30% to 50% for outdoor uses, easing the burden on local water infrastructure and your wallet [3]. This is particularly impactful in states like California, where water restrictions are common, or in Florida, where irrigation can be a significant expense during dry seasons. It’s a straightforward way to boost your homestead’s **water independence** and contribute to **soil health** with naturally superior water.
- Reduces reliance on municipal water supplies.
- Lowers monthly utility bills.
- Provides **chlorine-free water** for plants.
- Supports healthy soil microbiology.
- Offers a slightly acidic **pH level** beneficial for many plants.
Sizing your system for success
Before you even think about buying a barrel, you need to understand your water needs and your roof’s potential. In regions like central Texas, where summer heat can demand significant irrigation, knowing your capacity is crucial. Start by calculating your **roof footprint** – the area that sheds water to your chosen collection point. For a typical rectangular home, this is simply length multiplied by width. For example, a 1,000 square foot roof can capture approximately 620 gallons of water from just one inch of rain [4]. This calculation, often simplified to 0.62 gallons per square foot per inch of rain, is your starting point for understanding supply.
Estimating your water demand
Next, consider your **irrigation requirements**. How much water do your plants actually need? A vegetable garden, for instance, might require one inch of water per week, which translates to about 0.62 gallons per square foot. If your garden is 200 square feet, that’s 124 gallons per week. Compare this to your potential collection. If you live in a USDA zone 7 area receiving 40 inches of annual rainfall, that 1,000 square foot roof could theoretically provide over 24,000 gallons annually, far exceeding the 6,448 gallons needed for a 200 square foot garden over a 52-week growing season. However, you won’t capture every drop, and storage is finite.
- Assess your garden’s square footage.
- Estimate water needs per week (e.g., one inch).
- Factor in local rainfall patterns.
- Consider peak demand periods.
The goal isn’t necessarily to meet 100% of your needs, but to significantly supplement them. Many growers aim to reduce **municipal water demand** by 30% to 50% for outdoor uses [3].
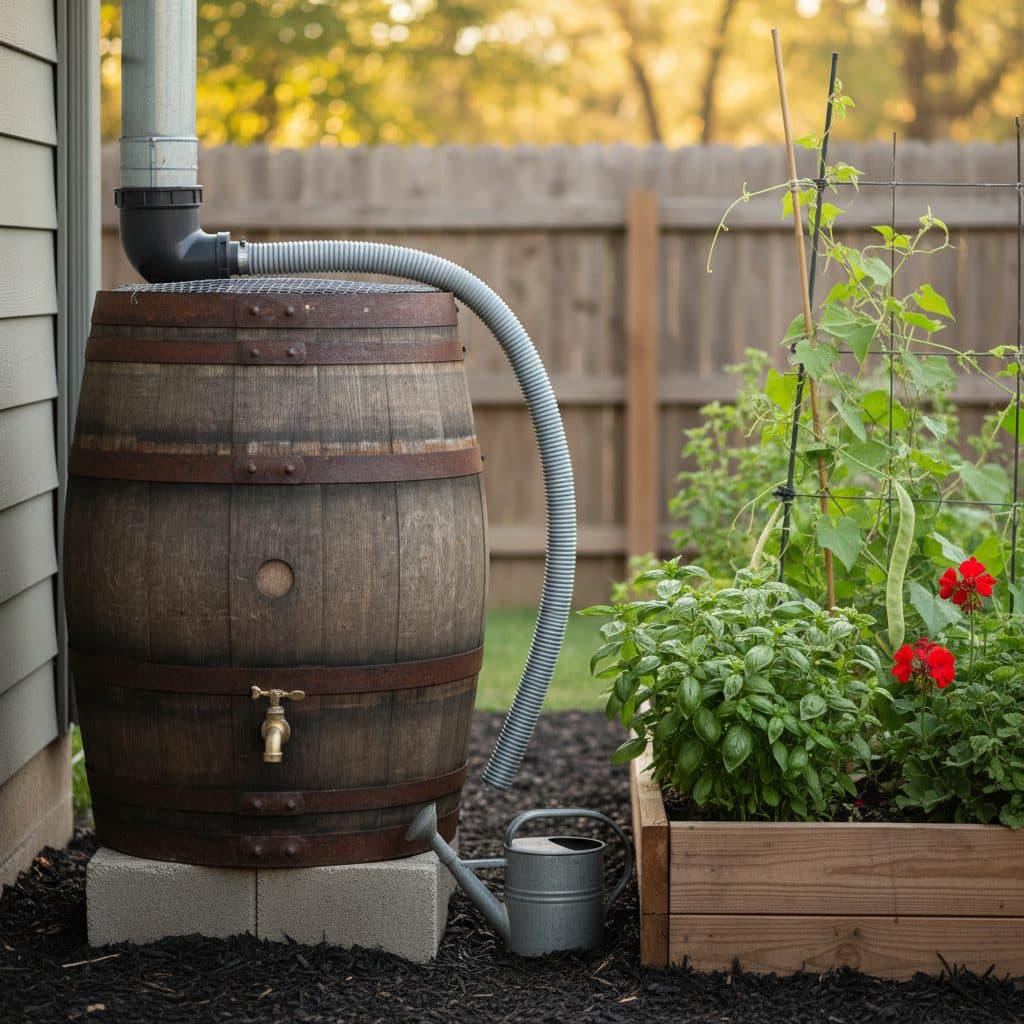
Choosing your containers and channeling the flow
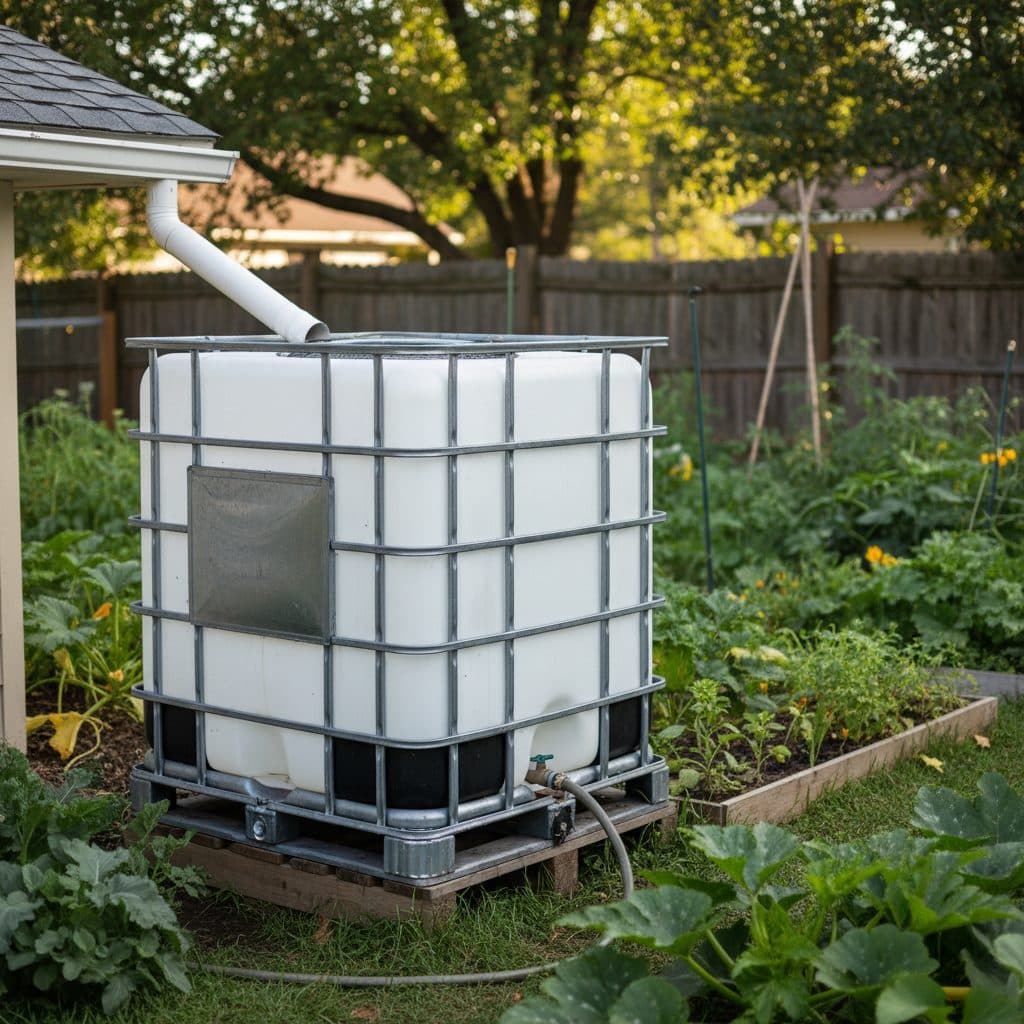
When it comes to storage, you’ve got options. The most common choices for homesteaders are **rain barrels** and **IBC totes**. A typical rain barrel holds 50 to 60 gallons, making it ideal for small gardens or supplementing a few raised beds. They’re relatively inexpensive, easy to install, and can be found at most hardware stores or garden centers. For larger needs, **IBC totes** (Intermediate Bulk Containers) are a popular choice. These sturdy, caged plastic tanks can hold 275 to 330 gallons, offering significantly more storage for a comparable footprint [2]. Always ensure you source food-grade IBC totes if you plan to use the water on edibles, even if it’s just for irrigation.
Gutter systems and downspout diverters
No matter your container choice, an efficient **gutter system** is non-negotiable. Properly installed gutters are crucial for directing water from your roof to your storage. A typical 6-inch K-style gutter can handle up to 5,500 square feet of roof area in a 1-inch per hour rainfall, making it suitable for most residential applications [1]. You’ll need a **downspout diverter** to channel water from your gutter’s downspout into your barrel or tote. These come in various designs, from simple flexible hoses to more sophisticated automatic diverters that send overflow back down the main downspout once your container is full. Consider using a Garden PE Irrigation Hose to connect your barrels or for direct drip irrigation.
- Ensure gutters are clear of debris.
- Install proper downspout diverters.
- Connect multiple barrels for increased capacity.
- Elevate containers for better water pressure.
- Use **food-grade plastic** for edible gardens.
The first-flush and filtration
One of the most critical, yet often overlooked, components of a rainwater harvesting system is the **first-flush diverter**. When rain first hits your roof, it washes off accumulated dust, leaves, bird droppings, and other **roof contaminants**. This initial water is the dirtiest. A first-flush diverter is designed to capture and divert this initial volume of water, preventing it from entering your main storage tank. These devices typically remove the initial 10 to 20 gallons of water, which often contain the most contaminants, significantly improving the quality of the water you collect [1]. For instance, a system on a garage roof in rural Ohio might collect significant pollen and dust, making a first-flush essential.
Pre-filtration and screening
Before water even reaches the first-flush diverter, it’s a good idea to have some basic pre-filtration in place. This usually involves **leaf screens** or mesh filters installed at the top of your downspouts or where the downspout enters the diverter. These screens prevent larger debris like leaves, twigs, and insects from entering the system, which can clog pipes and promote algae growth in your storage containers. A screen with a mesh size of about 1/4 inch is usually sufficient for this purpose. Regular cleaning of these screens, especially during autumn in areas with deciduous trees, will ensure optimal flow and prevent **sediment build-up** in your barrels or totes. While rainwater is generally clean, this two-stage filtration — screening and first-flush — ensures you’re collecting the cleanest possible water for your garden, even if it’s not intended for **potable water** use.
- Install a first-flush diverter to remove initial pollutants.
- Use leaf screens at downspout entry points.
- Regularly clean screens to prevent blockages.
- Consider a finer mesh screen (1/16 inch) for mosquito prevention.
- Ensure easy access for maintenance and cleaning.
Integrating with passive irrigation
Collecting rainwater is just the first step; getting it to your plants efficiently is the next. While a simple spigot and a watering can work for small setups, integrating your harvested water with **passive irrigation** methods can dramatically improve efficiency and reduce labor. Methods like **ollas** and **wicking beds** are excellent for maximizing every precious drop. Ollas, unglazed clay pots buried in the soil, slowly release water directly to plant roots, reducing evaporation by 50% to 70% compared to surface watering. Wicking beds, popular in arid regions like Arizona, use a reservoir at the bottom to draw water up to plant roots, often reducing water use by 30% to 50%.
Earthworks and gravity-fed systems
For larger homesteads, consider incorporating **earthworks** like swales or berms that capture and slow down runoff, allowing it to infiltrate the soil slowly. A well-designed **keyline design** can distribute water across contours, ensuring it soaks in rather than running off. You can also use the elevation of your rain barrels or IBC totes to create a simple gravity-fed drip irrigation system. By elevating your storage containers on a sturdy platform, you can achieve enough pressure to run a basic drip line to your garden beds. This eliminates the need for pumps and makes irrigation almost effortless. For more advanced systems, consider exploring solar water pumps for wells and irrigation to move larger volumes of water or overcome elevation challenges.
- Utilize ollas for targeted, slow-release irrigation.
- Build wicking beds for efficient water delivery.
- Implement swales or berms to retain soil moisture.
- Elevate storage for gravity-fed drip systems.
- Explore keyline design for landscape-scale water management.
Maintenance and safety considerations
A well-maintained rainwater harvesting system will serve you for years, but neglect can lead to problems. The primary concern in many US regions, especially the South, is **mosquito breeding**. To prevent this, ensure all openings, including overflow pipes and access points, are covered with fine mesh screens, ideally 1/16 inch or smaller. Regularly inspect these screens for holes or gaps. Another issue is **algae growth** inside the barrels, which can be minimized by painting opaque containers or ensuring they are not exposed to direct sunlight. Cleaning your barrels annually, typically in the late fall or early spring, will remove any accumulated sediment or sludge.
Winterizing and child safety
For growers in colder climates, like USDA zone 6 and above, **winterizing** your system is crucial. Before the first hard freeze, typically when temperatures consistently drop below 32 degrees Fahrenheit, drain your barrels and disconnect them from downspouts to prevent freezing and cracking. Store them upside down or in a sheltered location. Reconnect the downspout to allow water to flow freely away from your foundation. Finally, always prioritize **child safety**. Ensure your barrels or totes are securely covered and cannot be easily opened by curious children. If using elevated platforms, make sure they are stable and robust enough to support the full weight of the water, which can be thousands of pounds for a full IBC tote. Regularly check for signs of **system overflow** and ensure proper drainage away from your home’s foundation.
- Cover all openings with 1/16 inch mesh to prevent mosquitoes.
- Clean barrels annually to remove sediment and algae.
- Disconnect and drain barrels in freezing temperatures.
- Ensure covers are child-proof and secure.
- Check for proper overflow drainage away from foundations.
| Feature | Rain Barrel | IBC Tote |
|---|---|---|
| Capacity | 50-60 gallons [2] | 275-330 gallons [2] |
| Cost (approx.) | $70 – $200 | $100 – $300 (often used) |
| Footprint | Small, circular | Medium, square (approx. 4 ft x 4 ft) |
| Portability | Easy to move when empty | Difficult to move when empty, very heavy when full |
| Aesthetics | Designed for gardens, various styles | Industrial appearance, often requires screening |
Grow more with less water
Explore efficient irrigation tools and drought-tolerant plants for your homestead.
Frequently asked questions
Is rainwater safe for all plants?
Yes, rainwater is generally excellent for plants, as its pH is typically slightly acidic, between 5.5 and 6.5, and it lacks chlorine found in municipal water [4]. This natural composition supports healthy soil microbiology and nutrient uptake for most garden species.
How much water can I realistically collect?
A 1,000 square foot roof can capture about 620 gallons of water from just one inch of rainfall [4]. In areas like the Pacific Northwest, with 40 inches of annual rain, this translates to over 24,000 gallons per year from the same roof area.
What’s a first-flush diverter and why do I need one?
A first-flush diverter channels the initial rain — typically the first 10 to 20 gallons — away from your main storage, as this water often contains debris, dust, and pollutants from your roof [1]. This simple device significantly improves the quality of your stored water for gardening.
Can I connect multiple rain barrels or IBC totes?
Yes, connecting multiple barrels or IBC totes in series is a common practice to increase storage capacity, which is especially useful for larger gardens or in regions with less frequent rainfall. Using a simple connector kit, you can easily expand your system to hold hundreds of gallons.
How do I prevent mosquitoes from breeding in my rainwater system?
To prevent mosquito breeding, ensure all openings, including overflow pipes and access points, are covered with fine mesh screens, ideally 1/16 inch or smaller. Regularly inspect your system for gaps and consider adding a small amount of mosquito dunks, which contain a natural larvicide, every 30 days during warmer months.
How often should I clean my rainwater collection system?
You should ideally clean your rain barrels or IBC totes annually, typically in the late fall or early spring, to remove any accumulated sediment or algae. This helps maintain water quality and ensures the system functions efficiently throughout the growing season.
References
- Advanced Rainwater Harvesting through Smart Rain Barrels (2019). Advanced Rainwater Harvesting through Smart Rain Barrels.
- Rainwater-Harvesting Elements (2017). Rainwater-Harvesting Elements.
- Rainwater-Harvesting Technology (2017). Rainwater-Harvesting Technology.
- Rainwater Harvesting in the 21st Century (2024). Rainwater Harvesting in the 21st Century.
- Rainwater Harvesting (2023). Rainwater Harvesting.
- Rain Barrel Owners: Meeting the Programming Needs of the Unique Extension Audience (2018). Rain Barrel Owners: Meeting the Programming Needs of the Unique Extension Audience.