Key takeaways
- Plant hardneck garlic in Ontario during autumn, between late September and early November, depending on your regional hardiness zone.
- Target soil temperatures around 10°C at planting depth, roughly three to six weeks before the soil freezes solid.
- Choose cold-hardy hardneck varieties like Music, which thrive in Ontario winters and produce vigorous spring scapes.
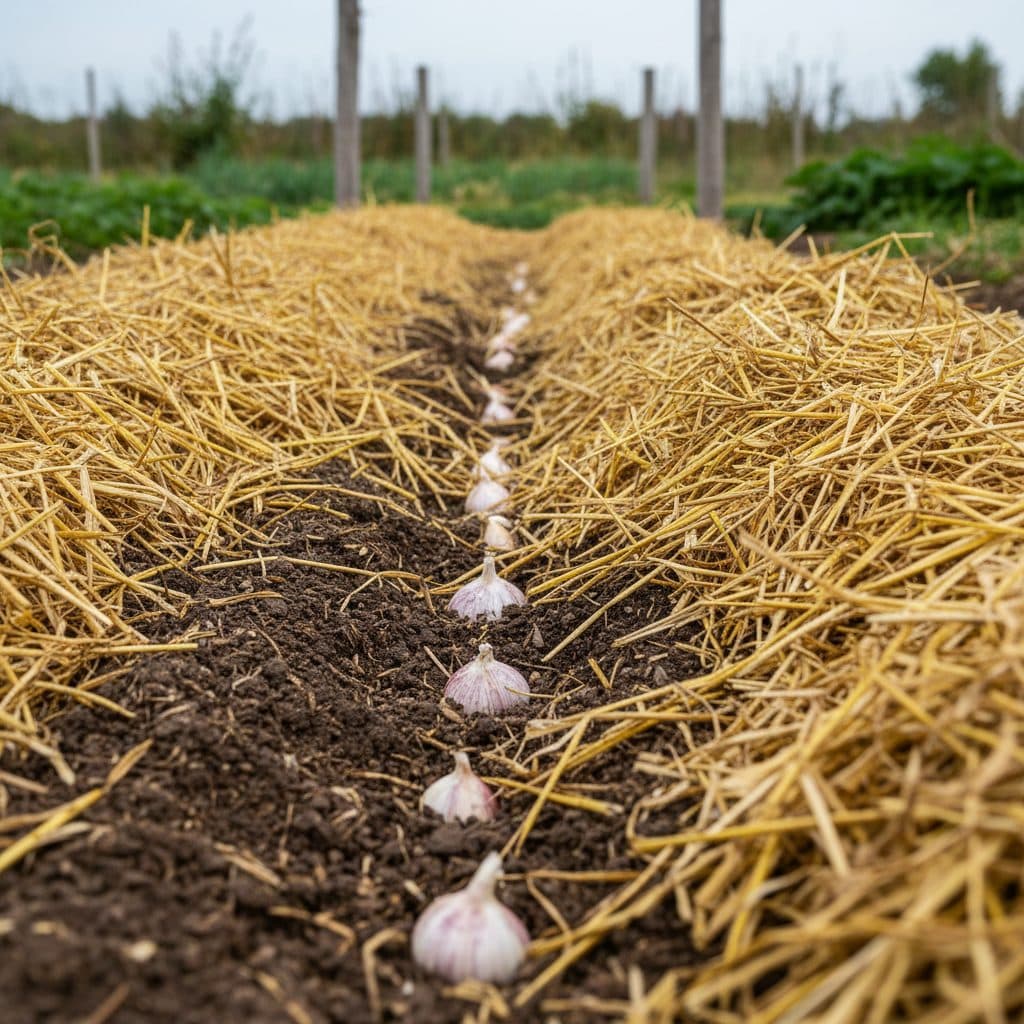
- Plant individual cloves 5 to 7.5 cm (2 to 3 in) deep from the tip (7.5 to 10 cm from the base), pointed end up, spaced 15 cm apart in fertile, free-draining garden beds.
- Spread a 10 to 15 cm layer of clean straw or shredded leaves (15 to 20 cm in northern Zones 3-4) immediately after planting to prevent frost heaving.
- Harvest mature bulbs in mid-to-late summer when the lower three to four leaves turn yellow and brown.
Quick answer: In Ontario, plant garlic in autumn from late September through early November before the ground freezes. Northern Ontario gardeners should plant from late September to early October, while central and southern growers aim for mid-October to early November. This allows cloves to establish root systems without pushing tender green foliage above ground before winter.
Growing garlic across Canada offers one of the highest yields per square metre in the home food garden. Hardneck garlic requires a vernalization period of 6 to 10 weeks of cold temperatures (typically between 0°C and 10°C / 32°F to 50°F) to trigger bulb differentiation and clove development in spring.
Understanding when to plant garlic in Ontario comes down to balancing soil cooling with root establishment. If you plant too early in late summer, the cloves expend energy pushing leafy green top growth that winter frosts will damage. If you plant too late after the topsoil freezes, cloves fail to anchor strong root networks before deep dormancy, leading to smaller summer bulbs.
+-------------------------------------------------------------+
|              ONTARIO FALL GARLIC PLANTING CALENDAR          |
|                                                             |
|   Region & Hardiness Zone        Optimal Planting Window    |
|   -----------------------        -----------------------    |
|   Northern Ontario (Zones 3-4)   Late September - Early Oct |
|   Central & Eastern (Zone 5)     Mid-October - Late October |
|   Southern & SW (Zones 6-7)      Late October - Early Nov   |
|                                                             |
|   Target Soil Temperature: ~10°C at 10 cm depth             |
|   Target Window: 4 to 6 weeks before hard ground freeze     |
+-------------------------------------------------------------+
Regional planting calendar for Ontario zones
Ontario spans several distinct climatic bands, meaning planting dates vary considerably between the northern Shield and the southern Carolinian zone.
Ontario Region | Representative Cities | Canadian Hardiness Zone | Ideal Planting Window |
|---|---|---|---|
Northern Ontario | Thunder Bay, Sudbury, Timmins | Zone 3 to 4 | September 20 to October 10 |
Eastern & Central | Ottawa, Peterborough, Barrie | Zone 5a to 5b | October 10 to October 25 |
Southern Ontario | Toronto, Hamilton, Kitchener | Zone 6a to 6b | October 15 to November 5 |
Southwestern Ontario | London, Windsor, Niagara | Zone 6b to 7a | October 25 to November 15 |
In colder northern areas, autumn soil cools rapidly after early September frosts. Cloves need two to three weeks of soil temperatures between 10°C and 15°C to initiate root growth. In southern Ontario, mild autumn conditions extend well into November, allowing later planting without risking root failure. Aim to plant when soil temperature drops consistently to 10°C (50°F) at a 10 cm (4 in) depth, typically 4 to 6 weeks before the ground freezes solid.
For additional allium cultivation principles, explore our comprehensive overview on how to grow garlic and compare requirements with how to grow onions.
Why hardneck garlic varieties excel in Canada
Garlic (Allium sativum) divides into two primary subspecies: hardneck (Allium sativum var. ophioscorodon) and softneck (Allium sativum var. sativum).
+-------------------------------------------------------------+
|               HARDNECK VS SOFTNECK IN ONTARIO               |
|                                                             |
|   HARDNECK (Recommended):                                   |
|   - Extreme cold hardiness through severe winter freezes    |
|   - Produces a central woody flower stalk (edible scape)    |
|   - Large, easy-to-peel cloves arranged in a single ring    |
|   - Examples: Music, Siberian, Red Russian, Georgian Fire   |
|                                                             |
|   SOFTNECK:                                                 |
|   - Better suited to mild maritime or southern climates     |
|   - No scapes; pliable stems suitable for braiding          |
|   - Smaller, multiple overlapping clove layers              |
|   - Prone to winterkill during severe Ontario freeze-thaw   |
+-------------------------------------------------------------+
The Porcelain hardneck cultivar known as Music is a top choice for Ontario growers. Developed and refined in Canadian growing conditions, Music produces vigorous root systems, strong resistance to cold-wet soil conditions, and four to six massive cloves per bulb with rich, pungent flavour.
You can review botanical profiles for garden alliums in our entry on Allium sativum.
Preparing soil and planting cloves step-by-step
Garlic requires full sun and loose, nutrient-dense, free-draining soil with a pH between 6.2 and 7.0. Heavy, waterlogged clay leads to fungal rot during spring thaw.
+-------------------------------------------------------------+
|                 GARLIC BED PREPARATION PROFILE              |
|                                                             |
|   [ 10-15 cm Straw Mulch Layer (15-20 cm in North) ]        |
|   ~~~~~~~~~~~~~~~   |
|   [ Pointed Tip Up ]   |  Planting Depth: 5 to 7.5 cm (tip) |
|         /\             |  Clove Spacing: 15 cm              |
|        /  \            |  Row Spacing: 20 to 30 cm          |
|       (    )           |                                    |
|   ====[====]=============================================   |
|   [ Loose Soil amended with Bone Meal & Compost (pH 6.5) ]  |
+-------------------------------------------------------------+
Step 1: Bed preparation and fertilization
Two weeks prior to planting, loosen the garden bed to a depth of 20 to 25 cm. Incorporate 5 cm of well-aged compost or leaf conditioner. Add phosphorus-rich bone meal or rock phosphate in the furrow at fall planting to promote strong root anchorage; apply high-nitrogen fertilizers (such as blood meal, compost tea, or calcium nitrate) in early spring once green shoots reach 10 to 15 cm tall. Discover methods for preparing homemade organic conditioners in our guide to make leaf mold soil conditioner.
Step 2: Selecting and cracking seed garlic
Always use certified disease-free seed garlic sourced from local growers or reputable Canadian nurseries. Grocery store garlic is often treated with sprout inhibitors and may carry soil-borne pathogens. Break whole heads into individual cloves no more than 24 to 48 hours before planting. Keep the papery skins intact on each clove, and select only the largest, firmest cloves for planting, reserving small or damaged cloves for the kitchen.
Step 3: Depth, orientation, and spacing
- Dig individual planting holes or continuous furrows 8 to 10 cm deep.
- Set each clove upright with the pointed tip facing upward and the flat basal root plate facing down. Planting cloves upside down forces the emerging shoot to loop underground, wasting energy and resulting in misshapen bulbs.
- Plant individual cloves 5 to 7.5 cm (2 to 3 in) deep — measured from the top of the clove to the soil surface (or 7.5 to 10 cm / 3 to 4 in measured from the base of the clove).
- Space cloves 15 cm apart within the row, leaving 20 to 30 cm between adjacent rows.
Mulching for winter protection
Mulch is not optional for Ontario garlic; it is critical insurance against frost heaving. Rapid winter temperature swings cause bare soil to expand and contract, snapping tender new roots and pushing dormant cloves to the surface where freezing winds desiccate them.
Immediately after planting and watering the bed, apply a 10 to 15 cm (4 to 6 in) layer of clean straw mulch in southern Ontario; northern Ontario (Zones 3-4) may require 15 to 20 cm (6 to 8 in) to prevent severe frost heave. This insulation blanket keeps soil temperatures stable, retains autumn moisture, and suppresses early spring weed emergence.
In high-wind open areas, lay evergreen boughs or a light row cover over the straw to keep it from blowing away before the first lasting snowfall.
Spring management and scape harvesting
As snow melts in April, green garlic spears will push directly through the decomposing straw mulch.
+-------------------------------------------------------------+
|               SPRING & SUMMER MANAGEMENT TIMELINE           |
|                                                             |
|   April (Early Spring):                                     |
|   - Inspect mulch; thin slightly if shoots struggle         |
|   - Side-dress with nitrogen (blood meal or compost tea)    |
|                                                             |
|   Late June (Early Summer):                                 |
|   - Scapes curl into 1 to 2 complete loops                  |
|   - Snap scapes at base to redirect energy to bulb swelling |
|                                                             |
|   Mid-to-Late July (Mid-Summer):                            |
|   - Lower 3 to 4 leaves turn yellow and dry                 |
|   - Stop watering 10 to 14 days before harvest              |
|   - Lift bulbs gently with a garden fork                    |
+-------------------------------------------------------------+
In early spring once green shoots reach 10 to 15 cm tall, side-dress rows with compost or high-nitrogen organic fertilizer to fuel rapid leafy growth. Maintain consistent soil moisture, providing 2.5 cm of water per week during the active leaf-building stage.
In late June, hardneck varieties send up central round flower stalks called scapes. When the scapes form one or two complete loops, snap or cut them off at the top leaf node. Removing the scape stops the plant from expending energy on seed production, increasing final bulb size by 20 to 30 percent. Garlic scapes are edible and make an excellent culinary addition with a mild garlic flavour.
To support perennial soil fertility across cold regions, explore companion strategies with cold hardy nitrogen fixers.
Harvesting, curing, and winter storage
Garlic signals maturity from the bottom up. In mid-to-late July across southern and central Ontario (or early August in northern zones), the lower leaves begin to yellow and brown while the top four to five leaves remain green.
- When to dig: Harvest when approximately one-third to one-half of the leaves have browned. If you harvest too early, cloves will be undersized and skins thin; if you wait until all leaves die back, the protective bulb wrappers will split underground, exposing cloves to rot and reducing storage life.
- Lifting: Never pull garlic by the stalk, which can detach and damage the bulb neck. Loosen the soil 15 cm away from the stem with a garden fork, then gently lift the bulb from beneath.
- Curing: Brush off loose dirt without washing the bulbs. Hang garlic in small bundles or lay them in a single layer on slatted racks in a warm, dry, well-ventilated location out of direct sunlight for three to four weeks.
- Trimming and storage: Once roots are brittle and the outer wrappers dry, trim roots to 1 cm and cut the hardneck stem 3 cm above the bulb. Store cured garlic in mesh bags at 13°C to 18°C with 60% relative humidity. Properly cured Music garlic will store in excellent condition for six to nine months.