How to Build Swales on Contour: Catch & Store Rainwater
Across the dry hillsides of Arizona and Colorado, a simple earthwork — a shallow trench dug on a precise level contour — can retain over 85% of rainfall runoff that would otherwise wash away topsoil. By capturing stormwater runoff and allowing it to percolate slowly, backyard growers can establish self-watering edible forests without relying on municipal systems. The process transforms a sloping yard into a highly productive sponge, allowing you to cultivate perennial plants using 100% natural rainfall. Building these passive earthworks requires a clear understanding of your site’s physical limits, contour layout, and soil structure.
Infiltration and gravity: how swales capture water
This passive irrigation method relies on gravity to arrest surface water runoff. When rainfall occurs, runoff flows downhill until it meets the level swale trench, where it is captured and held. The trench must be excavated with a 100% flat bottom to prevent water from pooling at one end, which could cause a blowout. Over a period of 24 to 36 hours, this collected water infiltrates the soil profile, creating a deep underground moisture plume that feeds the roots of downslope plantings. By storing water in the soil rather than in tanks, a single 50-foot swale can hold up to 500 gallons of water during a 1-inch rain event, reducing the need for municipal irrigation by 40%.
These earthworks act as a biological filter and sponge for the surrounding landscape. In addition to catching water, swales trap organic debris and fine sediments, which builds rich topsoil over a 3-year period. The downslope berm, formed from the excavated soil, provides an ideal aerated planting zone that remains hydrated via capillary action. By implementing these passive systems, backyard growers can establish a self-sustaining microclimate that protects plants from seasonal droughts and reduces surface erosion by up to 90%.
Site assessment and the 5-percent slope limit
These earthwork designs are highly sensitive to the slope of your landscape. Passive swales are most effective on gentle slopes ranging from 2% to 5%, where water moves slowly enough to be captured safely. If your slope exceeds 10%, traditional swales are not recommended, as the risk of soil saturation triggering landslides or slope failures increases significantly. On steeper slopes, alternative water harvesting features like terraces or keyline water management systems must be used to manage high-velocity runoff.
Understanding slope percentage
Slope percentage represents the vertical drop over a horizontal distance. To calculate this drop, run a level line between two stakes and measure the height difference.
Setback guidelines for foundations
Those slope limitations are paired with strict distance setbacks to protect existing structures. You must maintain a minimum setback distance of 10 feet from any home foundation or septic system. If your yard has a basement, increase this setback to 20 feet to prevent lateral water migration from seeping into subterranean walls. In addition, always consult local utility lines before digging to avoid damaging underground cables, which can result in fines of up to 1,000 dollars.
- Flat lands: For near-flat yards with less than 2% slope, swales function primarily as shallow basins to collect localized pool water.
- Slopes between 2% and 5%: This is the ideal slope range for traditional swales on contour.
- Slopes over 10%: Use terraces or check dams instead of swales.
Soil drainage testing before you dig
Those slope measurements must be paired with an accurate assessment of soil infiltration rates. Before excavating, you must perform a standard percolation test to determine how quickly your soil absorbs water. Dig a test hole that is 12 inches deep and 12 inches wide, fill it with water, and allow it to drain completely to saturate the surrounding soil. Refill the hole and measure the water level drop hourly over a 6-hour period using a measuring tape.
This infiltration rate directly determines whether your soil is suitable for a swale. An ideal percolation rate is between 0.5 inches and 2 inches per hour. If your soil drains slower than 0.25 inches per hour — typical of heavy clay — the swale will hold water too long, creating anaerobic conditions and killing plant roots. In clay soils, you must amend the basin with coarse organic compost or install a gravel-filled French drain to increase infiltration rates by 50%.
_d8fh19e79c9g0092k8n0Check Soil Moisture Before Digging
Ensure your yard has proper drainage and baseline moisture levels. Monitor soil conditions with our 3-in-1 Moisture Meter.
Shop the Soil MeterCalculating swale sizing for rainfall events
This infiltration rate directly determines the dimensions of your swale trench. To size your swale correctly, you must calculate the volume of runoff generated by a typical 1-inch storm event on your property. For every 1,000 square feet of roof or compacted yard area, a 1-inch rain event generates approximately 623 gallons of runoff. Your swale trench must be large enough to hold this volume of water while it infiltrates the soil profile over 24 hours. A standard residential swale is typically 18 inches wide and 12 inches deep, which provides 1.5 square feet of cross-sectional area.
These dimensions can be adjusted based on your local rainfall patterns and drainage needs. Refer to the capacity table below to compare swale dimensions and trench lengths needed for different catchment areas. By matching the swale volume to your specific watershed, you prevent the system from overflowing during heavy storms. If you anticipate extreme storm events exceeding 3 inches of rain in 24 hours, you must include a stabilized rock spillway every 50 feet along the swale to route excess water safely away from plantings.
| Catchment Area (sq ft) | 1-Inch Runoff (gal) | Swale Width (in) | Swale Depth (in) | Trench Length Needed (ft) |
|---|---|---|---|---|
| 500 | 311 | 18 | 12 | 28 |
| 1,000 | 623 | 18 | 12 | 56 |
| 1,500 | 934 | 24 | 12 | 62 |
| 2,000 | 1,246 | 24 | 12 | 83 |
Step-by-step guide to laying out contours
These sizing calculations must be translated onto the actual ground using precise contour lines. Because water always seeks the lowest point, a swale that is off-level by even 1 inch can cause water to pool at one end, leading to erosion and berm failure. To prevent this, you must use an A-frame level or a hose-based water level to mark true level points across your slope. Walk the A-frame across the hill, marking each point with a wooden stake every 5 feet, then connect the stakes to trace your contour path.

Those contour markings serve as the centerline for your excavation project. Before you begin digging, double-check your layout by running a string line between the stakes and verifying level with a line level. If you find any deviation, adjust the stakes by a few inches until the bubble remains centered. Taking this extra 30 minutes during layout ensures that your swale will distribute water 100% evenly along its entire length, preventing localized flooding.
- Walk the A-frame across the slope.
- Pivoting on one leg, move the other until the plumb bob is centered.
- Mark the level point with a wooden stake.
- Repeat this process across the entire width of your yard.
Excavating the basin and building the berm
This contour line marks the path where excavation will occur. Begin by digging a trench that is 18 inches wide and 12 inches deep along the marked centerline, throwing the excavated soil on the downhill side to form the berm. Ensure the bottom of the trench is kept 100% flat and level by checking it with a hand level every 3 feet. The downhill berm should be shaped with gently sloping sides at a 3:1 ratio to prevent the soil from slumping back into the basin.
Digging the infiltration trench
Excavate the trench with flat vertical walls and a smooth bottom. Remove any rocks larger than 3 inches that could puncture the soil profile.
Shaping the downhill berm
That downhill berm must be compacted gently to create a stable planting bed. Walk along the berm to compress the loose soil, which reduces settling by 20% over the first year. The final berm should stand approximately 8 inches to 12 inches high with a broad, rounded top. To prevent erosion during the first rain event, cover the basin and berm with a 3-inch layer of organic wood chips or straw mulch. This mulch layer retains 60% more moisture and prevents the soil from crusting over.
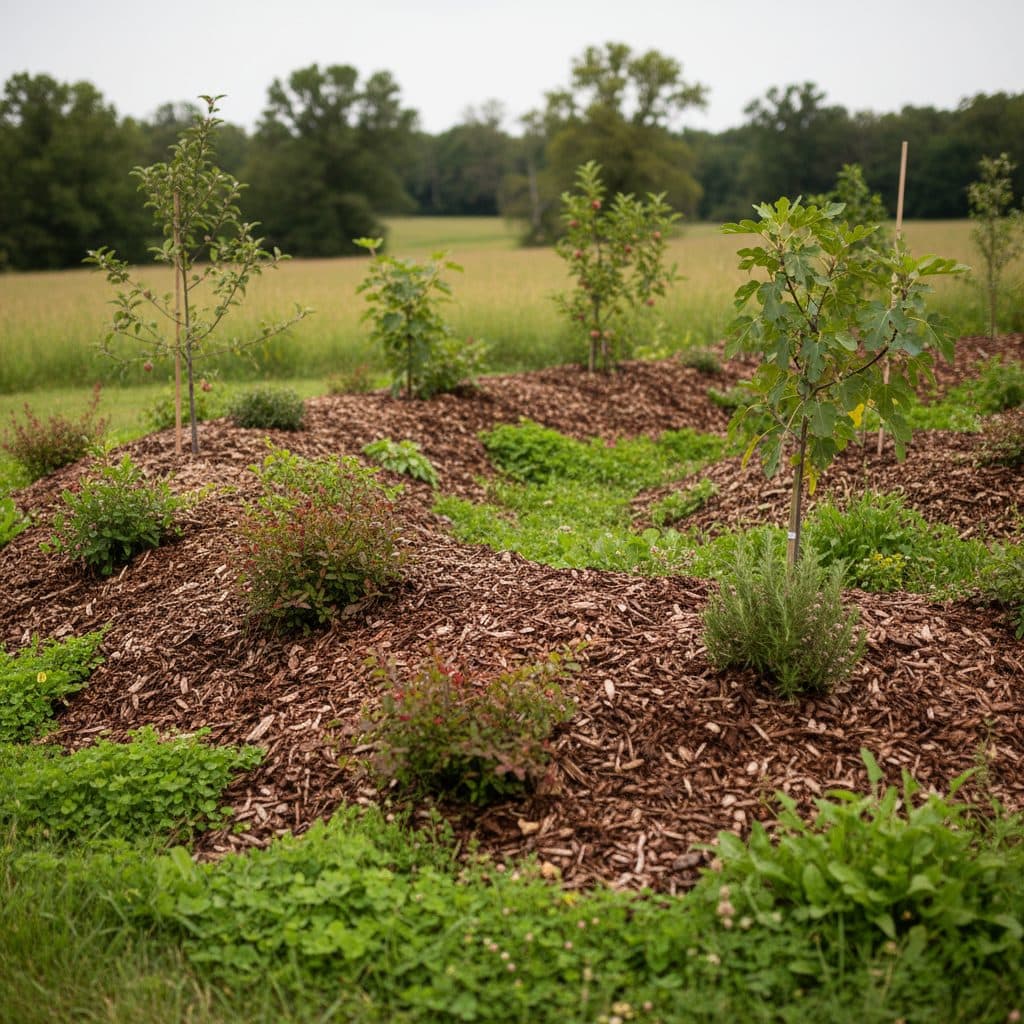
Planting the downslope berm for stability
Those loose earthen mounds require immediate vegetative stabilization to prevent erosion. Because the berm is made of loose soil and holds stored moisture, it is the perfect place to plant a diverse polyculture of fruit trees, berry shrubs, and native ground covers. You should plant your trees on the upper third of the downslope berm, which allows their roots to access the water plume without waterlogging the trunk. Space your trees according to their mature canopy size, typically 10 to 15 feet apart for semi-dwarf varieties.

Selecting deep-rooting plants
Choose perennial species with extensive root systems to anchor the soil. These roots act as biological netting, holding the berm together.
Using ground cover for erosion control
These plants must be selected to match your local climate and USDA hardiness zone. For example, in USDA zones 5 through 8, a mix of apple trees, comfrey, and clover works well to stabilize the berm. Comfrey acts as a dynamic accumulator, sending roots down 6 feet to pump up minerals, while clover fixes nitrogen at a rate of 100 pounds per acre annually. To ensure a 95% survival rate, plant these species immediately after building the earthworks and apply a gentle watering using hand tools.
- Fruit trees: Plant apples, pears, or peaches on the upper third of the berm.
- Berry shrubs: Plant blueberries or blackberries on the mid-berm slope.
- Ground covers: Sow clover and comfrey to cover the soil.
Essential Tools for Swale Planting
Plant your swale berm with precision. Use our complete Garden Hand-Tool Set containing a trowel, rake, cultivator, and weeder.
Shop the Hand-Tool SetLong-term maintenance and sediment control
These planted systems will evolve over time, requiring regular maintenance to function. You must inspect your swales twice a year — once in spring and once in autumn — to clear out accumulated sediment and leaf litter. If sediment builds up to a depth of more than 2 inches, it reduces the trench capacity by 30%, increasing the risk of overflows. Use a garden shovel to scoop out the silt and place it back on the downslope berm to recycle the nutrients.

That maintenance schedule includes checking the rock-stabilized spillway for blockage. During intense storms exceeding 2 inches of rain in 24 hours, the spillway acts as a safety valve to release excess water without washing away the berm. Ensure that no large branches or debris block this path, which should remain 100% clear. In addition, monitor soil moisture levels along the berm to track infiltration rates over time, ensuring your plants receive consistent hydration. You can also integrate this system with a gravity-fed drip irrigation design to water other sections of your garden.

Water in Your New Swale Plants
Gently irrigate young seedlings on the swale berm with our Delixi Electric Garden Sprayer, available in 3, 5, or 8-liter sizes.
Shop the Electric SprayerConclusion
This rainwater harvesting strategy turns yards into productive sponges. By slowing, spreading, and soaking stormwater runoff, you can capture up to 85% of rainfall on-site, reducing your outdoor water bill by 40% annually. These simple, low-tech earthworks create a permanent reservoir of soil moisture that supports perennial crops and builds resilient backyard ecosystems. With a few hours of design work and basic hand tools, you can transform your landscape into a self-watering food forest that thrives for years to come.
Frequently asked questions
Can I build a swale on a slope steeper than 10 percent?
Passive earthworks like swales are not recommended for slopes exceeding 10 percent. On slopes this steep, water can build high velocity and saturate the soil profile, which increases the risk of slope failure and landslides.
How far should my swale be from my home foundation?
You must maintain a minimum setback distance of 10 feet from any building foundation or septic drain field. This safety margin prevents water from pooling and seeping into basement walls or disrupting septic system performance.
How long should water stay in the swale trench after a storm?
Water should fully infiltrate into the ground within 24 to 36 hours. To prevent mosquito breeding cycles, standing water must not remain in the swale basin for longer than 72 hours under any circumstances.
What tools do I need to plant on the swale berm?
You can plant the berm using standard tools like a trowel, cultivator, and rake from a standard garden tool set. These tools are ideal for shaping the soil and planting native grasses, ground covers, and trees.
Do swales require regular maintenance?
Yes, swales require yearly maintenance to clear accumulated sediment and debris. You should inspect the earthworks after any storm event exceeding 2 inches of rainfall to ensure the spillway is clear.
References
- University of Arizona Cooperative Extension. Rainwater Collection: Passive Water Harvesting (AZ1564)
- Colorado State University Extension. Rainwater Collection in Colorado (Fact Sheet 6.707)
- NC State Extension. Backyard Rainscaping with Earthworks
- University of Nebraska-Lincoln Extension. Stormwater Management: Rainwater Harvesting in Residential-Scale Landscapes (NebGuide G2148)
- Alabama Cooperative Extension System. A Homeowner’s Guide to Rainwater Harvesting in Alabama