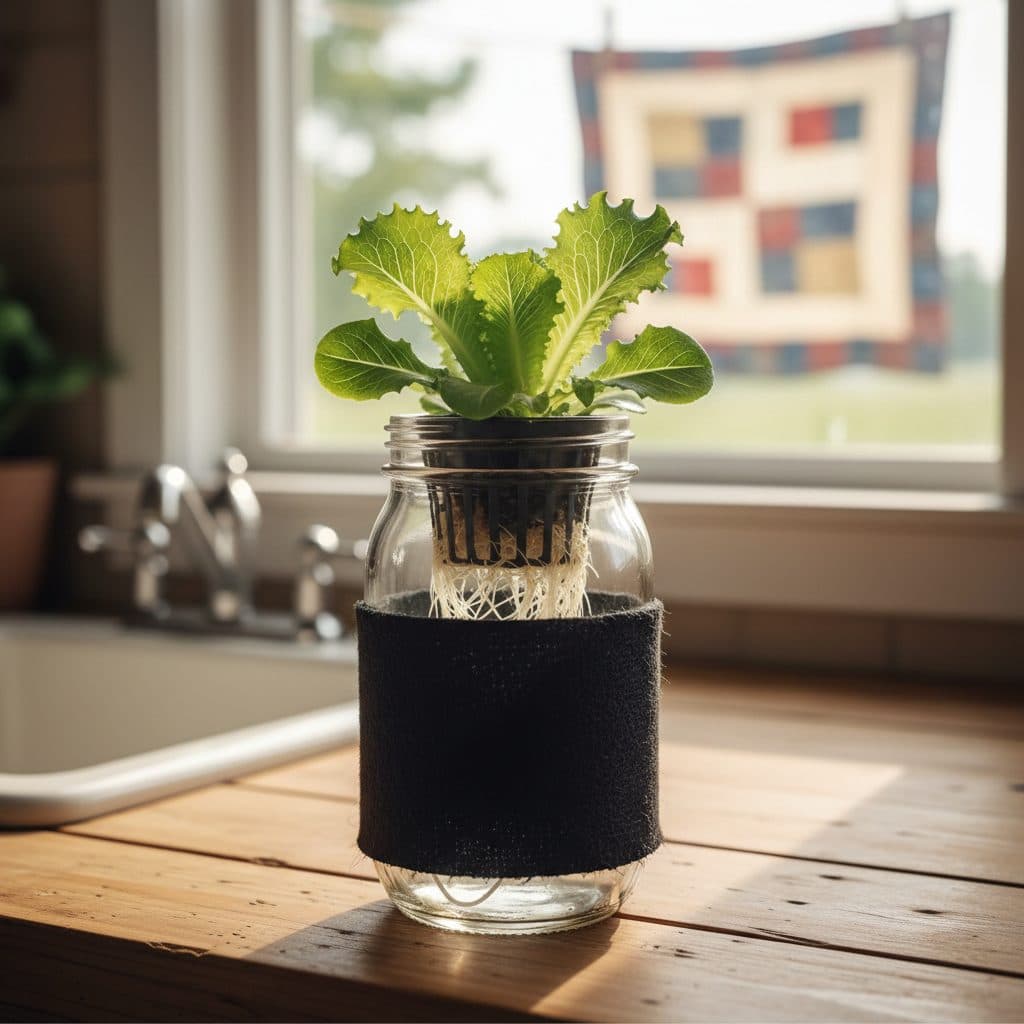
Key takeaways
- The Kratky method is a passive hydroponic system requiring no pumps or electricity, suitable for growing lettuce.
- You can assemble a functional Kratky mason jar setup for less than $20 using common household and garden supplies.
- Proper nutrient solution management, including starting level and EC/pH, is critical for plant health and growth.
- Lettuce varieties like romaine or butterhead can be harvested in 30-45 days from transplant in a Kratky system.
- Blocking light from the nutrient reservoir is essential to prevent algae growth and maintain solution quality.
- This method offers significant water savings, potentially using 90% less water than traditional soil gardening.
Quick answer: You can build a Kratky mason jar hydroponics system for under $20 using readily available materials like mason jars, net pots, growing medium, seeds, and hydroponic nutrient solution. This passive method allows you to grow lettuce without electricity or pumps.
For many Americans, particularly those in urban apartments or arid regions like Arizona, fresh, locally grown produce can be a luxury. Traditional gardening might be limited by space, water availability, or even local soil conditions. But what if you could grow crisp lettuce right on your kitchen counter, using a system that costs less than $20 to build and requires minimal daily attention?
That’s where the Kratky hydroponic method comes in, especially when paired with readily available mason jars. This passive, non-circulating technique lets you cultivate leafy greens with surprising efficiency, often yielding a full head of lettuce in 30 to 45 days. It’s a practical approach for anyone in USDA zone 7 and beyond looking to supplement their diet with homegrown food, saving money at the grocery store while enjoying peak freshness.
Why the Kratky method and why mason jars?
The Kratky method, developed by Dr. Bernard Kratky at the University of Hawaii, is a straightforward, non-circulating hydroponic technique. Unlike other hydroponic systems that rely on pumps and electricity to circulate nutrient solutions, the Kratky method is entirely passive. Plants absorb nutrients from a static reservoir, and as the water level drops, an air gap naturally forms around the roots, providing essential oxygen. This simplicity means no moving parts to fail, no electricity costs, and very little daily maintenance once set up, making it ideal for beginners or those with limited resources. Research from 2009 demonstrated its effectiveness for growing lettuce, requiring minimal intervention after initial setup [2].
the benefits of a passive system
Using mason jars for a Kratky setup offers several distinct advantages. Standard 32-ounce (quart) mason jars are inexpensive and widely available, often costing less than $2 each. Their transparent glass allows for easy monitoring of nutrient solution levels, though you’ll need to cover them to prevent algae. Each jar can support one lettuce plant, providing a convenient modular system. This allows you to stagger plantings (starting a new jar every week or two) to ensure a continuous harvest of fresh greens, rather than having all your lettuce mature at once. This small-scale approach is perfect for a kitchen counter or a sunny windowsill, needing only about a 4-inch square of shelf space per jar, plus room for the leaves to spread.
- No electricity required, saving on utility bills.
- Minimal daily maintenance, freeing up time for other tasks.
- Low initial cost, often under $20 for a complete setup.
- Scalable design, easily add more jars as needed.
- Water-efficient, potentially using 90% less water than soil gardening.
Gathering your materials for under $20
Building your Kratky mason jar system costs very little. Working from the shopping list below, two complete setups come to roughly $19 to $31, depending on what you buy and what you already have on hand.
budget-friendly shopping list
When selecting your nutrient solution, look for a balanced formula designed for leafy greens. Many brands offer ‘grow’ formulas with a higher nitrogen content, ideal for lettuce. For example, a 1-liter bottle of a reputable two-part nutrient solution might cost $15-$20, but a smaller 250ml bottle could be $8-$12 and provide enough for several months of small-scale growing. You’ll also want some aluminum foil or dark spray paint to cover the jars, preventing light from reaching the nutrient solution—this keeps algae from competing with your plant for nutrients. If you’re starting seeds, a small seed-starting tray or even repurposed egg cartons can work. Remember, the key is resourcefulness to keep costs down to your $20 target for two complete setups, allowing you to grow two heads of lettuce simultaneously.
- Two 32-ounce wide-mouth mason jars: $4-$6
- Two 3-inch net pots, sized to rest in a wide-mouth jar rather than drop through: $2-$4
- Rockwool cubes or coco coir pellets (small pack): $3-$5
- Packet of lettuce seeds (e.g., ‘Black Seeded Simpson’): $2-$4
- Hydroponic nutrient solution (small bottle): $8-$12
Step-by-step assembly of your Kratky jar
Assembling your Kratky mason jar system is a straightforward process that takes less than 15 minutes per jar once you have all your materials. First, thoroughly clean your 32-ounce mason jars with soap and water, then rinse them well to remove any residue. Next, prepare your growing medium. If using rockwool, soak the cubes in pH-balanced water (around 5.5-6.5 pH) for at least 30 minutes. For coco coir, hydrate the pellets until they expand. These mediums provide a stable base for your seedlings and allow roots to grow down into the nutrient solution. For a comprehensive look at various DIY hydroponic systems, including the Kratky method, you can visit our article on DIY hydroponic systems.
planting your lettuce seedlings
Once your growing medium is ready, carefully place one lettuce seed into each rockwool cube or coco coir pellet. You can start seeds directly in the net pot or germinate them separately and transplant them once they have two or three true leaves, usually about 2-3 weeks after sowing. A 1976 study on seedling transplant practices found that careful handling avoids unnecessary stress [4]. Fill the mason jar with your prepared hydroponic nutrient solution, following the manufacturer’s instructions for leafy greens. Aim for an Electrical Conductivity (EC) between 1.2 and 1.8 mS/cm and a pH between 5.5 and 6.5 for optimal lettuce growth, as suggested by research on hydroponic lettuce cultivation [1]. The nutrient solution level should reach just the bottom of the net pot, allowing the growing medium to wick up moisture but leaving a small air gap for initial root development. Finally, cover the entire jar with aluminum foil or dark spray paint to block 100% of the light from the solution, preventing algae. Place the net pot with your seedling into the jar’s opening, and position your setup under a grow light or in a sunny window receiving at least 6 hours of direct sunlight.
- Clean mason jars thoroughly with warm, soapy water.
- Soak rockwool cubes in pH 5.5-6.5 water for 30 minutes.
- Place one lettuce seed per growing medium cube.
- Mix hydroponic nutrient solution to 1.2-1.8 EC and 5.5-6.5 pH.
- Fill jar so solution touches the bottom of the net pot.
- Cover the jar completely with foil or dark paint.
Planting, nutrient management, and harvest
Once your Kratky mason jar is assembled, the growing phase begins with minimal intervention. If you started seeds separately, transplant your seedlings when they are about 2-3 inches tall and have 2-3 true leaves. Gently place the rockwool cube or coco coir pellet into the net pot, ensuring the roots dangle into the nutrient solution. The initial nutrient solution level is crucial: it should just touch the bottom of the net pot, allowing the growing medium to wick moisture while creating a small air gap for the roots to breathe. As the plant grows, it will consume the solution, and the water level will naturally drop, increasing the air gap and providing more oxygen to the developing roots—a key feature of the Kratky method, as described in a 1993 publication [3].
optimizing light and nutrients
Lettuce (Lactuca sativa) thrives with adequate light, ideally 12-16 hours per day. If you’re using natural light, a south-facing window in a home in, say, California, might suffice, but a dedicated LED grow light providing 300-400 PPFD (Photosynthetic Photon Flux Density) will ensure faster, more robust growth. You can find suitable grow lights for under $30 online. Monitor your plants for signs of nutrient deficiency, such as yellowing leaves or stunted growth, though with the Kratky method, you generally don’t refill the solution until harvest. The plant is designed to consume the entire reservoir. Most lettuce varieties are ready for harvest in 30-45 days from transplant. You can harvest outer leaves as needed for a continuous supply, or harvest the entire head at once. After harvesting, simply clean the jar, prepare a new seedling, and start a fresh cycle. For more information on growing lettuce, refer to our Lettuce plant guide.
- Transplant seedlings when 2-3 inches tall with 2-3 true leaves.
- Ensure the nutrient solution initially touches the bottom of the net pot.
- Provide 12-16 hours of light daily, aiming for 300-400 PPFD.
- Monitor plants for nutrient deficiency signs like yellowing leaves.
- Harvest outer leaves or the entire head in 30-45 days.
Troubleshooting common issues and expanding your setup
Even with a simple Kratky setup, you might encounter a few common issues. The most frequent problem is algae growth in the nutrient solution. This occurs when light penetrates the reservoir, feeding photosynthetic algae. Algae competes with your lettuce for nutrients and oxygen, potentially starving your plant. The solution is to ensure your mason jar is completely opaque, blocking 100% of light with foil or dark paint. If you see green growth, drain the solution, clean the jar thoroughly, and re-cover it. Another issue can be nutrient deficiencies, often indicated by yellowing or browning leaves. This usually means the nutrient solution was either too weak, or the pH was outside the optimal 5.5-6.5 range, preventing nutrient uptake. Always check your nutrient manufacturer’s recommendations and use a pH testing kit, which costs about $10-$15, to ensure proper balance.
scaling your hydroponic garden
If your initial Kratky mason jar setup proves successful and you want to grow more, expanding is straightforward. You can simply add more jars, staggering your plantings to ensure a continuous supply of fresh lettuce. For a larger yield, consider moving to larger containers, such as 5-gallon buckets, which can support bigger plants or multiple smaller ones. These larger systems still operate on the same passive Kratky principles. If you’re looking to grow indoors year-round, especially in colder climates like Minnesota, investing in a grow tent can significantly improve results by controlling light and humidity. A small grow tent, like the Beylsion Grow Tent, costs under $100 and creates an enclosed environment for better growth. You can explore options like the Beylsion Grow Tent on our shop. Remember to adjust your nutrient solution volume and light intensity proportionally as you scale up your operation, maintaining the 12-16 hours of light per day for best results.
- Algae growth: Ensure 100% light blockage on the reservoir.
- Nutrient deficiencies: Check nutrient concentration and pH (5.5-6.5).
- Stunted growth: Verify adequate light (300-400 PPFD) and temperature (65-75°F).
- Pests: Inspect plants regularly; use organic pest control if necessary.
- Root rot: Often caused by lack of oxygen; ensure proper air gap formation.
Cost Savings: Two Kratky mason jar setups come to roughly $19 to $31 in initial materials, depending on what you already have on hand.
Water Efficiency: The Kratky method can reduce water consumption by up to 90% compared to traditional soil-based gardening, making it ideal for arid regions like the American Southwest.
Rapid Harvest: Lettuce varieties grown in a Kratky system are typically ready for harvest within 30-45 days from transplant, providing quick turnaround.
Frequently asked questions
How often do I need to change the nutrient solution in a Kratky jar?
In a true Kratky system, you generally don’t change or refill the nutrient solution. The plant is designed to consume the entire reservoir over its 30-45 day growth cycle. Once the solution is depleted, you harvest the plant, clean the jar, and start a new cycle with fresh solution.
What kind of lettuce grows best in a Kratky mason jar?
Leafy lettuce varieties like romaine, butterhead, or ‘Black Seeded Simpson’ are excellent choices for Kratky mason jar systems. They typically mature quickly, often within 30-45 days, and have relatively shallow root systems that adapt well to the passive method.
How do I prevent algae from growing in my Kratky jar?
To prevent algae, you must block 100% of light from reaching the nutrient solution. Covering your 32-ounce mason jar completely with aluminum foil, dark spray paint, or a dark fabric sleeve is crucial. Algae competes with your plant for nutrients and can significantly hinder growth.
Can I reuse the nutrient solution after harvesting my lettuce?
No, it is not recommended to reuse the nutrient solution. After a 30-45 day growth cycle, the solution will be depleted of specific nutrients and its pH will have shifted. Starting with fresh solution each cycle ensures your new plant receives the optimal balance of nutrients for robust growth.
What is the ideal temperature range for growing lettuce in this setup?
Lettuce prefers cooler temperatures, ideally between 65°F and 75°F (18°C and 24°C). While it can tolerate slightly warmer conditions, sustained temperatures above 80°F (27°C) can lead to bolting (going to seed) and bitter-tasting leaves, leaving you with a noticeably less palatable harvest.
References
- Hydroponic lettuce cultivated under different electrical conductivities in the Kratky method (2025). Hydroponic lettuce cultivated under different electrical conductivities in the Kratky method.
- THREE NON-CIRCULATING HYDROPONIC METHODS FOR GROWING LETTUCE (2009). THREE NON-CIRCULATING HYDROPONIC METHODS FOR GROWING LETTUCE.
- A Capillary, Noncirculating Hydroponic Method for Leaf and Semi-head Lettuce (1993). A Capillary, Noncirculating Hydroponic Method for Leaf and Semi-head Lettuce.
- Seedling Transplant and Its Effects on Mechanized Greenhouse Lettuce Production (1976). Seedling Transplant and Its Effects on Mechanized Greenhouse Lettuce Production.
- USDA Natural Resources Conservation Service (2024). USDA Natural Resources Conservation Service.