Key takeaways
- Apply a multi-layer elastomeric polymer or polyurethane liquid membrane over clean, crack-free RCC roof slabs.
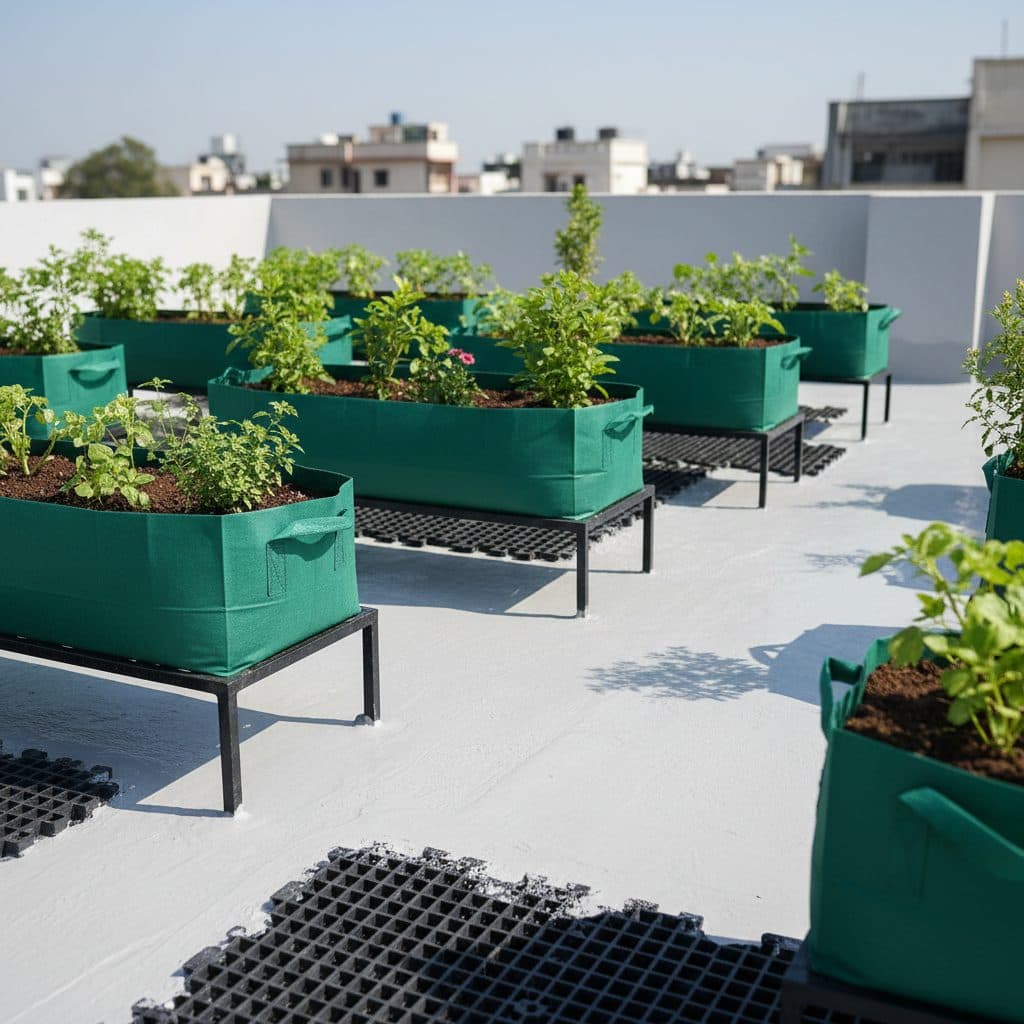
- Elevate all grow bags and pots on interlocking plastic drain cells or PVC stands to prevent moisture entrapment.
- Calculate total saturated wet weight to ensure combined loads stay well below residential slab limits.
- Place heavy fruit trees and large planters directly over structural load-bearing beams and columns.
- Maintain a minimum slope toward roof rainwater outlets and clear drainage weep holes before the monsoon.
Quick answer: Terrace garden waterproofing protects reinforced concrete slabs by applying seamless elastomeric or polyurethane membranes beneath an elevated drainage layer. Gardeners prevent structural damage by keeping wet container weights below slab limits, elevating pots on stands or drain cells, and maintaining unobstructed slope drainage to roof spouts.
The fear of causing roof leaks or structural cracks is the single most common reason homeowners across India hesitate to start a terrace garden. A standard reinforced cement concrete (RCC) roof slab is designed to shed rainwater quickly, but placing hundreds of kilograms of moist soil, standing pots, and continuous irrigation directly onto unprotected concrete can lead to water seepage, damp ceilings, and rusted reinforcement steel.
However, a properly built waterproofing system reduces these risks to a manageable level. When you understand the difference between dead loads and live loads, choose modern liquid waterproofing membranes, and install high-flow drainage cells, you can cultivate a lush garden on your roof with structural confidence.
Whether you are converting an existing concrete terrace with potted grow bags or constructing raised brick planting beds, following sound civil and horticultural practices ensures your building remains bone-dry through the heaviest monsoon seasons.
Does a terrace garden damage the roof slab?
A terrace garden only causes roof damage when two basic civil engineering mistakes occur: standing water accumulation and excessive point loading.
+-------------------------------------------------------------------------------+
|                       SEEPAGE & CRACK FORMATION PATHWAY                       |
|                                                                               |
|   1. Direct Pot Contact  --> Moisture trapped beneath pot base               |
|   2. Fertiliser Salt Runoff--> Chlorides and sulphates leach into open cracks |
|   3. Capillary Suction   --> Water drawn through micro-fractures into slab   |
|   4. Rebar Oxidation     --> Steel reinforcement rusts, expands, and spalls  |
|                                                                               |
|   THE SOLUTION: Multi-layer membrane + 5 cm container elevation + free runoff|
+-------------------------------------------------------------------------------+
Concrete is naturally porous; over time, hairline micro-cracks form due to thermal expansion and contraction under alternating summer heat and winter cooling. When wet pots sit directly on these micro-cracks, moisture acts via capillary action, seeping into the slab.
If the moisture reaches the internal steel rebar, the steel oxidises and expands to up to six times its original volume, cracking the surrounding concrete (a process called spalling). Modern coatings and elevated stands keep water off the structural slab — provided the membrane is inspected each year and recoated at the end of its service life.
Managing rooftop weight and structural slab capacity
Before placing dozens of pots on your roof, evaluate the structural load-bearing capacity of your building.
+-------------------------------------------------------------------------------+
|                       TERRACE LOAD CAPACITY GUIDELINES                        |
|                                                                               |
|   Standard Residential RCC Slab Design:                                       |
|   --> IS 875 (Part 2): accessible flat roof 1.5 kN/m² (~150 kg/m²);           |
|       maintenance-only access 0.75 kN/m² (~75 kg/m²). Check building drawings.|
|                                                                               |
|   Material Weight Comparison (Per 100 Litres Volume Saturated):               |
|   --> Plain Wet Red Soil:       160 to 190 kg (Heavy / Dangerous in bulk)     |
|   --> Saturated Cocopeat Mix:   60 to 75 kg   (Safe / Lightweight)            |
+-------------------------------------------------------------------------------+
+-------------------+-------------------+-------------------+-------------------------------------------+
| Container Type | Volume / Size | Saturated Weight | Best Rooftop Placement Strategy |
+-------------------+-------------------+-------------------+-------------------------------------------+
| Small Grow Bag | 24 x 24 cm (12 L) | 8 to 10 kg | Dispersed anywhere on the slab |
| Medium Grow Bag | 35 x 35 cm (30 L) | 20 to 25 kg | Dispersed along perimeter parapet walls |
| Large Fruit Tub | 45 cm dia x 60 cm | 65 to 75 kg | Positioned DIRECTLY above load beams |
| Brick Raised Bed | 2 m x 1 m x 0.4 m | 900 to 1,100 kg | Over columns/beams only; engineer required|
+-------------------+-------------------+-------------------+-------------------------------------------+A 2 m x 1 m x 0.4 m brick bed holds ~800 L of medium (480-600 kg saturated) plus 400-450 kg of brickwork, totalling 900-1,100 kg (~500 kg/m²). This far exceeds normal terrace live-load allowances and must be assessed by a structural engineer before construction.
Strategic placement rules
- Keep Heavy Planters Over Columns: Always position large containers (such as fruit trees in drums or permanent masonry beds) directly over vertical structural columns or load-bearing beams.
- Never Concentrate Loads in the Centre: Avoid clustering large numbers of heavy containers in the middle span of a slab, where bending moment stress is highest.
- Use Lightweight Growing Media: Never use straight garden soil. Formulate your containers with lightweight organic blends as detailed in our guide on how to make potting mix at home india, which cuts overall rooftop weight by more than half.
Waterproofing membrane options for Indian terraces
When preparing an existing or new rooftop for gardening, select a waterproofing system suited to foot traffic, roots, and continuous moisture.
+-------------------+---------------------------+-------------------+-------------------------------------------+
| System Name       | Material Composition      | Service Life      | Best Application Scenario                 |
+-------------------+---------------------------+-------------------+-------------------------------------------+
| Polyurethane (PU) | Liquid applied elastomeric| 12 to 15 years    | Premium seamless protection; high traffic |
| Acrylic-modified  | Cement slurry with        | 7 to 10 years     | Standard residential terrace slabs        |
| cementitious coat | acrylic / SBR latex       |                   |                                           |
| APP Bitumen Felt  | Torched bitumen membrane  | 8 to 12 years     | Underlayer beneath tiled / paved terraces |
| Cold Bituminous   | Black brush-on emulsion   | 3 to 5 years      | Budget recoating under elevated pot stands|
+-------------------+---------------------------+-------------------+-------------------------------------------+
The polyurethane (PU) and acrylic coating method
- Surface Preparation: Clean the concrete slab thoroughly using a wire brush and pressure washer to remove all dirt, algae, and loose debris. Chip open any cracks, clean them, and seal with non-shrink polymer grout.
- Slope Verification: Ensure the terrace retains a minimum 1:100 slope toward drainage pipes. Water must never pool into stagnant puddles. For site percolation and drainage assessment fundamentals, review our soil drainage percolation test.
- Primer Application: Apply a deep-penetrating primer coat to seal concrete capillaries and create a bonding key.
- Liquid Elastomeric Coats: Apply two to three coats of UV-resistant elastomeric or polyurethane waterproofing compound, embedding a non-woven polyester or fiberglass mesh between coats across corners and joints. Extend the coating 30 cm up the vertical parapet walls (coving) to prevent water intrusion at slab-wall junctions.
The multi-layer rooftop drainage system
For built-in raised beds or high-density terrace setups, install a professional multi-layer drainage profile:
+-------------------------------------------------------------------------------+
|                      MULTI-LAYER TERRACE DRAINAGE PROFILE                     |
|                                                                               |
|   [Vegetation Layer]       --> Herbs, Vegetables, Fruit Bushes                |
|   [Potting Mix Layer]      --> 40% Coir, 40% Compost, 20% Soil                |
|   [Geotextile Filter]      --> Non-woven fabric (retains soil, passes water)  |
|   [Drainage Cells]         --> 30 mm interlocking dimpled plastic tiles       |
|   [Root Barrier]           --> Root-resistant sheet / certified FLL membrane  |
|   [Waterproof Membrane]    --> Elastomeric PU liquid coating (2-3 coats)      |
|   [RCC Structural Slab]    --> Primed concrete sloped to roof drain           |
+-------------------------------------------------------------------------------+- Root Barrier Layer: Liquid-applied PU or acrylic coatings are not root-impenetrable; install a root-resistant sheet certified to FLL standards, lapped, sealed, and turned up parapets.
- Interlocking Drain Cells: 30 mm high modular plastic drainage tiles create a continuous, unobstructed subterranean void that channels thousands of litres of water directly to roof outlets during intense monsoon storms.
- Geotextile Filter Fabric: A non-woven polypropylene geotextile fabric laid over the drain cells allows water to drain freely while stopping soil particles from washing down and clogging roof pipes.
For urban gardeners cultivating in high-heat coastal regions, review city-specific setup requirements in our guide to terrace garden chennai.
Practical maintenance and roof protection habits
- Saucer Trays and PVC Stands: For moveable grow bags, use heavy-duty plastic saucers or elevate pots 5 cm off the floor using PVC pipe stands or wire racks.
- Pre-Monsoon Inspection: Every year before the monsoon arrives, inspect all roof drain spouts, clear leaf debris from downspouts, and inspect parapet joints for hairline cracks.
- No Direct Drilling: Never drill screws, anchor bolts, or trellis supports directly into the waterproofed roof slab. Secure shade netting and vertical trellises to parapet walls or freestanding concrete ballast blocks.
For formulating lightweight, free-draining growing media that protects the roof slab, consult our guide on how to make potting mix at home india.