Key takeaways
- The ‘first flush’ of rain carries the highest concentration of pollutants from roof surfaces, impacting water quality.
- A first-flush diverter isolates the initial flow of rainwater, preventing debris from entering your main storage tanks.
- Simple diverters can be constructed from common materials like PVC pipe, barrels, or even repurposed water heaters.
- Proper sizing is crucial; a diverter should hold at least 5-10 gallons per 1,000 square feet of roof area.
- Regular maintenance, including draining and cleaning, ensures the diverter functions effectively and prevents mosquito breeding.
- Cleaner stored rainwater improves the health of plants in wicking beds and ollas, reducing disease risk.
Quick answer: A first-flush diverter isolates the initial flow of rainwater, which contains the highest concentration of pollutants, preventing debris from entering your main storage tanks and ensuring cleaner water for irrigation.
In many parts of the United States, from the arid Southwest to the humid Southeast, outdoor water use can account for 30% to 70% of a household’s total water consumption, especially during dry spells. Capturing rainwater from your roof is a practical way to supplement irrigation for gardens, wicking beds, and ollas, conserving municipal water and reducing utility bills. For instance, a 1,000 square foot roof can collect approximately 600 gallons of water from just one inch of rainfall, a significant volume that can support a substantial garden plot in USDA zones 6 through 9.
However, the first rain after a dry period washes accumulated dust, leaves, bird droppings, and other debris from your roof surface. This initial flow, known as the ‘first flush,’ carries a high concentration of pollutants that can compromise the quality of your stored water [1]. To ensure your harvested water is as clean as possible for your plants, building a first-flush diverter is an essential step. This device intercepts and diverts the dirtiest water before it reaches your main storage tanks.
Understanding the first flush effect
When rain begins to fall on a dry roof, it acts like a natural cleaning agent, sweeping away everything that has settled on the surface. This initial runoff, often just the first few gallons, contains the highest concentration of particulate matter, dissolved solids, and microbial contaminants [2]. Research on copper roofs, for example, showed that the first flush contained significantly higher levels of copper compared to later runoff, with concentrations dropping by 70% after the initial wash [3]. Without a diverter, all this material ends up in your storage tank, potentially clogging filters, promoting algae growth, and introducing undesirable elements to your garden’s water supply.
the problem with dirty water
Using unfiltered rainwater directly from a roof can introduce a range of issues for your garden. Particulate matter, such as dust and fine grit, can quickly clog the pores of ollas, reducing their passive irrigation efficiency. For wicking beds, sediment can accumulate in the water reservoir, impacting the wicking material’s ability to draw moisture up to plant roots. Furthermore, organic debris like leaves and bird droppings can decompose in your storage tank, leading to anaerobic conditions, foul odors, and the growth of harmful bacteria. A study in 2024 highlighted that the first flush consistently showed elevated levels of turbidity and total suspended solids, underscoring the need for effective diversion [4].
- High pollutant concentration: The first 10% to 20% of runoff carries the majority of contaminants.
- Clogging risks: Sediment and organic matter can block irrigation lines and olla pores.
- Algae and bacterial growth: Nutrients from debris can foster unwanted biological activity in tanks.
- Reduced water quality: Compromised water can negatively affect plant health and soil microbiology.
- Maintenance burden: Cleaning clogged systems or fouled tanks requires significant effort and time.
How a first-flush diverter works
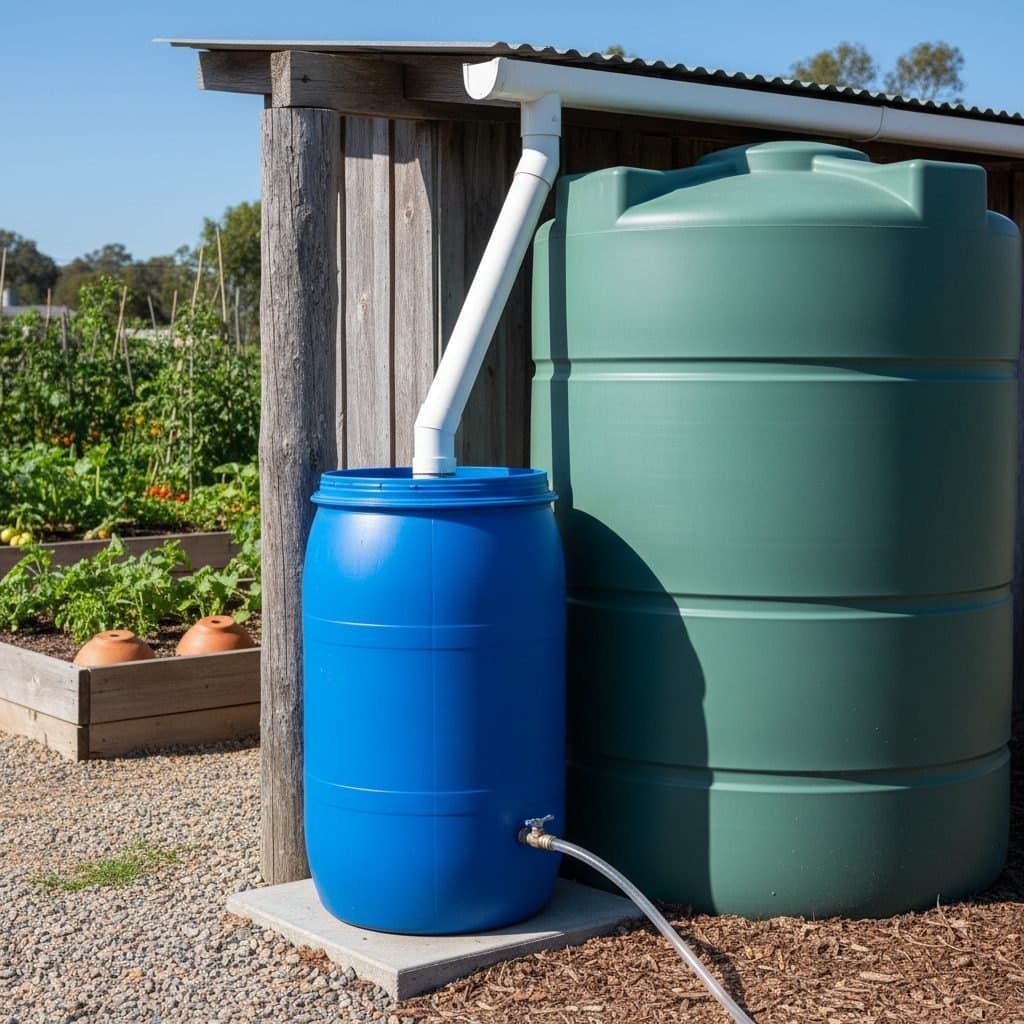
A first-flush diverter operates on a simple principle: it temporarily stores the initial, dirty runoff in a separate chamber before allowing cleaner water to flow into your main storage tank. The most common design involves a vertical section of PVC pipe or a small barrel positioned between your downspout and your primary rainwater collection tank. As rain begins, the water flows into this diverter chamber. Once the chamber is full, the cleaner water that follows is then directed into your main storage. This ensures that the first 5 to 10 gallons per 1,000 square feet of roof area, which contain the bulk of the debris, are captured and isolated.
components of a simple diverter
The core components of a basic first-flush diverter include a collection chamber, an inlet from the downspout, an outlet to the main storage tank, and a drain valve for emptying the captured dirty water. Many designs also incorporate a floating ball or a similar mechanism inside the chamber. This ball floats up with the rising water, eventually sealing the outlet to the main tank once the diverter chamber is full. This prevents the initial dirty water from mixing with the cleaner flow. The design can be adapted for various roof sizes; a 6-inch diameter PVC pipe can hold approximately 1.5 gallons per linear foot, making it suitable for smaller systems, while a 55-gallon barrel might be used for larger roofs exceeding 2,500 square feet.
- Inlet: Connects directly to the downspout, receiving the initial flow.
- Collection Chamber: A vertical pipe or barrel that holds the first flush water.
- Outlet: Directs cleaner water to the main storage tank once the chamber is full.
- Floating Ball (optional but recommended): Seals the outlet to prevent dirty water from entering the main tank.
- Drain Valve: Located at the bottom to empty the collected debris and water after each rain event.
Building a simple barrel diverter
A straightforward and effective first-flush diverter can be constructed using a repurposed 55-gallon plastic barrel, ideal for a roof area of up to 5,000 square feet. This project requires basic plumbing skills and readily available materials. You’ll need the barrel, a section of 4-inch PVC pipe for the downspout extension, a 4-inch PVC elbow, a 2-inch bulkhead fitting, a 2-inch PVC ball valve, and a floating ball (like a plastic Wiffle ball or a specific diverter ball). The total cost for materials typically ranges from $50 to $100, depending on where you source your barrel and fittings. This setup is particularly robust for regions experiencing heavy rainfall, such as the Gulf Coast states, where large volumes of water need to be managed quickly.
step-by-step construction guide
First, select a sturdy, food-grade 55-gallon plastic barrel. Cut a 4-inch hole in the top of the barrel to accommodate the downspout extension. This extension should reach about 6 inches below the barrel’s lid. Next, about 6 inches from the top of the barrel, install the 2-inch bulkhead fitting. This will be your overflow outlet to the main rainwater tank. Attach a short section of 2-inch PVC pipe and the ball valve to this bulkhead fitting. At the very bottom of the barrel, install a 1-inch spigot or ball valve for draining the first flush water. Ensure all connections are watertight using silicone sealant or plumber’s tape. Place your floating ball inside the barrel. When the barrel fills, the ball will rise and block the 2-inch outlet, preventing the initial dirty water from flowing to your main tank. This design is described in detail by many homesteading guides, including those focused on solar water pumps for wells and irrigation, as clean water is vital for pump longevity.
- Gather Materials: One 55-gallon plastic barrel, 4-inch PVC pipe and elbow, 2-inch bulkhead fitting, 2-inch ball valve, 1-inch spigot, floating ball.
- Prepare Barrel: Cut a 4-inch hole in the top for the downspout, and drill holes for the 2-inch and 1-inch fittings.
- Install Fittings: Secure the 2-inch bulkhead fitting near the top, and the 1-inch spigot at the bottom.
- Connect Plumbing: Attach PVC pipe and valves to the fittings, ensuring watertight seals.
- Insert Floating Ball: Place the floating ball inside the barrel before sealing the top.
Sizing and placement considerations
Correctly sizing your first-flush diverter is critical for its effectiveness. The general rule of thumb is to divert between 5 to 10 gallons of water for every 1,000 square feet of roof collection area [1]. For example, a 2,000 square foot roof would require a diverter capacity of 10 to 20 gallons. In areas with particularly dusty conditions or heavy tree cover, such as parts of Arizona or the Pacific Northwest, you might lean towards the higher end of this range, perhaps 15 gallons per 1,000 square feet. An undersized diverter will allow some dirty water into your main tank, while an oversized one wastes clean water. The USDA Natural Resources Conservation Service provides resources on calculating runoff volumes for various roof types and rainfall intensities [6].
optimal diverter location
The best location for your first-flush diverter is directly beneath the downspout, before the water enters your primary storage tank. It should be easily accessible for periodic draining and cleaning. Ensure the diverter is positioned on a stable, level surface to prevent tipping, especially when full of water, which can weigh over 400 pounds for a 55-gallon barrel. Consider the aesthetic impact as well; while functional, a large barrel diverter might be less obtrusive when placed behind a shed or integrated into a garden design. For systems using multiple downspouts feeding a single large tank, each downspout ideally should have its own diverter to ensure maximum pollutant removal efficiency across the entire roof surface. This setup is particularly useful for large agricultural operations in states like Iowa or Nebraska, where significant roof areas are common on barns and outbuildings.
- Calculate Roof Area: Determine the square footage of your roof that contributes to the downspout.
- Determine Capacity: Aim for 5-10 gallons per 1,000 square feet of roof area.
- Consider Local Conditions: Increase capacity for dusty environments or heavy tree cover.
- Placement: Locate directly under the downspout, before the main storage tank.
- Accessibility: Ensure easy access for draining and maintenance.
Maintenance and ongoing use
For your first-flush diverter to remain effective, regular maintenance is essential. After each significant rainfall event, especially during dry seasons, you should drain the diverter. This prevents the collected dirty water from becoming stagnant, which can lead to mosquito breeding, a concern in many US regions, particularly the South. The drain valve at the bottom of the diverter makes this process simple. You can direct this drained water to a non-edible landscape area or a French drain, avoiding direct contact with your garden plants. For instance, in Florida, where mosquito control is a year-round effort, draining diverters promptly after rain is a critical practice.
seasonal cleaning and inspection
Beyond regular draining, a thorough cleaning of the diverter chamber should be performed at least once every three to six months, or more frequently if you notice excessive debris accumulation. This involves completely emptying the chamber, removing the floating ball, and scrubbing the interior walls to eliminate any slime, algae, or accumulated sediment. Inspect all fittings, seals, and the floating ball for wear or damage. Replace any compromised components to maintain watertight integrity and proper function. Consider adding a fine mesh screen over the downspout inlet to catch larger leaves and twigs before they even reach the diverter, reducing the cleaning frequency. This kind of preventative maintenance ensures your rainwater harvesting system provides clean water for years.
- Drain After Each Rain: Empty the diverter after every significant rainfall to prevent stagnation and mosquito breeding.
- Seasonal Cleaning: Perform a thorough interior scrub every three to six months, or as needed.
- Inspect Components: Check fittings, seals, and the floating ball for wear or damage.
- Add Pre-Filter: Install a mesh screen in the downspout to catch larger debris before it enters the diverter.
- Proper Disposal: Direct drained, dirty water away from edible gardens.
Comparison of First Flush Diverter Types
Diverter Type | Capacity Range | Cost Estimate | Complexity | Maintenance Frequency |
|---|---|---|---|---|
Manual Barrel/PVC | 10-100 gallons | $50-$150 | Low | After each rain |
Floating Ball (Integrated) | 5-50 gallons | $100-$300 | Medium | After each rain |
Automatic (Mechanical) | 10-200 gallons | $300-$800+ | High | Monthly/Quarterly |
Water Savings Potential: A 1,500 square foot roof in a region receiving 30 inches of annual rainfall can harvest approximately 28,000 gallons of water per year.
Pollutant Reduction: First flush diverters can remove over 80% of suspended solids and 50% of organic matter from collected rainwater, improving water quality for irrigation [2].
Frequently asked questions
How much water does a first-flush diverter typically hold?
The capacity of a first-flush diverter varies depending on roof size and local conditions, but a common recommendation is 5 to 10 gallons per 1,000 square feet of roof area. For example, a 2,000 square foot roof might require a diverter holding 10 to 20 gallons.
Can I use the diverted water for anything?
The water collected in the first-flush diverter contains the highest concentration of pollutants, so it is generally not recommended for irrigating edible plants. However, it can be safely used for non-edible landscaping, washing tools, or directed to a French drain, preventing waste of up to 50 gallons per rain event for a large roof.
How often should I clean my first-flush diverter?
You should drain the diverter after every significant rainfall event to prevent stagnant water and mosquito breeding. A more thorough internal cleaning, including scrubbing and inspecting components, should be performed every three to six months, especially in areas with high pollen or dust.
What materials are best for building a diverter?
Common and effective materials include PVC pipe (typically 4-inch or 6-inch diameter for smaller systems) or repurposed 55-gallon plastic barrels for larger roofs. These materials are durable, readily available, and relatively inexpensive, with a typical barrel project costing $50 to $100.
Will a first-flush diverter work in cold climates like USDA Zone 4?
Yes, a first-flush diverter can work in cold climates, but it requires winterization. You’ll need to completely drain the diverter and disconnect it from your system before freezing temperatures set in, typically when temperatures consistently drop below 32°F, to prevent ice damage to the pipes and valves.
References
- The application of improved flow diverter for first flush management (2010). The application of improved flow diverter for first flush management.
- Optimizing first flush diverter for urban stormwater pollution load reduction by most efficiently utilizing first flush phenomena (2023). Optimizing first flush diverter for urban stormwater pollution load reduction by most efficiently utilizing first flush phenomena.
- A field study on the first flush effect of copper roof runoff (2010). A field study on the first flush effect of copper roof runoff.
- Water Quality and the First-Flush Effect in Roof-Based Rainwater Harvesting, Part II: First Flush (2024). Water Quality and the First-Flush Effect in Roof-Based Rainwater Harvesting, Part II: First Flush.
- flush (with the roof) (2014). flush (with the roof).
- USDA Natural Resources Conservation Service (2024). USDA Natural Resources Conservation Service.