Key takeaways
- Hoop houses provide passive temperature buffering and wind protection at a fraction of the cost of permanent glazed greenhouses.
- Select framing materials based on climate demands: electrical conduit for heavy snow loads, PVC for lightweight tunnels, and cattle panels for rigid high tunnels.
- Cover the structure with 6 mil (0.15 mm) UV-stabilized greenhouse polyethylene film rather than non-stabilized hardware plastic.
- Install roll-up sidewalls or end-wall vents to release excess heat and prevent high humidity during sunny midday periods.
- Anchor ground posts securely using steel rebar, ground sleeves, or earth augers to resist high wind uplift.
Quick answer: A DIY hoop house consists of flexible framing ribs—such as PVC pipes, metal electrical conduit, or curved cattle panels—anchored over ground posts and covered with UV-stabilized greenhouse plastic. It extends the growing season by moderating temperature extremes, protecting crops from wind and hail, and capturing passive solar heat.
Unpredictable weather, early frosts, heavy rainstorms, and intense seasonal winds challenge growers worldwide. Building a diy hoop house offers an accessible, affordable method to take control of your garden microclimate. Unlike permanent glass greenhouses that require concrete foundations and high material budgets, hoop houses use simple arched ribs covered in greenhouse-grade plastic film to create a protected growing space.
Whether you need a low tunnel to protect tender spring salad greens from late frosts, or a walk-in caterpillar tunnel to shelter warm-season fruiting vegetables, the underlying engineering principles remain the same. A well-built hoop structure captures ambient solar radiation, moderates soil temperature swings, and shelters foliage from driving rain and mechanical wind damage.
By understanding material selection, framing geometry, plastic attachment methods, and ventilation management, you can construct a resilient hoop house tailored to your local climate and growing scale.
Hoop house vs greenhouse: key differences in cost and function
Before purchasing materials, growers should understand how a hoop house differs from a traditional greenhouse in function and construction:
- Structure and foundation: Greenhouses use rigid frames made of heavy aluminum, steel, or timber set onto permanent concrete footings or timber ground beams. Hoop houses use flexible tubular ribs or curved wire panels anchored directly into native soil via rebar or metal pipe sleeves.
- Glazing materials: Traditional greenhouses feature rigid glass or multi-wall polycarbonate panels. Hoop houses rely on flexible 6 mil (0.15 mm) UV-resistant polyethylene plastic film, shade cloth, or spun-bond frost fabric.
- Thermal performance: Permanent greenhouses often incorporate active supplemental heating, thermal curtains, and powered exhaust fans. Hoop houses operate passively, relying on solar gain, soil thermal mass, and manual or passive ventilation.
- Cost and portability: A DIY hoop house costs a small fraction of a comparable glazed greenhouse, mainly because it needs no foundation, no rigid glazing and no fixed services — but the exact saving depends on size, materials and local prices. Furthermore, hoop houses can be disassembled or shifted to new garden beds to support crop rotation.
Reviewing greenhouse styles and builds can help you decide whether your space warrants a permanent outbuilding or a modular hoop structure.
+-------------------------------------------------------------+
|             ANATOMY OF A CATERPILLAR HOOP HOUSE             |
|                                                             |
|                    Ridge Purlin (EMT Conduit)               |
|                           ======                            |
|                     . - '   |    ' - .                      |
|                 . '         |          ' .                  |
|    Hoop Rib   /             |              \   UV Poly Film |
|    (PVC/EMT) /              |               \  Covering     |
|             |               |                |              |
|             |   Garden Bed  |   Garden Bed   |              |
|             |   [Raised]    |   [Raised]     |              |
|  Ground     +---------------+----------------+   Ground     |
|  Level =====|================================|====== Level  |
|             |                                |              |
|             | Rebar Stake        Rebar Stake |              |
+-------------------------------------------------------------+
Comparing popular DIY hoop house plans and designs
Growers can choose from three main structural designs based on available tools, budget, and local weather intensity:
1. Low tunnel garden systems
Low tunnels are compact structures standing 60 cm to 90 cm (2 ft to 3 ft) tall, designed to cover individual garden beds. They use heavy galvanized wire (9-gauge) or 13 mm (0.5 in) flexible PVC conduit bent over the bed at 1.2 m (4 ft) intervals. Low tunnels are ideal for extending early spring and late autumn harvests of brassicas, carrots, and salad greens.
2. Cattle panel hoop house structures
Cattle panel houses use heavy-gauge welded steel livestock panels, typically measuring 1.2 m by 4.8 m (4 ft by 16 ft). By securing the panel ends inside a rigid rectangular wooden baseboard measuring 2.1 m to 2.4 m (7 ft to 8 ft) wide, the panel arches into a self-supporting Gothic or round hoop. Cattle panel structures offer superior rigidity, withstand moderate snow loads without bending, and provide a convenient trellis for vining crops.
3. Caterpillar tunnel and PVC hoop house models
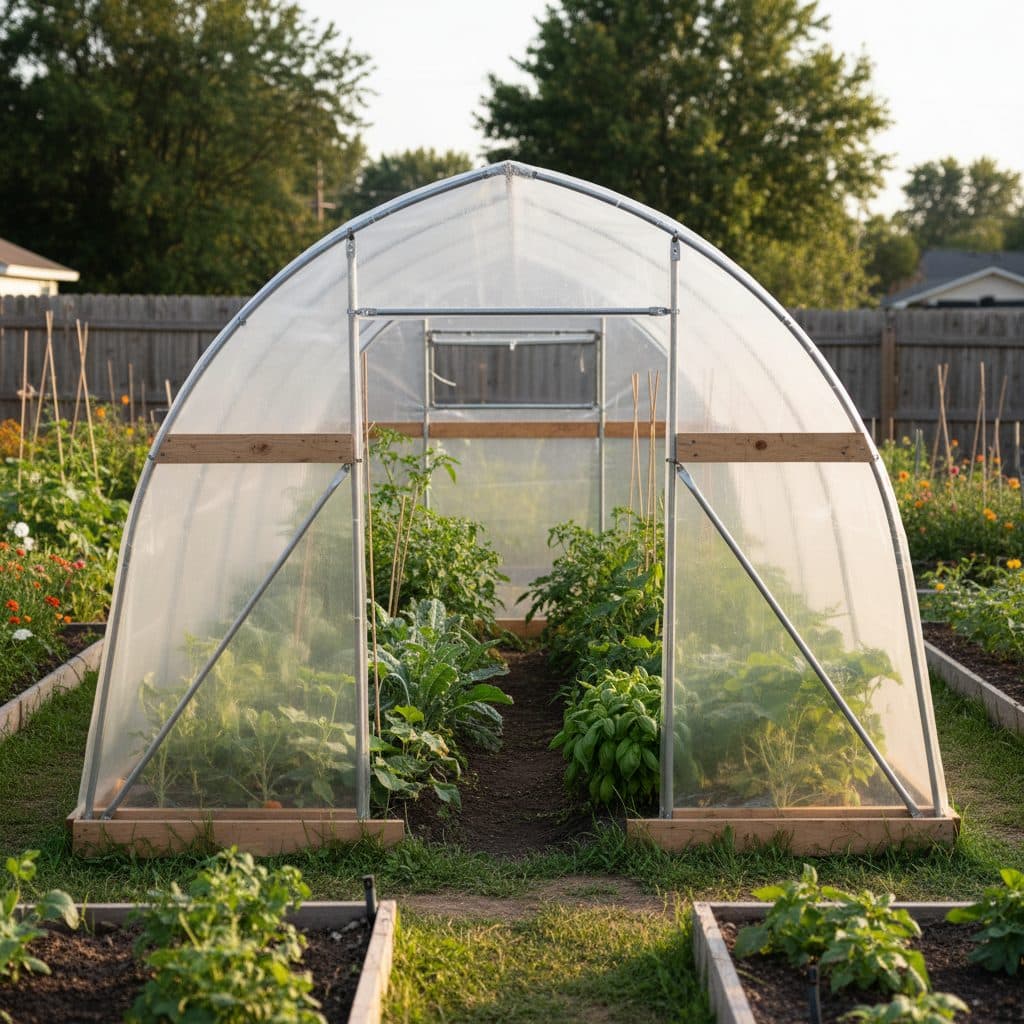
Caterpillar tunnels are walk-in hoop houses constructed from 25 mm (1 in) schedule 40 PVC pipe or 20 mm (0.75 in) galvanized EMT electrical conduit. Ribs are spaced every 1.2 m to 1.5 m (4 ft to 5 ft) along the length of the tunnel. A continuous center ridge purlin runs along the peak, connecting all hoops together. External batten strapping or crisscrossed cord cinches the plastic cover tightly against the ribs.
Step-by-step construction of a basic caterpillar hoop house
Building a 3 m wide by 6 m long (10 ft by 20 ft) walk-in caterpillar tunnel requires straightforward carpentry and assembly skills:
- Layout and ground stakes: Clear and level the site over your raised bed gardening plots. Drive 60 cm (24 in) lengths of 13 mm (0.5 in) steel rebar into the ground at 1.2 m (4 ft) intervals along two parallel lines 3 m (10 ft) apart, leaving 25 cm (10 in) of rebar exposed above the surface.
- Bending and setting ribs: Slide the ends of 6 m (20 ft) lengths of PVC pipe or bent metal conduit over the opposing rebar stakes to create the arched ribs.
- Installing the ridge purlin: Clamp a continuous length of metal conduit along the top center underside of all the arched ribs using pipe clamps or heavy zip ties. This ridge purlin prevents individual hoops from swaying or collapsing under wind.
- Attaching the greenhouse film: Pull a sheet of 6 mil (0.15 mm) UV-stabilized greenhouse polyethylene film over the frame on a calm, windless day. Ensure equal overhang on all sides.
- Securing the cover with batten straps: Anchor high-strength nylon batten tape or polyester rope at the base of each hoop, passing it over the plastic to the opposite side in a zigzag pattern. Tightening these straps locks the plastic securely against the frame.
Managing ventilation, humidity, and temperature swings
Even in cool weather, bright sunshine can heat an enclosed hoop house to dangerous temperatures within an hour. High humidity also encourages powdery mildew, botrytis, and damping-off fungal pathogens.
To regulate temperatures passively:
- Roll-up sidewalls: Install a continuous pipe along the lower edge of the plastic covering so you can roll the sides up to hip height during sunny afternoons, allowing cross-ventilation.
- End-wall doors and louvers: Construct framed end-walls with hinged doors or mesh-screened louvers to exhaust hot air collecting at the peak.
- Thermal mass water barrels: Place dark 200-litre (55-gallon) water containers along the shaded interior wall — the north wall in the Southern Hemisphere, the south wall in the Northern Hemisphere — where they will not shade the beds. Water absorbs excess solar heat during the day and gently radiates warmth back into the structure overnight.
Techniques from greenhouse climate control without electricity explain how to stabilize interior temperatures naturally. Use drip irrigation system design inside the tunnel to deliver water directly to plant roots without wetting foliage or inflating air humidity, and monitor bed moisture with soil moisture finger test meters.
+-------------------------------------------------------------+
|              VENTILATION AND AIRFLOW DYNAMICS               |
|                                                             |
|                 Hot Air Exhausts Through Peak               |
|                           ^   ^   ^                         |
|                          /         \                        |
|   Cool Air Enters       /           \       Cool Air Enters|
|   ===> (Rolled Wall)   |             |   (Rolled Wall) <=== |
|                        |  Plant Bed  |                      |
+-------------------------------------------------------------+
Anchoring against heavy wind and snow loads
Wind uplift is the primary cause of hoop house failure. In strong gales, air flowing over the curved roof creates aerodynamic lift, pulling unsecured ground posts out of the earth.
To secure your structure:
- Earth anchors: Screw helical steel earth anchors 60 cm to 90 cm (24 in to 36 in) into the ground at all four corners and attach them to the end hoops with high-tensile turnbuckles.
- Burying plastic edges: In high-wind areas, dig a 15 cm (6 in) trench along both sides of the tunnel, place the bottom edge of the plastic into the trench, and backfill with compacted soil.
- Snow management: In areas prone to wet snow, maintain a steep Gothic arch profile so snow slides off the roof, and place temporary vertical 50 mm by 100 mm (2 in by 4 in) center support posts under the ridge purlin before winter storms.
Regional climate adaptations for hoop house gardening
Growing strategies within hoop structures must adapt to local seasonal challenges:
In cool temperate climates:
Use hoop houses to extend the shoulder seasons, starting seed trays 4 to 6 weeks earlier in spring and maintaining hardy greens well into winter. During freezing periods, add an inner layer of floating row cover directly over the crops inside the hoop house. Depending on fabric weight this typically adds about 1°C to 4°C (2°F to 7°F) of frost protection — heavier fabrics give more, at the cost of light transmission.
In subtropical and tropical climates:
Replace clear polyethylene film with 30% to 50% shade cloth and insect-exclusion netting during hot, wet seasons. This protects tender vegetables from torrential monsoon rain, scorching solar radiation, and aggressive insect pests while maintaining continuous airflow.