Key takeaways
- A cold frame can add six to eight weeks to the growing season in USDA zones 5 and 6.
- Salvaged materials like old windows and lumber can build a functional cold frame for less than $50.
- Proper solar orientation, typically facing south at a 15-30 degree angle, maximizes heat gain.
- Thermal mass, such as 5-gallon water jugs, helps stabilize internal temperatures by 10-15°F overnight.
- Ventilation is critical; for winter greens start venting in the mid-40s°F and open wider as the interior climbs past 60°F.
- Cold frames buy roughly one hardiness zone of protection: a few degrees on a still night for a simple frame, more with weather stripping, thermal mass and an inner row cover.
Quick answer: A DIY cold frame is a low-cost, unheated structure with a transparent lid that uses passive solar gain to extend your growing season by creating a warmer microclimate for plants. You can build one for under $50 using salvaged materials like old windows and lumber, orienting it south at a 15-30 degree angle.
In the high desert of Eastern Oregon, where winter temperatures can drop to 0°F and below, extending the growing season feels like a constant battle against the elements. Many growers in USDA zone 6 and colder regions face similar challenges, with short frost-free periods limiting fresh produce to just a few months each year. However, a simple, low-cost solution exists that can add 6 to 8 weeks to your growing calendar: the DIY cold frame.
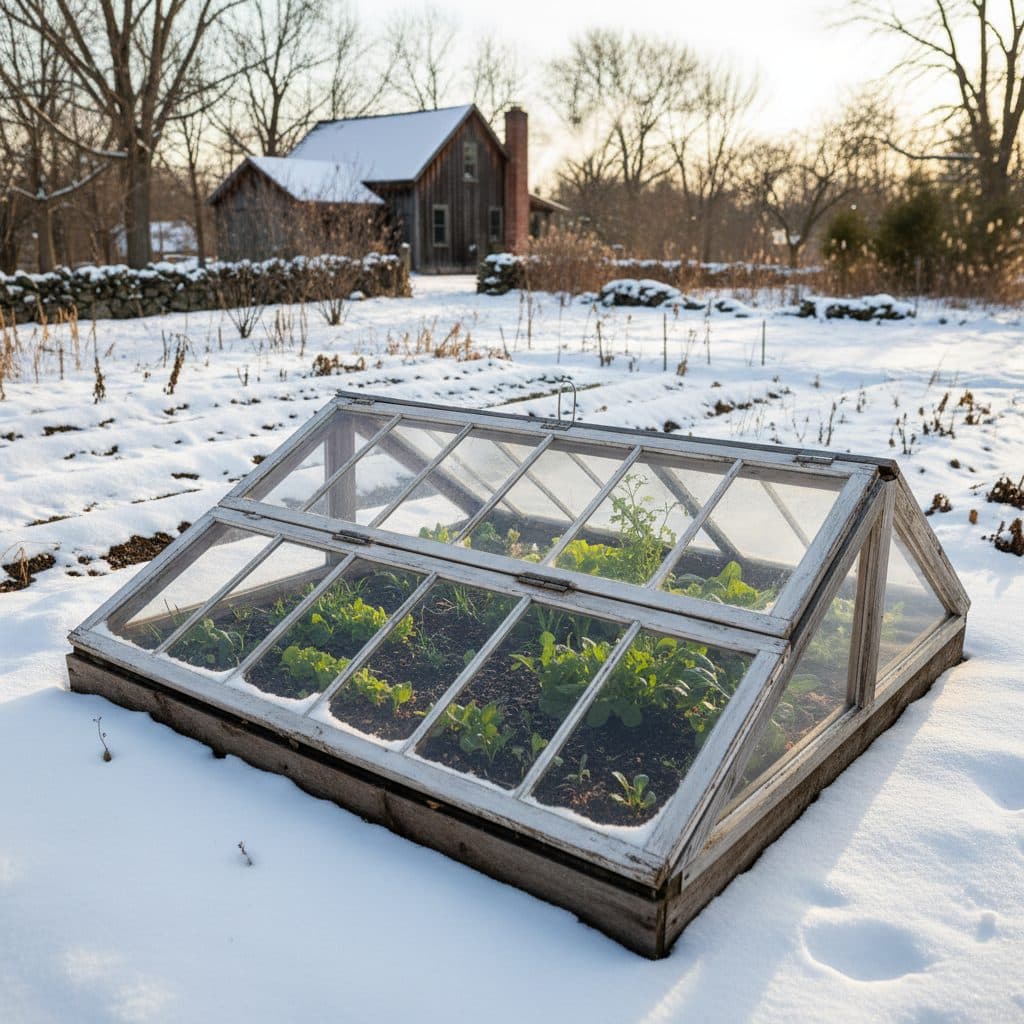
A cold frame is essentially a bottomless box with a transparent lid, designed to capture solar energy and protect plants from harsh weather. It’s a fundamental tool for off-grid homesteaders and backyard gardeners alike, allowing for early spring starts, late fall harvests, and even some winter greens. With readily available materials and basic carpentry skills, you can construct a highly effective cold frame for under $50, significantly boosting your food self-sufficiency.
What is a cold frame and why build one?
A cold frame is a miniature greenhouse, typically low to the ground and unheated, that relies on passive solar gain to create a warmer microclimate for plants. It’s an essential tool for season extension, particularly in regions like the upper Midwest or New England, where the growing season might only be 120-150 days. By building a cold frame, you can start seeds 4-6 weeks earlier in spring, harden off seedlings before transplanting, and continue harvesting cold-hardy crops well into late autumn or even winter.
Extending your harvest window
The primary benefit of a cold frame is its ability to elevate internal temperatures by 10-20°F above ambient conditions, even on cloudy days. This allows crops such as spinach, lettuce, kale, and radishes to thrive when outdoor temperatures hover between 20°F and 40°F. For example, in USDA zone 5, a cold frame can enable harvesting of fresh greens through December and resuming in late February, effectively adding two months to the typical growing year. This simple structure offers significant protection from frost, extends the harvest period substantially, and provides a sheltered environment for young plants, making it a valuable addition to any homestead.
- Start seeds 4-6 weeks earlier than direct sowing.
- Protect tender seedlings from late spring frosts below 30°F.
- Harvest cold-hardy greens through winter in many zones.
- Extend the life of fall crops by 6-8 weeks.
- Harden off transplants before moving them to the garden.
Choosing your materials and site
Building a cold frame doesn’t require expensive materials. Many homesteaders construct theirs from salvaged items, keeping costs below $50. The most common materials include old windows for the lid, and scrap lumber (like 2x6s or 2x8s) or even concrete blocks for the frame. Two cautions on salvage, because you will be eating what grows inside. Windows from houses built before 1978 are likely to carry lead paint, so pass on any sash with flaking or chalking paint. Lumber treated before 2004 may be CCA-treated and can leach arsenic into soil, so assume any weathered, green-tinged salvaged timber is CCA and keep it out of a food-growing frame. If you want rot resistance, use naturally durable untreated cedar or larch, a concrete or block foundation, or line modern copper-treated lumber with heavy plastic so it never contacts the growing soil. In colder areas, a stable base matters more: a frame set on ground that heaves will rack out of square and lose the seal between lid and frame.
Site selection and orientation
The success of your cold frame hinges on its location. Choose a spot that receives full sun for at least 6-8 hours daily during the winter months. A south-facing exposure is ideal, with the lid angled between 15 and 30 degrees to maximize solar gain, particularly at lower sun angles in December. Good drainage is also important; avoid low-lying areas where water might collect, as excessive moisture can lead to plant diseases. Consider placing your cold frame against a south-facing wall of a building or a fence, which can provide additional wind protection and reflected heat, lifting daytime temperatures inside the frame. This placement increases solar absorption, provides shelter from prevailing winds, and prevents standing water around the frame.
- Select a south-facing site with 6-8 hours of winter sun.
- Angle the lid 15-30 degrees for maximum solar gain.
- Ensure good drainage to prevent waterlogging.
- Consider placing it against a building for added protection and heat reflection.
- Measure your available space to determine ideal cold frame dimensions.
Step-by-step construction guide
Once you’ve gathered your materials and selected your site, construction is straightforward. For a standard cold frame measuring 3 ft by 6 ft, you’ll need two side pieces of lumber cut to 3 ft, and two longer pieces cut to 6 ft. The back piece should be taller than the front piece to create the necessary slope for the lid. Be careful with the arithmetic here: over a 3 ft front-to-back depth, a 4 in difference gives only about 6 degrees — far short of the 15 to 30 degrees this design calls for. You need roughly 10 in of rise for 15 degrees, or about 21 in for 30 degrees, over that same 3 ft. An 18 in high back with an 8 in high front lands at about 15 degrees. Assemble the box using 3 in deck screws, ensuring all corners are square. For added stability, especially in windy areas, you can anchor the frame to the ground with rebar stakes driven 18 in deep at each corner.
Building the lid and adding thermal mass
The lid is often the most critical component, as it provides the solar collection and insulation. If using an old window, ensure it fits snugly over your frame with minimal gaps. Attach two sturdy hinges to the back of the frame and the window, allowing it to open easily for ventilation. For improved insulation, consider adding weather stripping around the edges of the lid. Inside the cold frame, incorporate thermal mass elements like painted black 5-gallon water jugs or dark rocks. These absorb solar heat during the day and slowly release it overnight, helping to maintain internal temperatures 10-15°F warmer than the outside air, which is particularly beneficial when nighttime lows drop to 25°F. This addition buffers nighttime temperatures and slows heat loss around sensitive plants. For more advanced passive solar designs, see our guide on four-season greenhouse design.
- Cut lumber to size for the frame, ensuring a sloped design.
- Assemble the frame securely with 3 in deck screws.
- Attach the transparent lid with heavy-duty hinges.
- Add thermal mass like black water jugs inside.
- Seal any gaps with weather stripping for better insulation.
Managing your cold frame for optimal growth
A cold frame requires regular ventilation. On sunny days, even when ambient temperatures are in the 30s°F, the interior of a cold frame can quickly reach 80-90°F, damaging plants. For the cool-season greens a winter frame holds, start venting once the interior reaches the mid-40s°F and open wider as it climbs past 60°F, then close the lid well before sunset to trap the day’s heat. An automatic vent opener simplifies this task if you are away during the day. The common type is a sealed wax-piston cylinder that expands as it warms and lifts the lid on its own; it needs no power at all, which makes it well suited to off-grid sites.
Watering and plant selection
Watering needs inside a cold frame are generally less frequent than in an open garden due to reduced evaporation. Check the soil moisture every few days and water thoroughly when the top 1-2 inches feel dry. Avoid overhead watering in cold weather, as wet foliage can lead to fungal diseases. For best results, select cold-hardy crops. Spinach, kale, collards, Swiss chard, and various types of lettuce (like ‘Black Seeded Simpson’ or ‘Buttercrunch’) are excellent choices, tolerating temperatures down to 15-20°F. Root crops like carrots and radishes also perform well, with carrots often becoming sweeter after a few frosts. Managing ventilation, watering consistently, and choosing cold-hardy varieties keeps winter greens productive.
- Ventilate daily, propping the lid once the interior reaches the mid-40s°F and opening wider past 60°F.
- Water sparingly, checking soil moisture every 3-5 days.
- Choose cold-hardy crops like spinach, kale, and lettuce.
- Monitor for pests and diseases, which can thrive in enclosed spaces.
- Close the lid completely before nightfall to retain heat.
Integrating with off-grid systems
While a cold frame is inherently passive, there are ways to improve its performance, especially for those living off-grid. Small-scale solar power can be integrated to automate ventilation or provide minimal supplemental heat. A wax-piston vent opener handles overheating with no power at all and should be your first choice. If you also want forced air circulation, a 10-watt solar panel and a small 12V battery (similar to those discussed in solar panels for off-grid living) will run a small fan.
Advanced thermal strategies
For colder climates, like USDA zone 4, where winter temperatures frequently drop below 0°F, additional thermal strategies can be employed. Lining the interior walls of the cold frame with rigid foam insulation (roughly R-5 per inch) cuts conduction through the sides, which are the weakest part of the envelope after the glazing. Building the frame partially into the ground, a technique known as a sunken cold frame, drops the growing bed below the wind and puts it against soil that cools far more slowly than the air. Soil at a few feet down is not at a constant temperature (it still tracks the seasons with a lag of a month or two, and in a zone 4 winter it sits far closer to freezing than to 50°F), but the lag and the wind shelter are both real gains. Combining these approaches protects crops in severe winter cold.
- Fit a wax-piston automatic vent opener, which needs no power at all.
- Use rigid foam insulation (R-5 per inch) on frame walls to reduce heat loss.
- Consider a sunken cold frame to utilize stable ground temperatures.
- Integrate a simple thermostat to control a small fan or vent opener.
- Explore passive solar design principles for maximum efficiency.
Cold frame vs. mini greenhouse
Feature | Cold frame | Mini greenhouse |
|---|---|---|
Cost | $20 – $100 (DIY) | $100 – $500+ |
Size | Small (3×6 ft typical) | Medium (4×6 ft to 6×8 ft typical) |
Portability | Often movable | Usually semi-permanent |
Temperature boost | 10-20°F above ambient | 20-30°F above ambient |
Ventilation | Manual lid propping | Manual or automatic vents |
Primary use | Season extension, hardening off | Seed starting, year-round growing |
Cost Savings: Building a DIY cold frame from salvaged materials can cost as little as $20, compared to purchasing a new one for $150 or more.
Temperature Stability: Incorporating 5-gallon water jugs as thermal mass can stabilize nighttime temperatures by 10-15°F, protecting plants from sudden drops.
Frequently asked questions
What crops can I grow in a cold frame during winter?
You can successfully grow cold-hardy crops like spinach, kale, lettuce, Swiss chard, and radishes. Many varieties can withstand temperatures down to 15°F when protected inside a cold frame, providing fresh greens even in January.
How often do I need to water plants in a cold frame?
Watering frequency is reduced due to lower evaporation rates. Check the soil every 3-5 days, and water thoroughly when the top 1-2 inches of soil feel dry, typically needing water once every 7-10 days in winter.
Can a cold frame protect plants from freezing temperatures?
A cold frame holds the air inside warmer than the air outside: on a still night typically only a few degrees for a simple single-glazed frame, and more with weather stripping, thermal mass and an inner row cover. It buys you roughly one hardiness zone, not immunity. At 0°F outside, an unheated frame will fall well below the 15-20°F that spinach, kale and lettuce tolerate, so in that weather add an inner cover and a thick mulch, or expect losses.
What is the ideal angle for a cold frame lid?
The ideal angle for a cold frame lid is typically between 15 and 30 degrees, facing south. This slope maximizes solar gain during the low-angle winter sun, ensuring optimal heat capture for your plants.
How much does it cost to build a DIY cold frame?
Building a DIY cold frame can be very affordable, often costing less than $50 if you use salvaged materials like old windows and scrap lumber. New materials might bring the cost to $100-$150, still significantly cheaper than commercial options.