Key takeaways
- Chitting seed potatoes encourages stubby green shoots before planting, advancing harvest dates by two to three weeks.
- Start chitting first earlies in late January or February across southern England, shifting to late February or March in northern areas and Scotland.
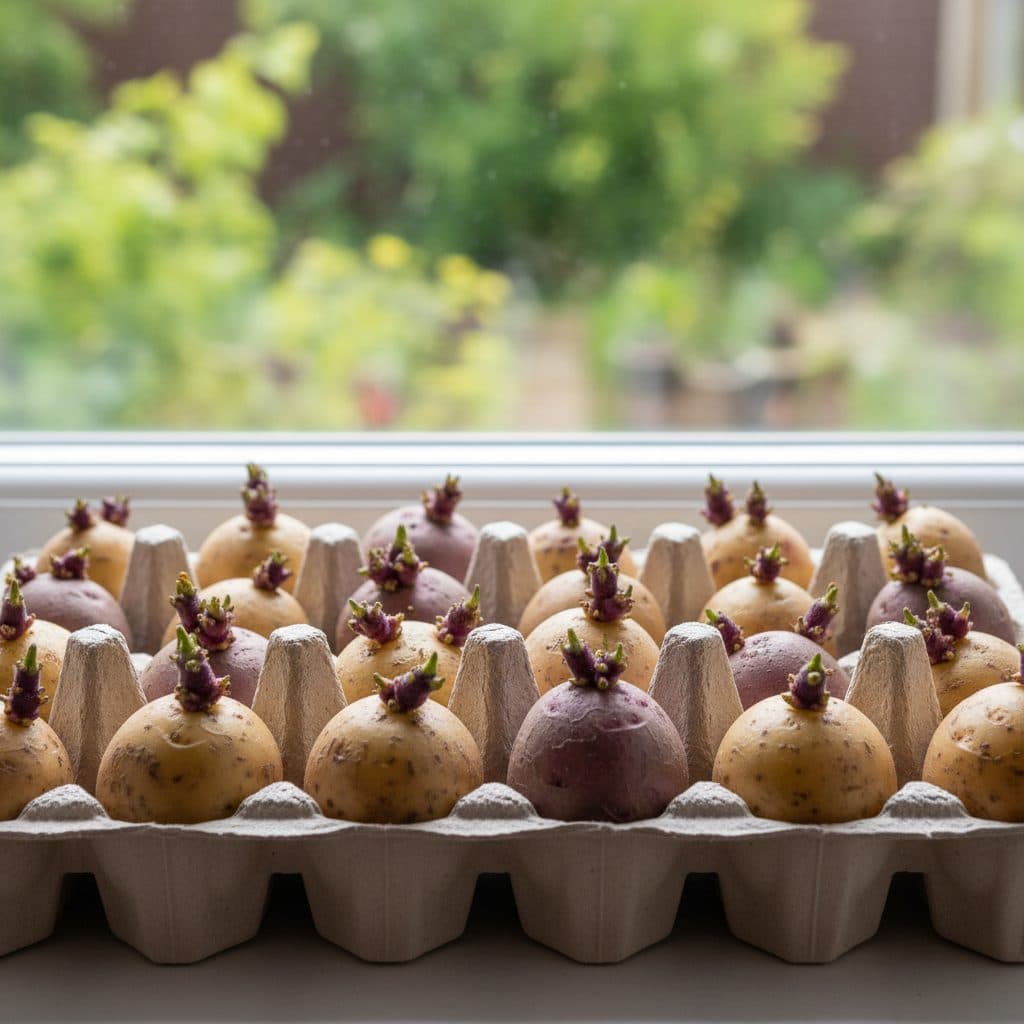
- Place tubers in cardboard egg boxes with the blunt end and highest concentration of eyes facing upward.
- Provide bright, indirect natural light and cool temperatures between 10°C and 15°C to prevent thin, pale, brittle sprouts.
- Rub off excess chits on early cultivars to leave three or four strong shoots for larger individual tubers.
- Plant out carefully once soil warms to at least 7°C, taking care not to snap delicate sprouts during handling.
Quick answer: Chitting potatoes means placing seed tubers in a cool, bright, frost-free location for four to six weeks before planting so they develop short, sturdy shoots. This traditional UK technique gives first and second early potatoes a head start, resulting in faster establishment and earlier summer harvests.
Chitting potatoes is a time-honoured late winter ritual across UK allotments and kitchen gardens. As seed potatoes arrive in garden centres and through mail-order suppliers from January onwards, preparing them properly indoors bridges the gap between winter dormancy and the spring planting season.
While the practice is straightforward, getting the balance of light and temperature right makes the difference between robust, productive plants and fragile, spindly growth. Understanding how sprout development works helps you decide which varieties benefit most from pre-sprouting and how to manage the process reliably on your plot.
The process also provides an opportunity to inspect your seed stock thoroughly before committing bed space, so only vigorous, disease-free tubers enter your soil.
What is chitting and why do it on UK plots?
Chitting is the process of breaking tuber dormancy and encouraging controlled sprout development before planting in the ground. Seed potatoes possess a natural dormant period during which biochemical inhibitors prevent sprout formation. By exposing the tubers to cool temperatures, natural daylight, and moderate humidity, you stimulate the dormant eyes into active growth.
In the UK climate, early spring soil remains cold and wet well into March and April. Planting unsprouted seed potatoes directly into cold, saturated ground often leads to rotting or sluggish root development. Chitted potatoes enter the ground with active green shoots and root initials already formed, enabling rapid emergence as soon as soil conditions improve.
The primary benefit is timing. Chitted first early varieties such as 'Swift', 'Rocket', or 'Duke of York' can mature up to three weeks faster than unchitted tubers. This accelerated development delivers fresh new potatoes in June and frees up valuable bed space for follow-on crops like leeks or winter brassicas. For growers growing potatoes in bags or patio containers, chitting ensures predictable growth in compact volumes of compost.
+-------------------------------------------------------------+
|               SEED POTATO CHITTING ORIENTATION              |
|                                                             |
|          "Rose" End (More eyes / blunt top)                 |
|                   \   |   /                                 |
|                 ( *   *   * )  <-- Sturdy, dark-green chits |
|                (             )                              |
|                (    Tuber    )                              |
|                 (           )                               |
|                  (    *    )                                |
|                   \   |   /                                 |
|          "Heel" End (Narrower stem attachment point)        |
+-------------------------------------------------------------+
When to chit potatoes across UK regions
Timing your chitting depends on your local climate, your soil type, and the specific potato group you are growing. The goal is to produce shoots that are 2 cm to 2.5 cm long precisely when your soil is workable and warming up.
Region | First Earlies Chitting Window | Maincrop Chitting Window | First Earlies Planting | Maincrop Planting |
|---|---|---|---|---|
Southern England & Coast | Late January to mid-February | Mid-February to early March | Mid-to-late March | Mid-to-late April |
Midlands & East Anglia | Early-to-mid February | Late February to mid-March | Late March to early April | Late April to early May |
Northern England & Wales | Mid-to-late February | Early-to-mid March | Early-to-mid April | Late April to mid-May |
Scotland & High Elevations | Late February to early March | Mid-to-late March | Mid-to-late April | Mid-to-late May |
First earlies require four to six weeks of chitting prior to planting out from mid-to-late March in the south through to mid-to-late April in Scotland. Second earlies follow a similar schedule, while maincrop varieties are planted roughly three to four weeks later in each region and can be chitted for three to four weeks or planted directly if indoor space is limited. If prolonged cold weather delays ground preparation, simply keep the chitting trays in a cooler room to slow shoot extension without harming the tubers.
How to chit potatoes step by step
Setting up seed potatoes takes only a few minutes per batch, but proper orientation and environmental control ensure uniform sprout development across every tuber.
1. Inspect the seed tubers
Unpack your seed potatoes as soon as they arrive. Discard any tubers showing signs of soft bacterial rot, dry fungal rot, or severe mechanical damage. Minor surface blemishes or common scab will not prevent healthy growth, but mushy tubers can spread pathogens to surrounding potatoes in the tray.
2. Identify the rose and heel ends
Every potato tuber has two distinct ends. The rose end is the blunt, rounded apex where the majority of dormant eyes cluster together. The heel end (or stolon end) is narrower and marks the point where the tuber was originally attached to the parent plant's root system.
3. Place tubers upright in trays
Arrange the seed potatoes upright in recycled cardboard egg boxes, wooden fruit trays, or modular seed flats. Ensure the rose end faces directly upward and the heel end rests in the base of the compartment. The individual dividers in egg boxes support the tubers and prevent them from rolling over during handling.
4. Provide cool temperatures and bright natural light
Position the containers in a cool, bright, frost-free room. An unheated spare bedroom, bright garage windowsill, enclosed porch, or frost-protected greenhouse bench provides suitable conditions. Maintain temperatures between 10°C and 15°C.
Bright, indirect daylight is essential. Exposure to light stimulates chlorophyll production in the developing shoots, making them dark green or purple, thick, and physically resilient. Never place chitting potatoes in a dark cupboard, as darkness induces etiolated, white, spindly sprouts that break off during planting.
Identifying healthy chits versus poor sprouts
Recognising the difference between high-quality chits and weak sprouts ensures you plant only viable seed stock and avoid cold wet soil nutrient deficiency issues later in the spring.
- Healthy chits: These measure 1.5 cm to 2.5 cm in length. They are thick, dark green, deep purple, or bronze depending on the cultivar. Small green leaf buds and tiny root nubs are visible near the base of the shoot.
- Weak, leggy sprouts: These are long (often exceeding 5 cm), pale white or yellow, thin, and brittle. They develop when tubers are kept in darkness or excessive warmth. If your tubers produce these, gently rub them off and move the potatoes into brighter, cooler conditions to stimulate a second, sturdier flush of shoots.
For first early varieties where you want a concentrated harvest of large new potatoes, rub off all but three or four of the strongest chits near the rose end. For second earlies and maincrops where total yield weight matters more than individual tuber size, leave all healthy chits intact.
Do you need to chit maincrop potatoes?
Chitting is standard practice for first and second early potatoes, but its necessity for maincrop cultivars depends on your plot conditions and storage space. Maincrop varieties, such as 'King Edward', 'Maris Piper', or 'Cara', remain in the soil for 16 to 22 weeks. Because they have a long growing season extending into autumn, the two-week head start gained from chitting makes a smaller relative difference to final yields.
However, on northern plots or heavy clay soils where spring planting is routinely delayed by waterlogging, chitting maincrops offers real advantages. It allows the plant to build root infrastructure indoors while you wait for your soil to dry and warm. If you have bench space and egg cartons available, chitting maincrops is worthwhile; if space is restricted, reserve your brightest windowsills for early cultivars.
Planting out chitted seed potatoes
Before planting out, assess your soil readiness. Checking soil drainage percolation test patterns helps verify that beds are not waterlogged. Soil temperature should consistently measure at least 7°C at a depth of 10 cm. Working cold, saturated soil damages structure and chills developing sprouts.
To plant your chitted tubers:
- Excavate a trench 10 cm to 15 cm deep, or dig individual planting holes with a trowel.
- Incorporate well-rotted garden compost or leaf mould to enrich organic gardening soil structure and moisture retention.
- Carefully lift each seed potato from its egg box, cradling the tuber so you do not rub or snap the chits.
- Place the potato in the trench with the chits pointing upward towards the sky.
- Space first earlies 30 cm apart in rows 60 cm apart. Space maincrop varieties 38 cm to 45 cm apart in rows 75 cm apart.
- Gently backfill with loose soil, taking care not to crush the shoots.
As the shoots emerge through the soil surface two to three weeks later, begin earthing up by drawing loose soil from between the rows over the foliage. This protects tender green stems from late spring frosts and prevents light from reaching shallow tubers, which causes greening. You can consult our full guide on how to grow potatoes for subsequent crop management steps and pest advice.
Common chitting mistakes to avoid
Avoiding standard pitfalls ensures your seed potatoes remain healthy throughout the pre-planting phase.
- Tubers shrivelling excessively: Do not wet the tubers. Some softening is normal as the tuber feeds the chits; if shrivelling is severe, move the trays somewhere cooler and out of drying air rather than misting them.
- Sprouts growing too long before planting: If wet weather delays ground preparation and sprouts exceed 3 cm, move the trays to a cooler (5°C to 8°C) but still bright spot. This halts stem elongation while preserving shoot vigor.
- Frost damage during chitting: Seed potatoes stored in unheated glasshouses can suffer frost damage during severe sub-zero nights. Cover the trays with horticultural fleece or move them indoors if hard overnight freezes are forecast.
By managing light and temperature carefully from late winter onwards, chitting provides a reliable, practical foundation for early and bountiful potato crops across the UK growing season.