Key takeaways
- Eradicating bindweed (Convolvulus arvensis and Calystegia sepium) requires a multi-year strategy; there are no instant, single-season fixes.
- Never rotovate or mechanically till ground infested with bindweed, as chopped root fragments as small as 5 cm (and any fragment carrying a dormant bud) generate new plants.
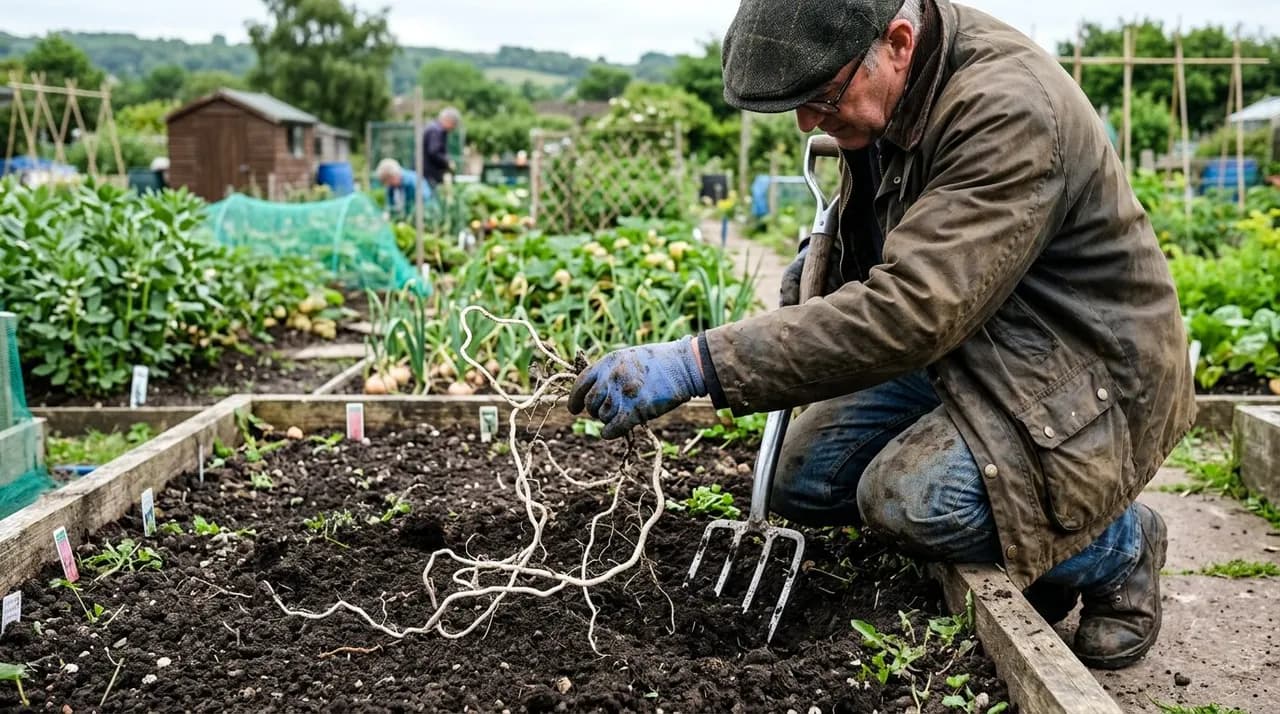
- Carefully fork out brittle white rhizomes during autumn or spring bed clearing, sifting soil by hand to remove root pieces.
- Deprive roots of sunlight by severing emerging green shoots every 7 to 10 days, starving the underground network of photosynthetic sugars.
- Smother heavily infested areas with heavy-duty black light-excluding silage tarpaulins for a minimum of two consecutive growing seasons.
Quick answer: To get rid of bindweed organically in UK gardens, hand-fork out roots without snapping them, sever emerging green shoots weekly with a sharp hoe to starve the root system, and smother dense patches under light-excluding tarpaulins for two full seasons. Never compost live roots without drowning them first.
Learning how to get rid of bindweed is one of the most demanding challenges faced by British gardeners and allotment tenants. Known colloquially as wild morning glory, bellbine, or devil's guts, bindweed is a resilient perennial vine equipped with an extraordinarily deep, brittle root system that can choke perennial borders, strangle fruit bushes, and smother vegetable crops within weeks.
There is no magical, overnight cure for established bindweed. Because chemical weedkiller approvals change frequently in the UK and synthetic sprays damage surrounding soil biology and pollinator health, successful eradication relies on biological reality and physical persistence. Bindweed survives by storing massive carbohydrate reserves in deep underground storage roots. Depriving the plant of energy faster than it can replenish it is the only permanent solution.
By combining careful mechanical excavation, systematic light deprivation (occultation), and relentless weekly shoot severance, you can gradually starve the root bank and reclaim infested ground over two to three seasons.
Identifying the two species of UK bindweed
Two distinct species of bindweed colonise British gardens and allotments:
+--------------------+-----------------------+--------------------+-------------------+
| Feature            | Field Bindweed        | Hedge Bindweed     | Visual Difference |
|                    | (Convolvulus arvensis)| (Calystegia sepium)|                   |
+--------------------+-----------------------+--------------------+-------------------+
| Habit              | Low creeping mats or  | Vigorous twining   | Hedge climbs high |
|                    | low scrambling climber| climber up to 3 m  | into trees/fences |
+--------------------+-----------------------+--------------------+-------------------+
| Leaf Shape         | Small, arrowhead-     | Large, broad,      | Hedge has large,  |
|                    | shaped (2 cm - 5 cm)  | heart-shaped (10cm)| glossy foliage    |
+--------------------+-----------------------+--------------------+-------------------+
| Flower Appearance  | Trumpet-shaped; pink, | Large, trumpet-    | Hedge produces    |
|                    | white, or pink-striped| shaped; pure white | showy white bells |
+--------------------+-----------------------+--------------------+-------------------+
| Root Penetration   | Fleshy rhizomes down  | Thick white stolons| Both form massive |
|                    | to 2 - 5 m in soil    | and deep root nets | underground banks |
+--------------------+-----------------------+--------------------+-------------------+
1. Field bindweed (Convolvulus arvensis)
Common in open allotment plots, lawn borders, and compacted soils. Field bindweed scrambles across the ground or twines anticlockwise around low vegetables and soft fruit canes. Its white and pink-striped trumpet flowers open on sunny mornings.
2. Hedge bindweed (Calystegia sepium)
A larger, more aggressive climbing vine common along allotment fence lines, hedgerows, and neglected shrubberies. It features large, heart-shaped leaves and pure white trumpet flowers reaching 5 cm across, rapidly ascending to 3 metres high.
Both species rely on brittle, white, chalky storage roots that store vast energy reserves and can survive freezing winters deep beneath the frost line.
Mechanical removal: fork excavation vs. the rotovator trap
The first step in clearing an infested plot is manual bindweed removal, but technique is everything:
+---------------------------------------------------------+
|                  [Excavating Bindweed]                  |
|                                                         |
|    [Garden Fork (YES)]          [Rotovator (NEVER)]     |
|     |  |  |  |                     \     /     /        |
|     |  |  |  |                      \   /     /         |
|   Lifts roots whole           Chops 1 root into 100     |
|   without fracturing          viable new weed pieces    |
|                                                         |
|   =================== Soil Surface ===================  |
|           \                                             |
|            -- Fleshy White Root System                 |
+---------------------------------------------------------+
Why you must never rotovate bindweed
The single worst mistake on a new allotment is running a mechanical rotary tiller (rotovator) through bindweed-infested ground. A rotovator's spinning steel blades chop underground bindweed roots into thousands of tiny segments. Chopped root fragments as small as 5 cm (and any fragment carrying a dormant bud) generate new plants within weeks, turning a localized clump into an impenetrable forest.
Fork excavation technique
- Use a garden fork, not a spade: Spades cut through roots, leaving severed tips behind. A flat-tined garden fork loosens the surrounding soil, allowing you to trace and lift long lengths intact.
- Work systematically in blocks: Mark out 1-metre wide strips across the bed. Insert the fork deeply, lever backward, and crumble the soil clods with gloved fingers.
- Bucket collection: Place every recovered white root fragment directly into a bucket. Never leave excavated roots on the soil surface where they can re-root after a rain shower.
To learn chemical-free plot clearing strategies across larger acreage, review our guide on glyphosate-free organic weed management.
The biological war of attrition: systematic shoot severance
Manual digging removes the bulk of roots in the top 30 cm of soil, but deep taproots remain. Complete bindweed organic control relies on systematic photosynthetic starvation:
How root starvation works
When a bindweed shoot emerges in spring, it initially uses stored starch reserves from the roots to fuel growth. It takes approximately 10 to 14 days of green leaf growth before the plant produces surplus sugars through photosynthesis to send back down into the root reserves:
- If you sever or hoe off the emerging green shoot every 7 to 10 days before it expands leaves, the plant is forced to expend stored energy without ever replenishing it.
- Over time, the underground root system exhausts its metabolic reserves, withers, and decays.
Hoeing and hand-weeding routine
- Walk your allotment beds weekly with a sharp oscillating or Dutch hoe on dry mornings.
- Slice shoots 2 cm beneath the soil surface.
- On climbing fences or inside berry bushes, trace vines down to soil level and snip them off rather than pulling aggressively, which can tear the host plant's foliage.
For spring sowing calendars to pair with early weed management, see what to plant in March in the UK.
Light deprivation: occultation and heavy sheet mulching
For heavily infested, neglected allotment beds where manual weeding is overwhelming, total light exclusion (occultation) provides an effective hands-off solution:
+---------------------------------------------------------+
|                  [Two-Season Occultation]               |
|                                                         |
|   Weighted Bricks / Heavy Timbers Along All Edges       |
|   ---------------------------------------------------   |
|   Heavy UV-Stabilised Black Silage Tarpaulin (100 µm+)  |
|   ---------------------------------------------------   |
|   Thick Overlapping Cardboard (Double Layer)            |
|   ---------------------------------------------------   |
|   ================ Bindweed-Infested Soil ============  |
+---------------------------------------------------------+
1. Installing heavy black silage tarpaulins
- Material choice: Use thick, UV-stabilised woven groundcover fabric or agricultural black silage plastic (minimum 100 to 150 microns thick). Thin black bin liners or permeable weed membranes will tear as bindweed shoots push through them.
- Base layer: Lay two overlapping layers of corrugated cardboard over the ground before rolling out the tarpaulin.
- Airtight securing: Weigh down all edges with heavy wooden scaffold boards, concrete blocks, or buried soil trenches. Light leaks around edges allow bindweed to migrate outward toward the light.
- Duration: Leave the tarpaulin in place undisturbed for a minimum of two full growing seasons (18 to 24 months). During this time, trapped shoots exhaust their reserves in absolute darkness.
- For cardboard sheet mulching mechanics, consult our tutorial on sheet mulching with leaves and cardboard.
2. Planting cleaning crops
If you wish to grow food while suppressing bindweed, plant vigorous "cleaning crops" that produce dense canopies:
- Maincrop potatoes or vigorous winter squashes (pumpkins and courgettes) shade the soil heavily. The regular earthing up and harvesting of potatoes repeatedly disturbs and weakens emerging bindweed shoots.
Safe disposal: managing bindweed in compost
A common way gardeners accidentally re-infest their plots is by improperly managing bindweed in compost:
Why live bindweed roots must never enter cold compost
Standard domestic allotment compost heaps do not reach the sustained high temperatures (60°C+) required to kill fleshy perennial weed roots such as bindweed, couch grass, and ground elder. Adding live roots to a cold compost bin allows the roots to thrive inside the warm, moist pile, infesting every bed you top-dress with finished compost.
Two safe disposal methods
- The "Drown and Ferment" Method:
- Pack excavated bindweed roots into a large plastic bucket or water butt.
- Fill with water, weight the roots down with a brick, and seal with a tight lid.
- Leave the roots submerged for 4 to 6 weeks. The roots drown and ferment into a nutrient-rich, completely anaerobic brown liquid.
- Strain the fermented liquid and dilute it 1:10 with fresh water to use as an organic potash-rich fertiliser. The disintegrated sludge can now be safely added to your compost heap.
- The Solar Desiccation Method:
- Lay freshly dug roots on a sheet of corrugated iron, a paved patio, or black plastic in direct, full sunlight.
- Allow the roots to bake until they are brown, shrivelled, and snap like dry twigs. Once completely desiccated, they are safe to compost.
Combine your weed management with seasonal allium planning in how to grow shallots and soil-enriching cover crops in green manure.