Key takeaways
- Understand the four-stage lifecycle of Tenebrio molitor: egg, larva (mealworm), pupa, and darkling beetle.
- Build an efficient three-drawer DIY breeding tower to automate sorting and harvest cycles.
- Provide dry wheat bran or rolled oats as bedding and feed, adding sliced carrots or potatoes for essential moisture.
- Maintain breeding temperatures between 70°F and 80°F (21°C to 27°C) for continuous year-round reproduction.
- Feed live or dried mealworms to your flock as a high-protein supplement during autumn molting and winter cold.
Quick answer: Raising mealworms for chickens involves cultivating the larvae of the darkling beetle (Tenebrio molitor) in shallow, ventilated plastic bins filled with wheat bran or rolled oats. By providing vegetable scraps for moisture and keeping bins at 70°F to 80°F (21°C to 27°C), homesteaders produce a continuous, high-protein supplemental treat that supports flock egg production and feather regrowth.
Commercial poultry feed prices continue to rise, prompting backyard chicken keepers and homesteaders to seek sustainable, home-grown protein sources for their laying flocks. While commercial layer feeds provide balanced baseline nutrition, laying hens thrive when offered supplemental living proteins rich in amino acids, beneficial fatty acids, and essential minerals.
Mastering the process of raising mealworms for chickens provides an inexpensive, odor-free, and highly productive micro-livestock system that can be operated in a spare closet, garage, or utility room. Mealworms—the larval stage of the darkling beetle (Tenebrio molitor)—contain roughly 50% protein and 25% to 35% fat on a dry-matter basis, varying with what the larvae were raised on, making them an exceptional supplement during the stressful autumn molt and freezing winter months.
Setting up a home mealworm farm requires minimal equipment, low ongoing maintenance, and an understanding of the insect's four distinct life stages.
The four-stage mealworm lifecycle
Successfully breeding mealworms requires understanding how the insect transforms through its developmental stages:
- Egg (1 to 2 weeks): Adult female darkling beetles lay hundreds of microscopic, sticky white eggs in the bran substrate. Eggs hatch within one to two weeks depending on ambient temperature.
- Larva / Mealworm (8 to 10 weeks): The active larval stage. Mealworms feed voraciously on the dry grain substrate, molting their hard chitinous exoskeletons 10 to 15 times as they grow from tiny threads to golden-brown worms roughly 1 inch (2.5 cm) long. This is the stage harvested for chicken feed.
- Pupa (1 to 2 weeks): When fully grown, the larva curls into a dormant, cream-colored pupa resembling an alien pod. Pupae do not eat or move significantly, undergoing complete metamorphosis into adult beetles.
- Darkling Beetle (8 to 12 weeks): Emerging beetles are initially soft and pale, hardening and darkening to shiny black over the following several days. Beetles mate and lay eggs continuously through their adult life, and they do not bite. They rarely fly in a warm, well-fed bin but are capable of flight, so keep drawers closed or screened.
For complete nutritional standards across a laying flock's lifespan, consult our comprehensive reference on what to feed chickens and explore our detailed breakdown of what is in chicken feed.
Building a three-drawer DIY mealworm farm
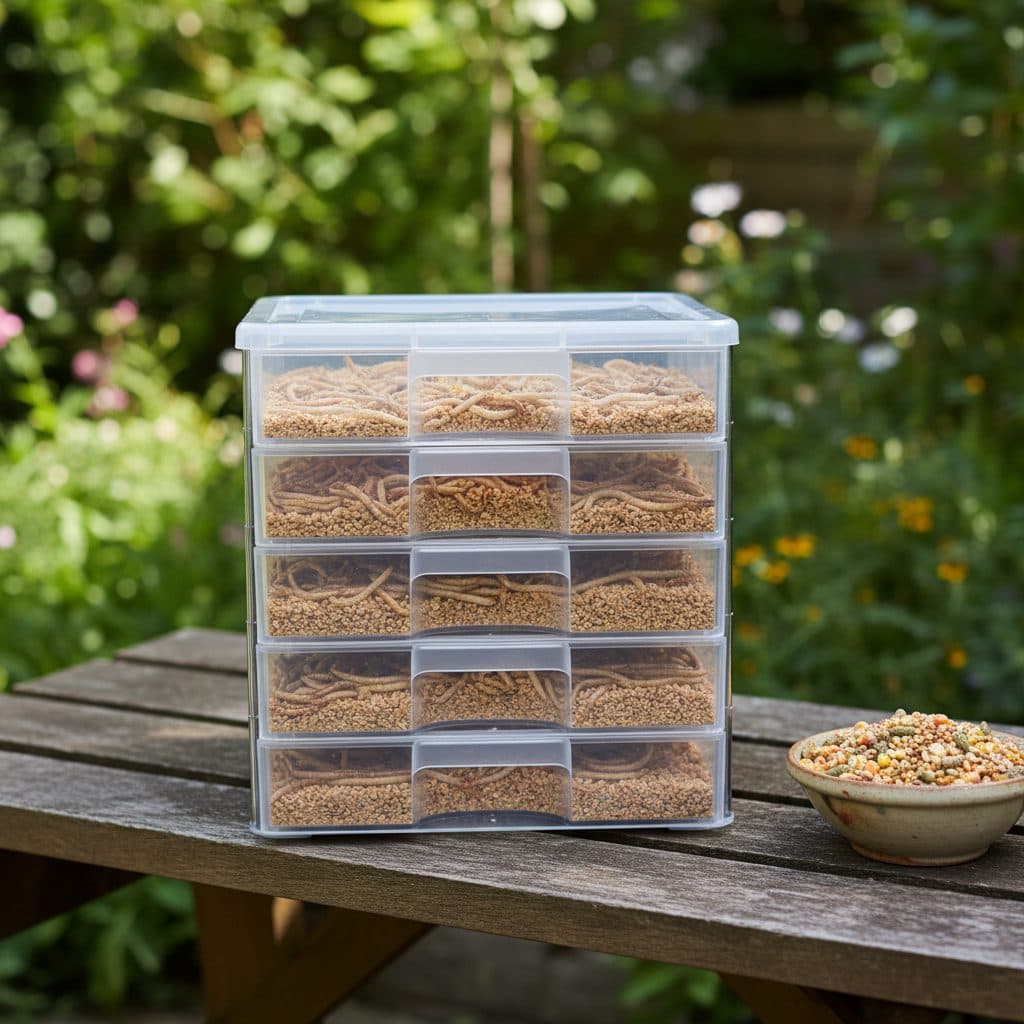
While mealworms can be raised in simple plastic shoeboxes, building a vertical three-drawer storage tower creates an automated, low-maintenance breeding system:
- Materials: Purchase an inexpensive three-drawer plastic storage cart (approx. 12x14 inches per drawer).
- Modifying the Top Drawer (Beetle Breeding Room): Cut out the solid plastic bottom of the top drawer, leaving a 1-inch perimeter frame. Using a hot glue gun or small screws, attach a sheet of 1/8-inch (or #8) wire mesh screen across the bottom. Place adult beetles and clean egg carton flats in this drawer over a thin layer of wheat bran. When beetles lay eggs, the eggs and tiny freshly hatched larvae naturally fall through the mesh into the drawer below, preventing adult beetles from eating their own eggs.
- Middle Drawer (Larval Growth & Nursery): Receives the falling eggs and young larvae. Fill this drawer with 2 to 3 inches of wheat bran. Larvae grow here until they reach harvesting size.
- Bottom Drawer (Pupae & Sorting): Place pupae collected from the middle drawer here until they hatch into beetles, at which point mature beetles are transferred back to the top drawer.
- Ventilation: Drill dozens of 1/8-inch holes in the top and sides of each drawer to allow airflow and prevent humidity buildup.
Compare this insect-protein setup with flock housing strategies detailed in our guide to backyard chickens in Ontario.
Substrate, feeding and moisture management
Maintaining the correct balance between dry bedding and moisture sources is critical to prevent grain mite infestations and lethal mold:
- Dry Substrate (Bedding & Food): Use food-grade wheat bran, coarse wheat middlings, or rolled oats. Avoid finely ground flour, which packs too tightly and suffocates larvae. Fill drawers 2 to 3 inches deep.
- Moisture Sources: Mealworms absorb all required water from fresh produce. Provide thick slices of **raw carrot, potato halves, sweet potato slices, or apple cores**. Carrots are the gold standard because they release moisture steadily without molding quickly.
- Moisture Placement Rule: Never bury wet vegetables directly into the grain substrate. Place vegetable slices on top of inverted cardboard egg carton pieces or small plastic lids. This prevents damp grain from developing mould. Penicillium (blue-green) and Aspergillus (yellow-green or black) both kill mealworm colonies, and Aspergillus flavus can produce aflatoxins in damp grain — discard any substrate that smells musty or shows mould rather than feeding it out.
- Replacing Vegetables: Remove and replace dry or uneaten vegetable scraps every two to three days.
Environmental control and temperature optimization
Mealworms are cold-blooded poikilotherms whose metabolic rate, growth speed, and reproductive output depend directly on ambient temperature:
- Optimal temperature range: Maintain bin temperatures between 70°F and 80°F (21°C to 27°C). At this temperature, a complete generation takes 10 to 12 weeks.
- Cool temperatures (50°F to 65°F / 10°C to 18°C): Growth slows significantly; life cycles extend to six months or more.
- Cold storage (40°F to 50°F / 4°C to 10°C): larvae go dormant and stop growing. True freezing (32°F / 0°C and below) kills them. You can hold harvested mealworms in a refrigerator (at 45°F / 7°C) for a few weeks, bringing them out for about 24 hours every week or two to warm up, feed and take moisture from a carrot slice before returning them.
- Excessive heat (above 88°F / 31°C): Causes heat stress, sterility in adult beetles, and high colony mortality.
- Humidity: Keep relative humidity around 50% to 60%. If humidity exceeds 70%, grain mites (Acarus siro) can invade the bins; reduce moisture additions immediately if tiny white dust-like mites appear.
Harvesting and feeding mealworms to your flock
Harvesting mealworms from your breeding bins is straightforward:
- Sifting frass: Every four to six weeks, pour the contents of the larval drawer through a fine kitchen sifter or flour sieve. The fine powdery insect waste (known as "frass") sifts through, leaving clean mealworms and bran behind. Mealworm frass is a useful nitrogen-rich soil amendment, but its analysis varies with the substrate the colony was fed — use it sparingly, like a concentrated manure, rather than to a stated N-P-K.
- Separating worms: Place a fresh piece of cardboard or potato slice in the drawer; within an hour, hundreds of mealworms will congregate underneath, allowing you to lift out large clusters easily.
- Feeding guidelines: Treat mealworms as a high-value protein supplement, not a complete replacement for balanced layer feed. Offer approximately 1 tablespoon of live mealworms per hen per day (or a small handful scattered across the flock). Keep mealworms and all other treats to under about 10% of the flock's daily intake; the rest should be balanced layer feed, or the extra fat and the calcium dilution will show up in shell quality and body condition.
- Flock benefits: Scattering live mealworms in the chicken run encourages natural scratching behavior, exercises birds, reduces flock boredom and aggressive pecking, and provides essential lysine and methionine to accelerate feather regrowth during autumn molting.
For broader poultry management systems, explore our guide to raising pastured chickens.