Key takeaways
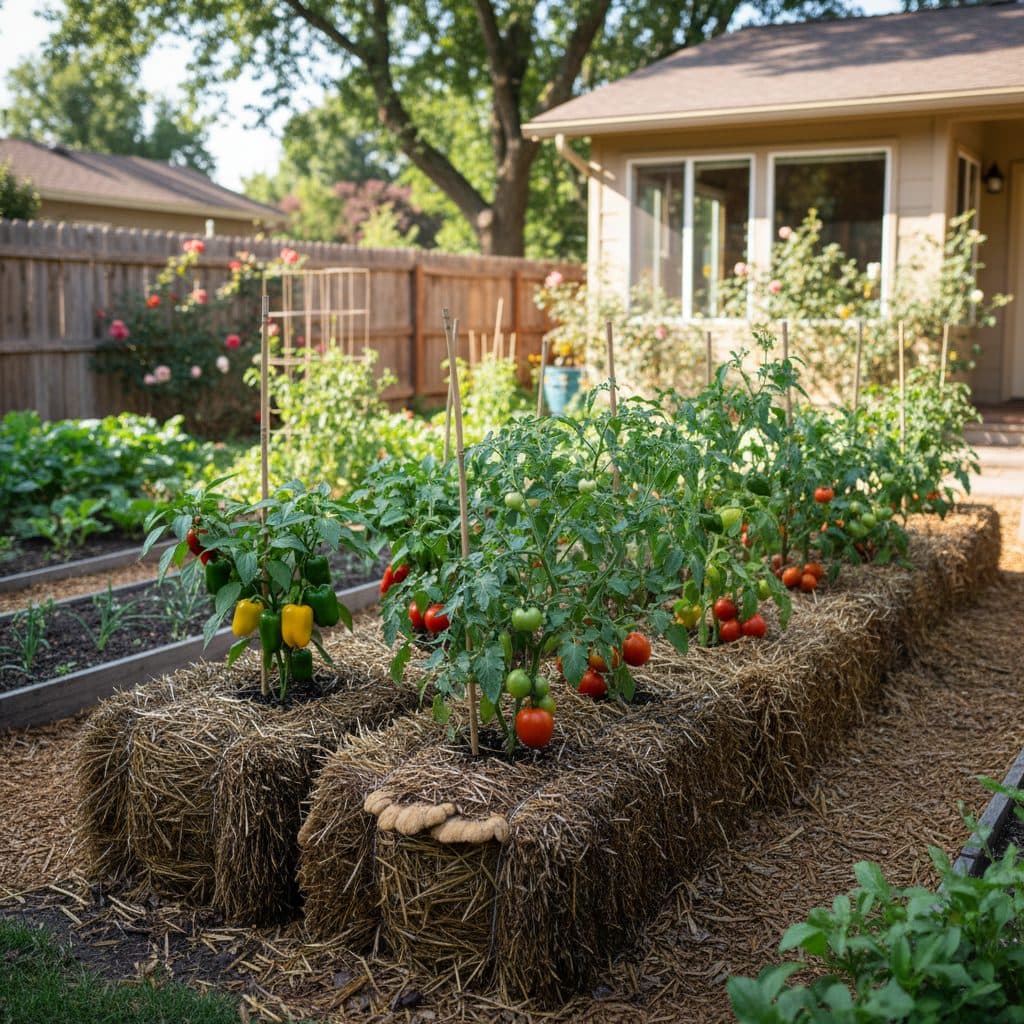
- Straw bale gardening provides an instant, raised growing medium that bypasses poor, rocky, heavy clay, or contaminated native soils.
- Always use tightly bound, weed-free straw (wheat, oat, or barley) rather than hay, which contains thousands of viable pasture weed seeds.
- Condition bales over 10 to 14 days with conventional nitrogen, or 18 to 21 days with organic nitrogen sources, to initiate internal composting.
- Monitor the internal bale temperature spike (120°F to 140°F) and wait until it cools below 100°F before inserting delicate transplants.
- Plant transplants directly into trowel-cut pockets filled with potting mix, or sow seeds across a 2-inch top layer of compost.
- Install drip irrigation or soaker hoses along the bale line to supply consistent moisture to fast-draining straw fibers.
Quick answer: Straw bale gardening is a method where vegetables are planted directly into conditioned straw bales that serve as both container and slow-release growing medium. Bales must be conditioned over 10 to 14 days with conventional nitrogen, or 18 to 21 days with organic nitrogen sources, to initiate internal composting before planting.
Straw bale gardening is one of the most accessible and innovative growing techniques for gardeners facing challenging soil conditions. Whether you have dense Midwestern clay, rocky desert subsoils, contaminated urban lots, or limited physical mobility that makes bending difficult, straw bales create an elevated, self-contained growing bed.
The straw bale functions simultaneously as a raised planter box and a biological compost engine. As the interior of the bale breaks down, it generates gentle root-zone warmth and releases nutrients. Understanding how to properly condition the bales, manage high water requirements, and support tall crops helps the bed produce well through the growing season.
Straw versus hay: the critical distinction
Using the correct type of agricultural bale is the most important decision in this growing system. Confusing straw with hay will result in severe weed infestations.
+-------------------------------------------------------------+
|                 STRAW VERSUS HAY COMPARISON                 |
|                                                             |
|   STRAW BALES (Ideal Choice):     HAY BALES (Avoid):        |
|  - Hollow, dry cereal stalks     - Dried green pasture grass|
|   - Wheat, oats, barley, rye        and alfalfa             |
|   - Golden-yellow color           - Greenish-brown color    |
|   - Seed heads harvested/absent   - Packed with weed seeds  |
|   - Decomposes cleanly            - Rapid weed jungle       |
+-------------------------------------------------------------+- Straw: The dry, hollow stems left behind after grain crops (wheat, oats, barley, or rye) have been harvested. The seed heads have been removed, resulting in a clean, golden, weed-free carbon structure.
- Hay: Hay contains weed seed heads and more nitrogen than straw, which can cause it to decompose rapidly into a dense, soggy, anaerobic mat, while sprouting thousands of pasture weeds that choke your vegetable roots.
- Herbicide awareness: Ensure your straw supplier has not treated cereal crops with persistent pyridine herbicides like aminopyralid. For testing methods, see our guide on bioassay testing for herbicide damage.
Site positioning and orientation
Straw bales become extremely heavy (over 100 pounds each) once saturated with water. Position them in their permanent garden location before beginning the conditioning process.
+-------------------------------------------------------------+
|                 STRAW BALE ARRANGEMENT                      |
|                                                             |
|          [ Twines Running Horizontally Around Sides ]       |
|                                                             |
|   Cut Stalk Ends Facing UP   <-- Absorbs water easily       |
|   ========================                                  |
|   ( Internal Straw Core )                                   |
|   ========================                                  |
|   Flat Ground / Weed Barrier <-- Newspaper or landscape cloth|
+-------------------------------------------------------------+- Sunlight: Choose a location that receives at least six to eight hours of direct, unfiltered sunlight daily.
- Weed barrier foundation: Lay down clean cardboard, newspaper, or landscape fabric beneath the bales to prevent underlying perennial weeds from growing up into the straw.
- Orientation: Position bales cut-end-up (twine running horizontally around the sides) so water and nutrients penetrate down into the hollow straw tubes rather than running off the smooth folded stems.
For alternative container layouts, see our overview of raised bed gardening.
The conditioning process
Raw straw contains high carbon and negligible nitrogen (a C:N ratio of approximately 80:1). If you plant into unconditioned straw, soil microbes will consume all available nitrogen to break down the carbon, starving your crops. Conditioning triggers internal thermophilic composting before plants are added.
+-------------------------------------------------------------+
|               12-DAY BALE CONDITIONING PROTOCOL             |
|                                                             |
|   Day 1: Water bales thoroughly until soaking wet           |
|   Day 2: Apply 1/2 cup high-N fertilizer; water in          |
|   Day 3: Water only to distribute nitrogen                  |
|   Day 4: Apply 1/2 cup high-N fertilizer; water in          |
|   Day 5: Water only                                         |
|   Day 6: Apply 1/2 cup high-N fertilizer; water in          |
|   Days 7-9: Apply 1/2 cup organic daily (or 1/4 cup conv.)  |
|   Day 10: Apply 1 cup balanced N-P-K fertilizer + water     |
|   Days 11-14: Monitor internal temperature cooling          |
+-------------------------------------------------------------+
Choosing your nitrogen source:
- Organic options: Blood meal, feather meal, or fresh poultry manure. Use 1 cup of organic meal per bale on nitrogen application days. Organic conditioning takes 18 to 21 days because microbial mineralization occurs before heat builds.
- Conventional option: Ammonium nitrate, urea, or lawn fertilizer (without weed killers). Use 1/2 cup per bale on application days.
- Days 7-9 schedule: Apply 1/2 cup of organic nitrogen daily (or 1/4 cup conventional nitrogen on Days 7 and 9); water in thoroughly.
The internal heat spike:
Between Days 5 and 9, the bale interior will heat up dramatically, reaching temperatures between 120°F and 140°F (49°C to 60°C). This heat pasteurizes any stray weed seeds and begins breaking down straw fibers into soft compost.
Critical planting rule: Never plant while the bale core is hot. Insert a compost thermometer into the center of the bale. Wait until the internal temperature drops below 100°F (38°C) before planting, as excess heat will cook plant roots.
For mulch properties, explore organic mulches: straw, wood, and leaves.
Planting techniques: transplants versus seeds
Once the bale has cooled and feels soft and spongy inside, planting can begin.
+-------------------------------------------------------------+
|                PLANTING TRANSPLANTS VS SEEDS                |
|                                                             |
|   TRANSPLANT METHOD:              SEED SOWING METHOD:       |
|   - Pry open pocket with trowel   - Spread 2-3 inch layer   |
|   - Add 2 cups potting compost      of seed starting mix    |
|   - Insert root ball; firm in     - Sow seeds in rows       |
|                                                             |
|        \ | /                              *   *   *   *     |
|       ( Plant )                     ====================    |
|      /   |   \                      [ 2 in Compost Bed ]    |
|     (Potting Mix)                   ====================    |
|     [ Straw Bale ]                  [ Straw Bale Top ]      |
+-------------------------------------------------------------+
Planting transplants (Tomatoes, peppers, brassicas):
- Use a hand trowel to pry open a 6-inch deep crevice or pocket in the top of the bale.
- Fill the pocket with 2 to 3 cups of quality potting compost or vermicompost.
- Insert your vegetable transplant into the compost pocket and press the straw firmly around the root ball.
Sowing seeds (Carrots, radishes, lettuce, beans):
- Spread a 2 to 3-inch (5 to 7 cm) layer of fine potting soil or finished compost across the entire top surface of the bale.
- Sow seeds at standard packet depths into this soil layer.
- Keep the surface consistently moist until germination occurs. Roots will grow through the top layer and anchor deep into the decomposing straw below.
Crop spacing per bale
A standard two-string straw bale measures roughly 36 inches long by 18 inches wide. Space your crops to prevent overcrowding:
- Tomatoes: 2 plants per bale.
- Peppers and Eggplants: 2 to 3 plants per bale.
- Zucchini / Summer Squash: 1 plant per bale.
- Cucumbers: 3 to 4 plants per bale (trained vertically).
- Bush Beans: 6 to 8 plants per bale.
- Strawberries: 6 plants per bale (planted into top and sides).
- Potatoes: Insert seed tubers 4 to 6 inches deep into the straw or nest them into the compost layer on top; check regularly as the bale settles and add loose straw over any tubers that become exposed to light.
For vertical staking configurations, see vertical vegetable gardening in small spaces and square foot gardening.
Watering and feeding routines
Because straw bales are porous and elevated, they drain rapidly and dry out faster than in-ground garden beds during hot summer weather.
- Irrigation system: Install a 1/2-inch drip irrigation line or soaker hose across the center line of the bales connected to a simple timer. Run the system for 15 to 20 minutes daily in warm weather.
- Ongoing fertilization: Once plants establish in mid-summer, apply a diluted organic liquid fertilizer (fish emulsion, liquid kelp, or comfrey tea) every two weeks to replace nutrients leached by regular irrigation.
End-of-season bale recycling
At the end of the growing season, your straw bales will have broken down into dark, rich, crumbly organic compost.
Rake the spent straw residue directly onto surrounding garden beds as premium winter mulch or blend it into your compost heap. The decomposed straw is packed with beneficial worms and microbial humus, enriching your garden soil for the following spring.