Key takeaways
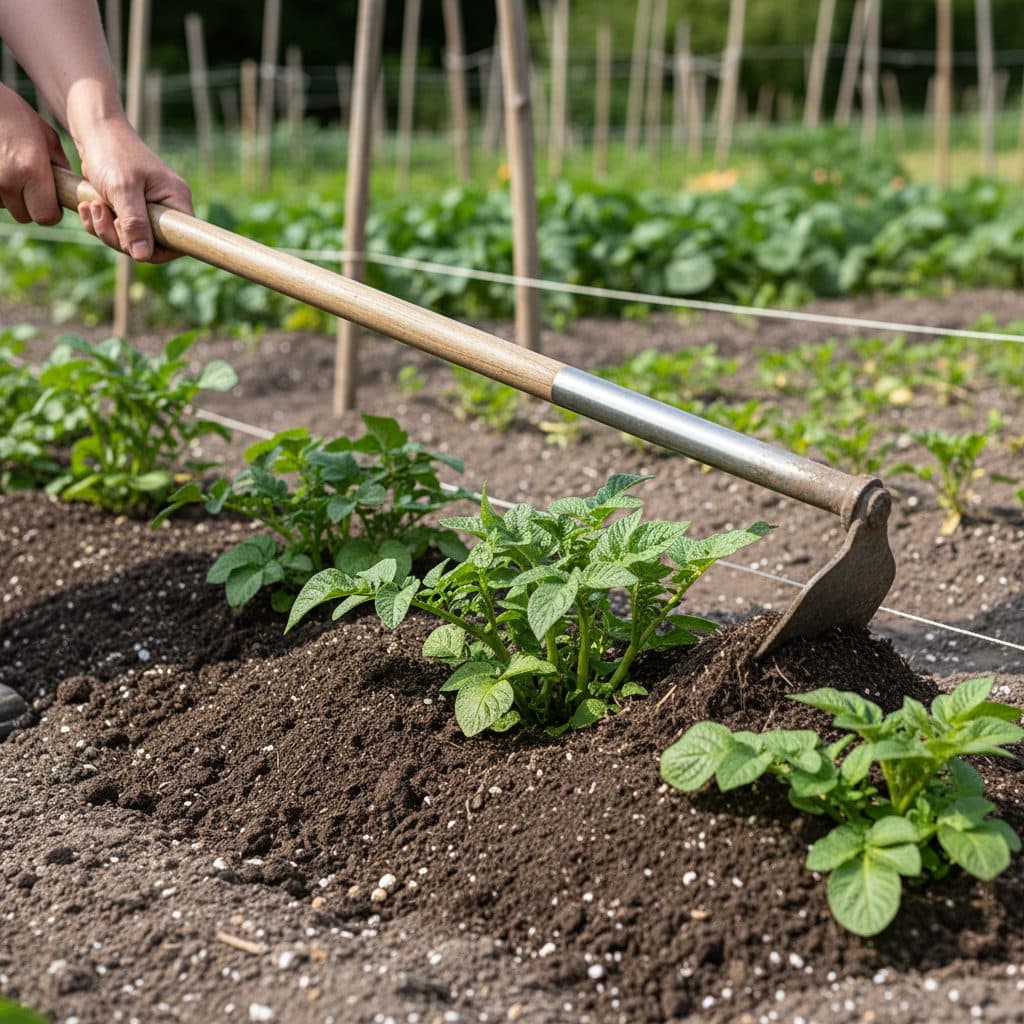
- Earthing up involves drawing soil or organic mulch around emerging potato stems in successive layers.
- The practice blocks sunlight from reaching expanding tubers, preventing greening and toxic solanine accumulation.
- Mounding protects vulnerable young shoots from late spring frosts in April and May.
- Burying extra stem length encourages additional stolons in indeterminate second early and maincrop varieties, though determinate first earlies gain little extra yield from it.
- Begin earthing up when green shoots reach 15 to 20 cm in height, repeating every two to three weeks.
Quick answer: Earthing up potatoes is the horticultural practice of drawing loose soil, compost, or mulch around the green stems of growing potato plants as they emerge. This technique prevents developing tubers from turning green in the sunlight, protects early foliage from late frosts, suppresses weeds, and encourages extra underground tuber formation along the buried stem.
Growing potatoes is a cornerstone of the British allotment calendar. From the moment seed tubers are chitted on a cool windowsill in late winter to the satisfaction of lifting the harvest in late summer, few crops are as rewarding. However, achieving clean, heavy yields of unblemished spuds depends fundamentally on mastering the art of earthing up potatoes.
Without regular mounding, expanding potato tubers naturally push toward the surface. When exposed to sunlight, potato skins develop chlorophyll and produce solanine, a bitter glycoalkaloid toxin that makes tubers unfit for consumption. Earthing up creates a deep, dark root zone while building physical ridges that drain excess rainwater during wet British summers and keep the root zone cool.
Why earth up potatoes: core horticultural benefits
Drawing soil up around potato stems serves multiple biological and practical purposes in the kitchen garden.
+-------------------------+-------------------------------------------------------------+
| Primary Benefit         | Horticultural Mechanism                                     |
+-------------------------+-------------------------------------------------------------+
| Light Exclusion         | Blocks all light, preventing chlorophyll and solanine buildup |
| Frost Shielding         | Insulates tender spring foliage from sub-zero night frosts  |
| Yield Expansion         | Buries stem nodes to stimulate additional stolon growth     |
| Weed Suppression        | Smothers germinating weed seeds between crop rows           |
| Moisture Regulation     | Flat-topped ridges let rain soak in while the furrows drain excess away |
+-------------------------+-------------------------------------------------------------+
1. Preventing green tubers and solanine toxicity
Potato tubers are modified stems, not true roots. They swell at the tips of stolons, the thin underground shoots that run out from the buried stem. When tubers are exposed to light, even through cracked dry topsoil, they begin photosynthesising and produce green pigmentation on the skin and flesh.
Along with chlorophyll, light exposure triggers the synthesis of solanine and chaconine. These toxic chemical compounds impart an unpalatably bitter taste and can cause severe gastrointestinal distress if eaten. A generous blanket of soil ensures all expanding tubers remain buried in complete darkness throughout their growth cycle.
2. Protecting young shoots from late spring frost
In the UK, early potato shoots frequently poke through the soil surface in April and early May, precisely when clear night skies bring late frosts. Unprotected potato leaves turn black and collapse when hit by sub-zero temperatures.
Drawing soil entirely over young emerging shoots provides an insulating soil blanket. While buried foliage might appear hidden, the stems quickly push back through the mound undamaged once warmer weather returns. If an unexpected hard frost threatens after plants have grown too tall to fully bury, draping horticultural fleece over the ridges provides supplementary protection.
3. Boosting tuber yield and harvest size
Potatoes produce new tubers along the lower sections of their buried stems. By gradually building a ridge of loose, aerated soil around the plant, you increase the subterranean stem area available for tuber development. This is especially advantageous for vigorous second early and maincrop varieties, which develop multiple tiers of tubers throughout a long growing season.
To explore full-season crop management, read our foundational guide on how to grow potatoes.
When to earth up potatoes by crop type
Timing depends on plant development and variety classification instead of fixed calendar dates. Plant seed tubers at a standard depth of 10 to 15 cm at planting time, then earth up incrementally as foliage develops.
+------------------+-----------------------+-----------------------+-----------------------+
| Potato Category  | Typical Harvest Time  | Mounding Frequency    | Primary Purpose       |
+------------------+-----------------------+-----------------------+-----------------------+
| First Earlies    | 10 to 12 weeks        | 1 to 2 passes         | Frost cover, greening |
| Second Earlies   | 13 to 15 weeks        | 2 passes              | Yield boost, greening |
| Maincrops        | 16 to 22 weeks        | 2 to 3 passes         | Large ridge building  |
+------------------+-----------------------+-----------------------+-----------------------+
Begin your first earthing up when the young shoots reach 15 to 20 cm (6 to 8 inches) above the soil level. Using a draw hoe or garden spade, draw soil from between the rows up against the stems, leaving just 5 cm of the top green leaves exposed to continue photosynthesising.
Repeat the process every two to three weeks as the haulms (stems) continue to elongate. Conclude earthing up when the ridges reach approximately 25 to 30 cm in height, or when the dense green canopy closes across the rows, naturally shading the soil surface beneath.
For allotment scheduling and companion succession plans, check what to plant in june uk.
How to earth up potatoes in traditional allotment trenches
The traditional trench method remains the gold standard for open-ground cultivation on allotments and vegetable plots where ample garden soil is available.
- Initial planting: Dig a straight trench 15 cm deep. Place your sprouted seed potatoes along the bottom at the recommended spacing (30 cm apart for earlies, 40 cm for maincrops) and cover with 10 cm of loose soil.
- First mound: When shoots reach 15 cm high, use a draw hoe to pull loose topsoil from the sides of the trench toward the plant stems. Form a broad, flat-topped ridge rather than a sharp peaked cone so rainwater penetrates down to the roots instead of running off into the pathways.
- Second and third passes: As foliage grows rapidly during late spring, draw additional soil from the inter-row paths onto the ridges. Work carefully to avoid slicing through shallow developing tubers or root systems with your hoe blade.
- Organic mulch integration: If your garden soil is heavy clay or stones make hoeing difficult, supplement garden soil with well-rotted manure, composted leaf mould, or clean straw along the ridges.
For growers dealing with common problems during this period, see our guides on slugs and on late blight.
Alternative earthing up materials: straw, leaf mould, and compost
While native topsoil is the traditional choice for mounding, gardeners can use various organic materials to build ridges, especially in no-dig setups or heavy clay gardens.
- Well-rotted compost: Adding garden compost directly over the rows enriches the soil, feeds developing tubers, and eliminates the physical labour of trenching heavy clay.
- Clean straw: Mounding with thick layers of clean agricultural straw creates a clean, lightweight barrier that excludes light while keeping tubers spotless for harvesting. Straw-grown potatoes can often be harvested by hand without a garden fork.
- Composted leaf mould: Leaf mould provides excellent moisture retention and crumbly aeration, making it easy for expanding potatoes to swell without encountering soil resistance.
Earthing up potatoes in pots, bags, and raised beds
Gardeners without large open allotment plots can successfully grow bountiful potato crops in large containers, fabric potato grow bags, or raised beds.
Container and bag method
Growing in containers utilizes the same vertical principle in a confined footprint:
- Select a pot or fabric bag holding at least 30 to 40 litres with ample drainage holes at the base.
- Fill the bottom of the container with just 10 to 15 cm of a rich growing medium, such as a loam-based John Innes compost blended with garden compost.
- Place two to three sprouted seed potatoes on top of the soil and cover them with an additional 10 cm of mix.
- As the green shoots grow 10 to 15 cm above the compost layer, unroll the sides of the bag and add more compost mix, leaving the top leaf tips exposed.
- Continue adding compost in stages until the soil level reaches within 5 cm of the container rim.
Container potatoes require regular watering. Potted plants dry out far faster than open ground, particularly once plants develop full foliage and start flowering. Maintain consistent moisture to prevent dry spells, which lead to hollow heart and uneven tuber expansion.
Harvesting and aftercare for earthed-up rows
When harvesting first earlies, you can gently probe into the side of the earthed-up ridge with your fingers to band-harvest individual large tubers while leaving smaller potatoes to continue swelling.
For maincrops intended for winter storage, wait until the foliage naturally yellows and dies back in late summer. Cut down the spent haulms to soil level and leave the tubers buried in their protective mounds for ten to fourteen days. This brief curing period in the soil allows the skins to harden, protecting the tubers from bruising and fungal rot once lifted.