Key takeaways
- Only a qualified structural engineer can tell you your slab's safe load; have the whole garden's saturated weight checked (soil, pots, water and people together) before you build, not just a water drum.
- Never place or lean heavy containers or water drums on or against non-structural parapet walls.
- Use a lightweight, porous potting mix: 50% washed coco peat, 30% aged vermicompost or cow manure, and 20% coarse river sand or perlite.
- Elevate all grow bags and pots on bricks or drain cells to protect the roof slab and ensure free water drainage.
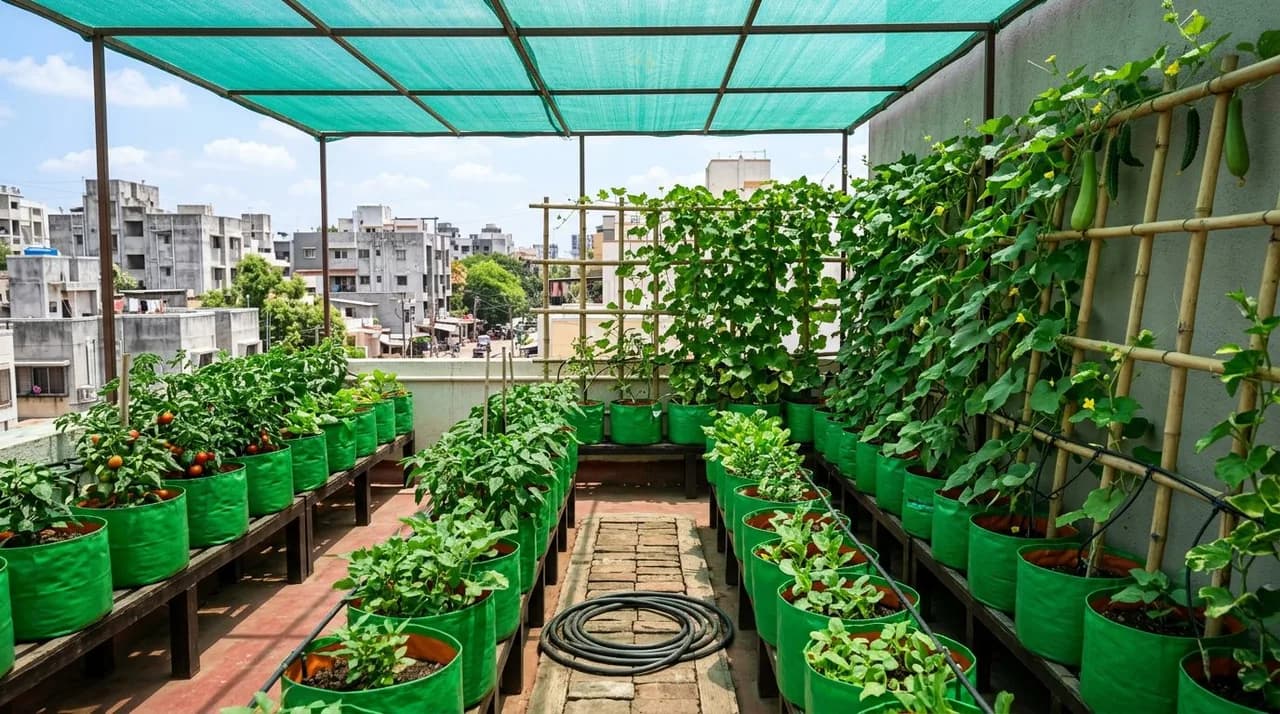
- Install a 50% green agro-shade net on a sturdy frame to protect container root zones from extreme summer radiant heat.
Quick answer: To set up a terrace garden in India, verify your roof waterproofing and load-bearing lines, then arrange elevated containers over structural beams and columns. Fill pots with a lightweight mix of 50% coco peat, 30% vermicompost, and 20% sand, and install a 50% green shade net for summer protection.
Transforming an open concrete rooftop into a productive terrace garden setup is one of the most effective ways for Indian urban families to grow fresh food, insulate their homes from summer heat, and create a green sanctuary.
However, gardening on an Indian concrete roof slab differs from ground-level gardening. An exposed rooftop experiences intense environmental extremes: blazing summer air temperatures running above 40°C across the northern and central plains, radiant concrete surface heat, torrential monsoon downpours, and gusty pre-monsoon winds.
Furthermore, structural safety must always come first. By assessing roof load lines, protecting the slab membrane, preparing an aerated lightweight potting mix, and choosing resilient crops, you can build a safe, sustainable rooftop ecosystem that flourishes for years.
Structural safety, slab load lines, and waterproofing checks
Before moving heavy soil bags, planters, and water drums onto your roof, structural safety must be thoroughly evaluated:
+-----------------------------------------------------------------------+
|                    TERRACE STRUCTURAL LOAD ZONES                      |
+-------------------+---------------------------------------------------+
| SAFE LOAD LINES   | Directly over structural columns and main beams   |
|                   | that sit underneath the concrete slab             |
| CAUTION ZONES     | Center of large spans between distant columns     |
| PROHIBITED LOAD   | Parapet walls (non-structural masonry kerbs)      |
+-------------------+---------------------------------------------------+
1. Identifying load-bearing lines
- Where to Place Weight: Position your heaviest items (such as 35 to 45 cm fruit tree containers, compost tumblers, and water storage containers) directly above the structural columns and primary load-bearing beams that run underneath the slab.
- The Parapet Warning: The perimeter parapet wall is a non-structural masonry safety barrier built on top of the slab. Never rest heavy pots, attach structural water tanks, or lean heavy loads against the parapet wall.
- Water Drum Safety: A filled 200-litre water drum weighs roughly 200 kg on a small footprint. Always confirm your slab's load capacity with your building society or a qualified structural engineer before you commit to the layout; the check covers the whole garden's wet weight, not just the water drum.
2. Roof waterproofing and drainage slope
- Inspect the roof slab for existing hairline cracks, peeling paint, or pooling water. The slab must possess a functional waterproofing membrane (such as an elastomeric coating or traditional brick-bat coba) with a steady gradient sloping toward rainwater drainage spouts (parnalas).
- Never allow garden runoff or decomposing organic sludge to pool around roof drains.
Container selection and the brick elevation rule
Proper container selection and elevation protect your building while ensuring healthy root oxygenation:
[ Correct Setup ]   Container elevated 5-7 cm on bricks --> Air gap --> Dry roof slab
[ Incorrect Setup ] Container resting flat on slab     --> Traps water --> Leaks & root rot
1. Why container elevation is mandatory
Placing flat-bottomed plastic grow bags directly onto a concrete roof creates a persistent moisture trap between the plastic base and the concrete. Over time, trapped standing water degrades the waterproofing membrane and causes damp patches on the ceiling below.
Always place two standard building bricks or interlocking plastic drain cells beneath every container. This 5 to 7 cm air gap allows irrigation runoff to flow freely to roof drains while air currents keep the slab surface dry.
2. Best containers for rooftops
- UV-Stabilized HDPE Grow Bags (240 to 350 GSM): Highly durable, lightweight, flexible, and economical. They add minimal dead weight to the roof slab.
- Plastic Crates and Troughs: Rectangular fruit crates lined with porous geotextile fabric create excellent shallow raised beds for leafy greens.
- Terracotta Pots: Porous clay walls cool the root zone through evaporation during hot zaid summer months.
To explore cost-saving upcycled container options, review our guide on low budget terrace garden ideas.
Lightweight potting soil formula for rooftop containers
Never fill rooftop containers with heavy, dense agricultural field soil or sticky clay, which adds dangerous structural weight and suffocates roots when wet:
+-----------------------------------------------------------------------+
|                 BALANCED ROOFTOP POTTING MIX FORMULA                  |
+-------------------+-------------------+-------------------------------+
| INGREDIENT        | VOLUME PERCENTAGE | FUNCTION                      |
+-------------------+-------------------+-------------------------------+
| Washed Coco Peat  | 50% by volume     | Moisture buffer, ultra-light  |
| Aged Vermicompost | 30% by volume     | Microbes, organic nutrients   |
| Coarse Sand/Grit  | 20% by volume     | Rapid drainage & aeration     |
| Neem Cake Powder  | 2 tablespoons/pot | Soil pest & nematode defense  |
| Bone Meal / Rock P| 1 tablespoon/pot  | Slow-release phosphorus       |
+-------------------+-------------------+-------------------------------+
Mixing steps
- Rehydrate compressed coco peat blocks in clean water, and rinse out any residual salts.
- Blend 50% fluffy coco peat with 30% aged vermicompost (or well-rotted cattle manure) and 20% coarse river sand.
- Incorporate neem cake powder and bone meal throughout the blend. This mix is much lighter than field soil, but any growing medium is far heavier once it is saturated; work out your roof load from the wet weight of a full container, not from the weight of the dry bag.
Designing shade nets, wind protection, and drip irrigation
Protecting your rooftop plants from severe weather extremes ensures year-round productivity:
[ GI Pipe / Bamboo Frame ] ----> Mounts 50% Green Agro-Shade Net at 2.4 m height
[ Drip Irrigation Line ]   ----> Connects to gravity water barrel with inline drippers
1. Summer shade netting (50% green agro-net)
During peak summer (March to June), concrete rooftop temperatures soar. Direct solar radiation can heat dark container soil, stressing roots and causing blossom drop.
- Erect a 50% green agro-shade net mounted on a sturdy GI pipe or bamboo pole frame at a height of 2.1 to 2.4 metres above the floor.
- A 50% net diffuses harsh midday ultraviolet rays and noticeably lowers canopy temperatures while allowing morning and late afternoon light to pass through.
2. Wind anchoring and trellising
Rooftops experience higher wind velocities than ground gardens. Secure bamboo trellises firmly to container handles or structural posts using coir rope or wire. Train heavy climbing gourds along a low, freestanding frame anchored to the containers themselves or to a braced post base sitting on the slab; never fix a trellis to, or lean one against, the parapet wall.
3. Drip irrigation and water storage
Carry water efficiently using a gravity-fed drip irrigation system:
- Mount a 100 to 200-litre water storage tank on an elevated masonry stand positioned over a structural column.
- Run 16 mm main supply tubing with 4 mm feeder lines and adjustable drippers to each container, delivering slow moisture directly to the soil surface.
Beginner crop layout and seasonal progression
Start your terrace journey with reliable, fast-yielding crops before expanding into complex fruit trees:
+-----------------------------------------------------------------------+
|                    TERRACE GARDEN BEGINNER CROPS                      |
+-------------------+-------------------+-------------------------------+
| CROP CATEGORY     | BEST SELECTIONS   | CONTAINER SIZING              |
+-------------------+-------------------+-------------------------------+
| Fast Greens       | Palak, Methi, Mint| 15-20 cm deep shallow troughs |
| Fruiting Veg      | Chillies, Tomato  | 25-30 cm deep grow bags       |
| Heavy Climbers    | Lauki, Torai      | 35-45 cm deep grow bags       |
| Perennial Herbs   | Curry Leaf, Tulsi | 30-35 cm terracotta pots      |
+-------------------+-------------------+-------------------------------+- Phase 1 (Month 1 to 2): Master fast leafy greens (palak, methi, red amaranth) and culinary herbs (pudina, kadi patta). For variety selection, see kitchen garden plants in India.
- Phase 2 (Month 3 to 6): Expand into fruiting vegetables like green chillies, bush tomatoes, and brinjals. Learn more about tomato care in how to grow tomatoes.
- Phase 3 (Monsoon): Erect bamboo frames and sow vigorous climbing cucurbits as detailed in our guide on vegetables to grow in monsoon.
- Urban Balcony Adaptations: If adapting these concepts to smaller apartment spaces, explore our guide on rooftop and patio container gardening.