Key takeaways
- Build sturdy, low-cost propagation benches using common materials like 2x4s and hardware cloth, supporting up to 50 pounds per square foot.
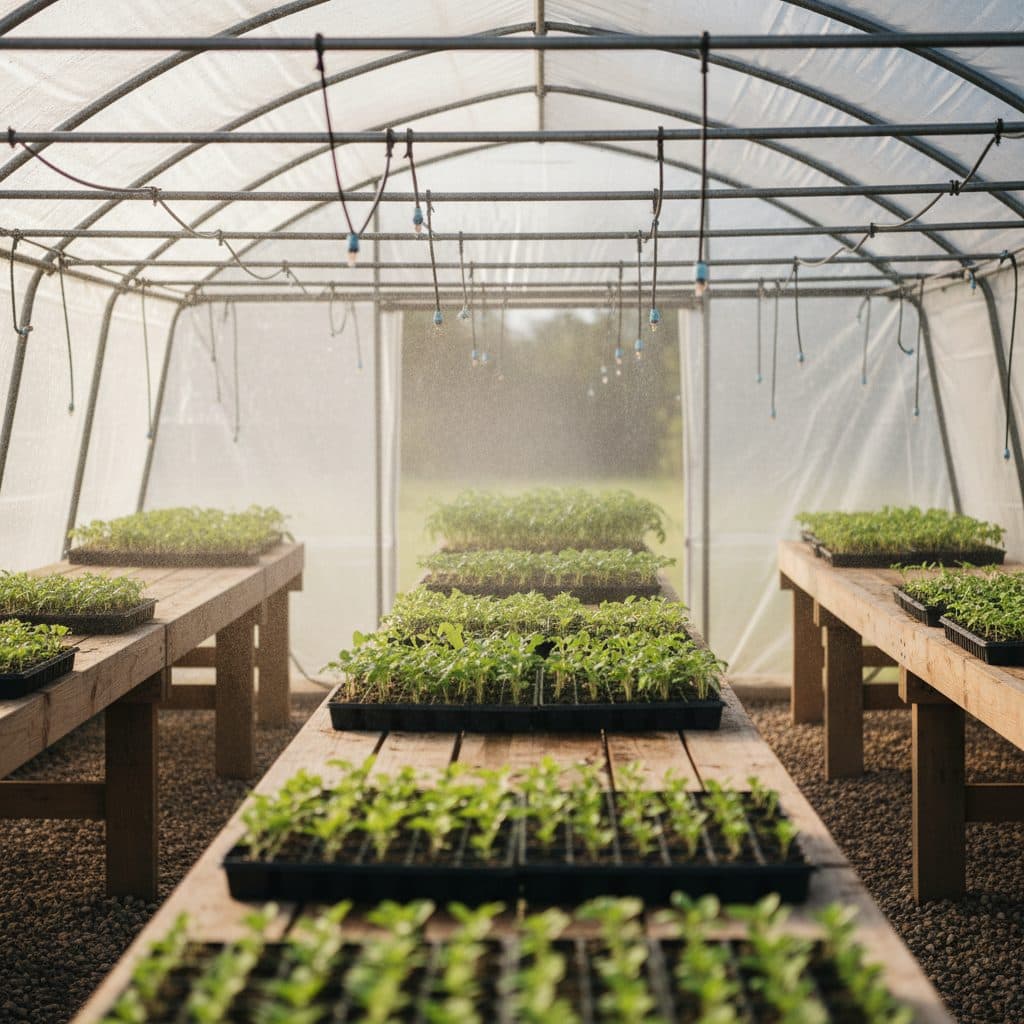
- Construct a simple hoop house with PVC pipes and greenhouse film to extend your growing season by several weeks in USDA zone 5 or 6.
- Implement a DIY propagation mist bed using a submersible pump and misting nozzles to raise rooting success for cuttings.
- Optimize seed-starting with proper soil mixes and consistent temperatures, aiming for 70-75°F for most vegetable seeds.
- Consider passive solar design for your hoop house, using water barrels for thermal mass, to capture and retain heat and cut supplemental heating on sunny days.
- Utilize propagation trays with domes to maintain high humidity around young seedlings, which many species need in order to germinate evenly.
Quick answer: Growers can scale up plant propagation affordably by building low-cost benches, constructing a simple hoop house to extend the growing season, and implementing a DIY propagation mist bed for high rooting success.
In many parts of the US, from the humid Southeast to the arid West, growers often face the challenge of expanding their operations without breaking the bank. Whether you are starting a small market garden in USDA zone 7 or aiming for a larger nursery in the cooler climate of USDA zone 5, increasing your plant propagation capacity efficiently is key to growth. This article outlines practical, budget-conscious strategies for scaling up your propagation efforts, focusing on three core components: low-cost benches, a simple hoop house, and an effective propagation mist bed.
Our goal is to help you produce more plants with less initial investment, allowing you to meet demand and improve your farm’s bottom line. By implementing these methods, you can significantly increase your plant output, potentially doubling your seedling production within a single season, and achieve higher success rates for both seeds and cuttings. We will ground these claims in real numbers and practical applications, drawing on experiences from various US agricultural settings.
building low-cost propagation benches
Expanding your nursery operations often starts with adequate workspace, and propagation benches are fundamental. You can build sturdy, functional benches for a fraction of the cost of commercial units, often around $50 to $75 per 8-foot section, depending on lumber prices in your region. For example, in the Midwest, a 2x4x8 foot stud might cost $4-$6. These benches need to support significant weight—up to 50 pounds per square foot when loaded with saturated propagation trays. A common design uses 2×4 lumber for the frame and legs, with hardware cloth or cattle panel for the bench surface, allowing for good drainage and air circulation.
To ensure longevity, especially in a humid greenhouse environment, consider using pressure-treated lumber or applying a wood preservative to untreated wood. The ideal height for a propagation bench is typically 30 to 36 inches, which minimizes back strain during long hours of potting and tending seedlings. A standard width of 36 inches allows for easy access from both sides. For a 20-foot hoop house, you might build two 16-foot benches, leaving a 4-foot aisle, providing 96 square feet of bench space.
materials for a sturdy bench
When sourcing materials, look for straight 2x4s and galvanized hardware cloth with a 1/2-inch or 1-inch mesh. For an 8-foot bench, you will need approximately four 8-foot 2x4s for the frame, four 30-inch 2x4s for the legs, and a 3×8 foot section of hardware cloth. Fasteners should be corrosion-resistant, such as 3-inch deck screws or galvanized nails. Buying the lumber and hardware cloth yourself costs a fraction of a comparable commercial bench. In a typical setup, you can build one 8-foot bench in about two hours with basic carpentry tools.
- Four 8-foot 2x4s for the main frame
- Four 30-inch 2x4s for the legs
- One 3×8 foot section of 1/2-inch or 1-inch galvanized hardware cloth
- One pound of 3-inch deck screws
- Optional: Wood preservative or exterior paint for untreated lumber
constructing a simple hoop house
A simple hoop house can extend your growing season by four to six weeks in the spring and fall, particularly beneficial for growers in USDA zones 5 through 7. This structure provides a protected environment, allowing you to start seeds earlier and harden off plants more effectively. A basic hoop house, often called a “caterpillar tunnel” or “quick hoop,” can be built for $200 to $500 for a 10×20 foot structure, significantly less than a permanent greenhouse that might cost $5,000 or more. The primary components are flexible hoops, a base frame, and greenhouse-grade plastic film.
PVC pipe, specifically 1-inch Schedule 40, is a common material for hoops due to its flexibility and low cost, typically $8-$12 per 10-foot section. For a 10-foot-wide, 20-foot-long hoop house you need eleven hoops spaced 2 feet apart. Each hoop is made from two 10-foot sections of 1-inch PVC joined with a coupler, since a semicircular arch over a 10-foot span needs roughly 16 feet of pipe, and the hoops are anchored to a wooden base frame. The base frame, often made from 2×6 pressure-treated lumber, provides a secure foundation and a place to attach the plastic film. This setup can raise internal temperatures by 10-20°F above ambient, important for early season growth.
securing the structure and covering
Anchoring the hoops firmly into the ground or to a robust base frame is critical, especially in regions prone to high winds, such as the Great Plains where gusts can exceed 50 miles per hour. Rebar stakes, driven 18 inches into the ground, can serve as anchors for the PVC hoops. The greenhouse film should be at least 6-mil thick, UV-treated, and rated for four years of outdoor use. This film can cost $0.50-$1.00 per square foot. Properly tensioning the film and securing it with wiggle wire or battens prevents tearing and heat loss. For ventilation, roll-up sides are simple to implement and allow for passive cooling on warmer days, maintaining optimal temperatures below 85°F. You can find more information on starting seeds in protected environments at agripure.org/articles/seed-starting-for-beginners.
- Twenty-two 10-foot sections of 1-inch Schedule 40 PVC pipe plus eleven couplers (two sections joined per hoop)
- Two 20-foot 2×6 pressure-treated boards for side base
- Four 10-foot 2×6 pressure-treated boards for end base
- One 24×20 foot section of 6-mil UV-treated greenhouse film
- Twenty-two 2-foot rebar stakes
setting up a diy propagation mist bed
For successful rooting of cuttings, a propagation mist bed is almost essential, especially for woody ornamentals or difficult-to-root herbs. A consistent, fine mist prevents desiccation of leaves, allowing cuttings to focus energy on root development rather than water absorption through non-existent roots. You can build a highly effective mist bed for $150 to $300, far less than commercial units that can cost upwards of $1,000. This setup typically involves a water source, a submersible pump, a timer, and misting nozzles. For example, in the humid climate of Florida, mist beds matter for propagating tropical plants, while in drier regions like Arizona, they are indispensable.
A 2×4 foot mist bed can accommodate 100-200 cuttings, depending on their size. The base can be a simple plastic tray or a custom-built frame lined with pond liner. A 5-gallon bucket can serve as a reservoir for the submersible pump. The pump, often a small pond pump, circulates water through a PVC manifold fitted with misting nozzles. These nozzles should produce a fine, fog-like mist, not large droplets, to avoid waterlogging the cuttings. A good misting cycle might be 5 seconds on, 5 minutes off, repeated throughout the day, especially when temperatures are above 70°F.
choosing the right misting components
The misting nozzles are perhaps the most critical component. Look for anti-drip, brass misting nozzles that produce a 0.006 to 0.012 inch droplet size. These typically cost $5-$10 each. For a 4-foot section, three to five nozzles spaced 12 inches apart usually provide adequate coverage. The submersible pump should be rated for continuous duty and have a flow rate sufficient for your number of nozzles—a 100-200 GPH (gallons per hour) pump is often enough for a small bed. Plug the pump and timer into a GFCI-protected outlet, use outdoor-rated cords, and dress the cable with a drip loop so water cannot track down it into the plug. A cycle timer, costing $30-$50, is vital for automating the misting schedule. This setup can achieve rooting success rates of 80-95% for many species, including rosemary and lavender, compared to 30-50% without mist. Consider propagating herbs like rosemary or basil in your mist bed; more tips can be found at agripure.org/articles/starting-a-herb-garden.
- One 5-gallon bucket or larger reservoir
- One small submersible pump (100-200 GPH)
- One cycle timer (e.g., 5 seconds on, 5 minutes off)
- Three to five anti-drip misting nozzles
- 2-3 feet of 1/2-inch PVC pipe for manifold
optimizing seed starting and cutting success
Beyond the physical infrastructure, the success of your propagation efforts hinges on proper technique and environmental control. For seed starting, the choice of growing medium is paramount. A sterile, fine-textured seed-starting mix provides the ideal environment for germination and early root development. These mixes, often peat- or coir-based with perlite or vermiculite, offer excellent drainage and aeration. A sterile mix germinates more reliably than garden soil, which can harbor pathogens and be too dense for delicate seedlings. For example, in California’s Central Valley, commercial growers often use specialized mixes to ensure uniform stands of lettuce and tomato seedlings.
Consistent temperature is another critical factor. Most vegetable seeds germinate best when the soil temperature is between 70-75°F. Bottom heat, provided by electric heating mats, can significantly improve germination speed and uniformity, sometimes reducing germination time by 30%. For example, peppers and tomatoes, common crops in USDA zone 8, show much higher germination rates at 75°F than at 60°F. After germination, maintaining slightly cooler air temperatures, around 65-70°F, helps prevent leggy growth. Light matters too, and providing 14-16 hours of bright, full-spectrum light daily is essential for strong seedling development.
propagation trays and domes
Using propagation trays with clear domes creates a mini-greenhouse effect, maintaining high humidity around newly sown seeds or cuttings. This is particularly useful for species that require high humidity for germination, such as celery, which can take up to three weeks to germinate. A 24-cell seedling tray with a dome, available for $5-$10, can significantly improve your success rates. You can find examples of these trays at agripure.org/shop/24-well-plastic-seedling-pot-succulent-sowing-seedling-box-insulated-seedling-tray. For cuttings, using a sterile, well-draining medium like perlite or a 50:50 mix of perlite and peat moss matters. Dipping the cut end in a rooting hormone, either powder or liquid, can boost rooting success by 20-30% for many species. Regularly inspecting your seedlings and cuttings for signs of disease or pests, and providing adequate air circulation, will ensure robust plant starts.
- Use a sterile, fine-textured seed-starting mix
- Provide consistent bottom heat, 70-75°F, for germination
- Ensure 14-16 hours of bright, full-spectrum light daily
- Utilize propagation trays with clear domes for humidity
- Dip cuttings in rooting hormone for improved success
Propagation Method Comparison
Method | Initial Cost (100 plants) | Success Rate | Time to Set Up | Best For |
|---|---|---|---|---|
Direct Sowing | $5-$10 | 40-60% | Minutes | Hardy annuals, large seeds |
Indoor Seed Starting (trays, lights) | $50-$150 | 70-85% | 1-2 Hours | Vegetables, flowers needing early start |
Mist Bed (cuttings) | $150-$300 | 80-95% | 80-95% | Woody ornamentals, herbs, difficult cuttings |
Hoop House (seedlings, hardening) | $200-$500 | 85-95% | 85-95% | Season extension, hardening off, cold-tolerant crops |
Bench Capacity: A single 8-foot propagation bench can hold up to 10 standard 10×20 inch propagation trays, supporting over 1,000 seedlings.
Hoop House Savings: A DIY 10×20 foot hoop house costs a few hundred dollars in materials, a small fraction of a permanent glazed greenhouse of similar footprint.
Misting Efficiency: A DIY mist bed uses only 0.5-1 gallon of water per hour, making it highly efficient for rooting hundreds of cuttings.
Frequently asked questions
How much space do I need for a basic propagation setup?
For a small-scale operation, a 4×8 foot area can accommodate one propagation bench and a small mist bed, allowing you to start hundreds of plants. This setup can fit in a corner of a garage or a small shed.
What is the most cost-effective way to heat a hoop house in winter?
For a small hoop house, passive solar design, using water barrels for thermal mass, can significantly reduce heating needs. In USDA zone 6, this can lower supplemental heating costs by 30-50% on sunny days.
Can I use regular garden soil for seed starting?
It is generally not recommended to use regular garden soil for seed starting. Garden soil is often too heavy, lacks proper drainage, and can contain weed seeds or pathogens that cause damping-off disease.
How often should I water seedlings in propagation trays?
Seedlings in propagation trays should be watered when the top 1/2 inch of the growing medium feels dry to the touch. This might be daily or every other day, depending on humidity and temperature, ensuring consistent moisture without waterlogging.
What types of plants are best suited for propagation in a mist bed?
Mist beds are excellent for propagating many plant types from cuttings, including woody ornamentals like hydrangeas and azaleas, many herbs such as rosemary and lavender, and even some fruit crops like figs. Success rates can exceed 85% for these species.
How long does it take for most seeds to germinate in ideal conditions?
Most common vegetable seeds, like lettuce, radishes, and beans, will germinate within 3-7 days under ideal conditions (70-75°F soil temperature). Slower germinators, such as parsley or celery, can take 14-21 days.
References
- USDA Natural Resources Conservation Service (2024). USDA Natural Resources Conservation Service.