Key takeaways
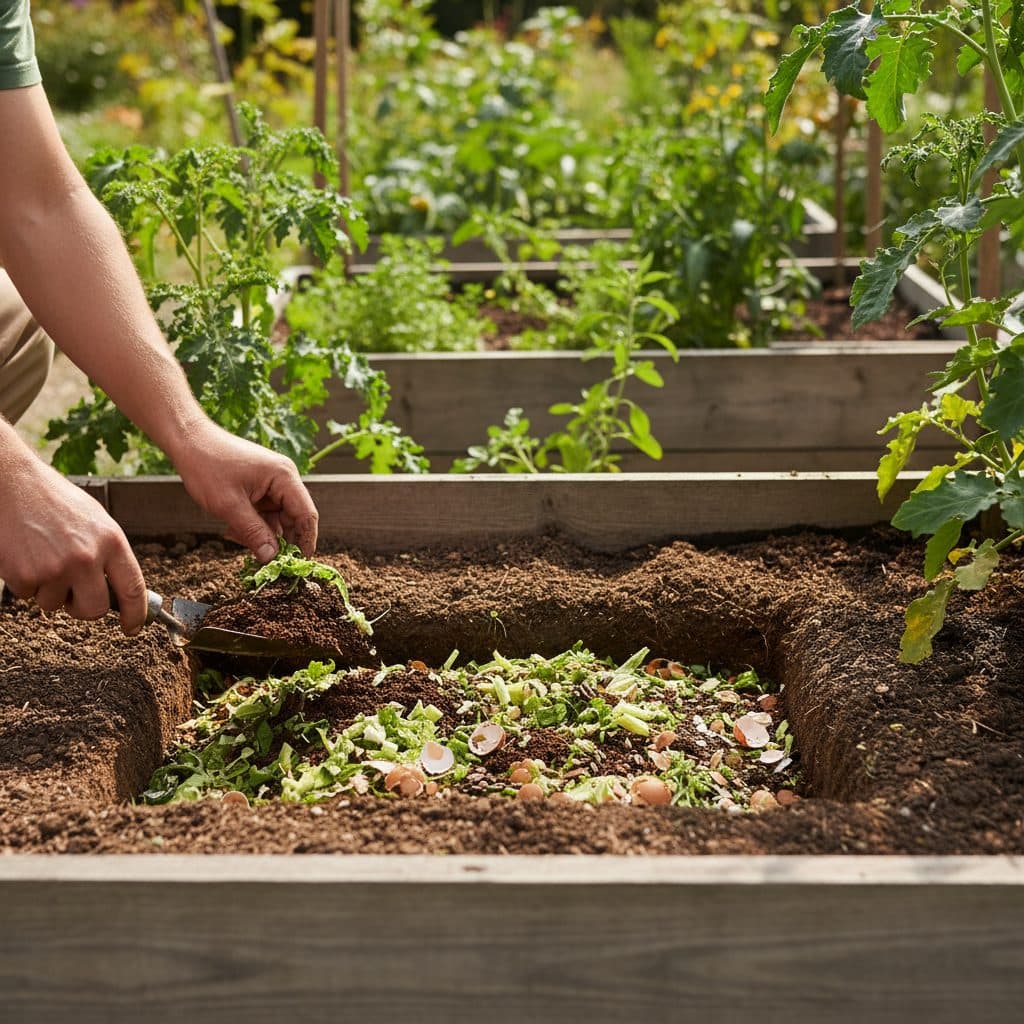
- Trench composting (also known as dig-and-drop or in-ground composting) involves burying organic kitchen waste directly into garden beds beneath a protective soil cap.
- Dig trenches 30 to 45 cm (12 to 18 in) deep, fill the bottom 10 to 15 cm (4 to 6 in) with chopped organic waste, and cap with at least 20 cm (8 in) of native soil.
- A soil cap of at least 20 cm completely eliminates odors and prevents dogs, raccoons, rats, and flies from detecting or digging up buried scraps.
- The classic 3-year English trench rotation method systematically fertilizes soil by rotating between composting trenches, walking pathways, and active crop rows.
- In-ground decomposition takes four to eight months, delivering 100 percent of soluble nutrients and moisture directly to the root zone without leaching losses.
- Avoid burying meat, large animal bones, dairy products, diseased crop foliage, or invasive perennial weed roots.
Quick answer: Trench composting is a simple, water-efficient method where you dig a 30 to 45 cm (12 to 18 in) deep trench directly inside garden beds, deposit chopped kitchen scraps into the bottom, and bury them under at least 20 cm (8 in) of soil. Earthworms and native soil microbes break the material down directly where future plant roots will grow, eliminating pile turning and outdoor bin odors.
For gardeners seeking a low-maintenance way to recycle kitchen scraps without managing large compost heaps, turning heavy tumblers, or dealing with fruit flies, in-ground composting is a solid option. Known historically as English pit composting or "dig and drop," trench composting integrates waste recycling directly into your vegetable growing beds.
Because the organic matter decomposes underground, trench composting retains moisture, prevents nitrogen gassing off into the atmosphere, and invites deep-burrowing earthworms directly into your garden subsoil. Understanding correct trench depth, layering ratios, and bed rotation schedules allows you to build rich, biologically active soil with minimal physical effort.
+-------------------------------------------------------------+
|                 TRENCH COMPOSTING CROSS-SECTION             |
|                                                             |
|   =========================================== Soil Surface  |
|   [ 20 cm (8 in) Native Soil Cap ]                          |
|   - Traps all odors; blocks rodents, dogs, and flies        |
|   - Provides root zone for shallow seasonal crops           |
|   -------------------------------------------------------   |
|   [ 10 to 15 cm (4 to 6 in) Organic Scraps + Carbon ]       |
|   - Chopped kitchen vegetable scraps, coffee grounds        |
|   - Dry leaves, shredded brown paper, garden trimmings      |
|   =======================================================   |
|   [ Subsoil Base with Native Earthworms & Microbes ]        |
|   Total Depth: 30 to 45 cm (12 to 18 in)                    |
+-------------------------------------------------------------+
How trench composting works: underground biological breakdown
Unlike hot above-ground compost heaps that rely on high thermophilic heat generated by rapid bacterial multiplication, trench composting operates via cool, steady, subterranean decomposition.
+-------------------------------------------------------------+
|                ABOVE-GROUND VS IN-GROUND COMPOSTING         |
|                                                             |
|   TRADITIONAL ABOVE-GROUND HEAP:                            |
|   - Requires regular turning to maintain oxygen flow        |
|   - Exposed to sun and wind; dries out quickly in summer    |
|   - Leaches soluble nutrients into the ground beneath bin   |
|   - Attracts rodents and flies if not sealed tightly        |
|                                                             |
|   IN-GROUND TRENCH METHOD:                                  |
|   - Zero turning; anaerobic-aerobic transition in soil      |
|   - Subsoil retains constant moisture and cool temperatures |
|   - 100% of nutrients and worm castings stay in crop bed    |
|   - Zero smell; completely inaccessible to surface pests    |
+-------------------------------------------------------------+
When you bury fresh kitchen trimmings beneath a dense soil cap, indigenous soil microorganisms, fungal mycelia, and earthworms (Lumbricus terrestris) migrate into the trench. Earthworms feed on decaying organic particles and microorganisms, tunneling through compacted subsoil and depositing nutrient-dense castings directly within your growing beds.
To compare how worm-driven nutrient cycling compares to traditional methods, explore our analysis in vermicompost vs regular compost.
The three primary trench composting methods
Gardeners can adapt in-ground composting to fit their space, garden layout, and household waste volume.
+-------------------------------------------------------------+
|               THREE IN-GROUND COMPOSTING STYLES             |
|                                                             |
|   1. CONTINUOUS TRENCH (The 3-Year English Rotation):       |
|   - Dig long trenches along entire bed lengths              |
|   - Rotate trench, path, and crop row annually              |
|                                                             |
|   2. SPOT / PIT COMPOSTING (Hole Method):                   |
|   - Dig individual 30 cm deep holes between perennial plants|
|   - Fill with one or two kitchen scrap buckets; backfill    |
|                                                             |
|   3. PATHWAY COMPOSTING (Walking Trench):                   |
|   - Excavate walking paths between raised beds              |
|   - Fill with woody trimmings and scraps; top with mulch    |
+-------------------------------------------------------------+
1. The 3-year English trench rotation
The most organized method for intensive vegetable gardens is the classic 3-year rotation system. Divide each growing bed lengthwise into three equal strips:
- Year 1:
- Strip A (Trench): Dig a 30 cm deep trench and fill with kitchen waste throughout the season.
- Strip B (Crop Row): Plant heavy-feeding crops (such as tomatoes, corn, or squash) in previously enriched soil.
- Strip C (Pathway): Walking path between beds.
- Year 2:
- Strip A: Plant heavy-feeding crops directly above last year's fully decomposed trench.
- Strip B: Becomes the walking pathway.
- Strip C: Dig the new composting trench.
- Year 3:
- Strip A: Becomes the walking pathway.
- Strip B: Dig the new composting trench.
- Strip C: Plant heavy-feeding crops.
Over three seasons, this rotation systematically enriches every square foot of your garden bed without requiring separate compost distribution.
2. Spot and pit composting
If you generate smaller batches of kitchen waste or grow around established perennial fruit trees and shrubs, spot composting is ideal. Simply dig a single hole 30 to 45 cm (12 to 18 in) deep using a post-hole digger or narrow spade, dump in your countertop kitchen compost caddy, chop the contents with the spade blade, and bury it with the excavated soil.
For growers comparing store-bought tumblers with DIY backyard systems, review our breakdown of the best DIY and store-bought compost bins.
Step-by-step trench composting execution
Proper execution ensures rapid decomposition and prevents common mistakes.
Step Number | Action | Technical Requirement |
|---|---|---|
Step 1: Excavation | Dig trench 30 to 45 cm (12 to 18 in) deep | Keep excavated topsoil mounded neatly along trench ridge |
Step 2: Carbon Base | Lay 2.5 cm (1 in) shredded cardboard or dry leaves | Absorbs excess liquid; provides initial aeration |
Step 3: Waste Addition | Add 10 to 15 cm (4 to 6 in) chopped kitchen scraps | Chop large rinds into 2.5 cm pieces for faster breakdown |
Step 4: Soil Inoculation | Scatter a handful of garden soil or biochar | Inoculates waste with native bacteria and mycorrhizae |
Step 5: Backfilling | Cover with minimum 20 cm (8 in) soil cap | Firm down gently; water thoroughly to settle soil |
+-------------------------------------------------------------+
|                 STEP-BY-STEP TRENCH WORKFLOW                |
|                                                             |
|   Step 1: Dig trench 30 to 45 cm deep (12-18 in)            |
|   Step 2: Add 2.5 cm shredded cardboard / leaves base       |
|   Step 3: Deposit chopped kitchen scraps (10-15 cm)         |
|   Step 4: Sprinkle handful of compost or inoculated biochar |
|   Step 5: Backfill with 20 cm (8 in) native soil cap        |
|   Step 6: Water thoroughly to settle soil and activate microbes
+-------------------------------------------------------------+
To improve microbial inoculation during burying, learn how to prepare nutrient-charged charcoal in our guide to biochar inoculation for soil fertility.
What to bury and what to avoid
Because trench composting is completely sealed underground, it can process some materials that open compost heaps struggle with, but certain guidelines remain critical:
Excellent materials for trench composting:
- Fruit rinds, citrus peels, and vegetable trimmings (citrus peels, coffee grounds, and allium scraps break down well in moderate amounts; avoid burying large quantities of whole citrus rinds in one spot, as high acidity and natural limonene oils can slow local earthworm activity)
- Coffee grounds and paper coffee filters
- Crushed eggshells (provides slow-release calcium)
- Spent tea leaves and shredded plain cardboard
- Soft green garden prunings and spent crop residue
Materials to strictly avoid:
- Fat, oils, and grease: Coat organic particles and create hydrophobic barriers that block microbial colonization.
- Large animal bones and raw meat: Decompose very slowly underground and may attract burrowing scavengers if buried too shallowly.
- Dog and cat feces: Contain harmful parasites (like Toxoplasma gondii) that can persist in vegetable garden soil.
- Diseased plants: Blighted tomato foliage or brassicas infected with clubroot should not be buried in active growing beds.
- Weed seedheads and invasive roots: Burying weed seeds prevents germination in the short term, but persistent weed seeds can remain dormant underground and emerge when cultivated; avoid burying mature weed seedheads or invasive perennial rootstocks (bindweed, couch grass).
Decomposition timeline and planting schedules
How quickly buried organic matter transforms into finished humus depends on soil temperature, moisture levels, and particle size.
+-------------------------------------------------------------+
|               TRENCH DECOMPOSITION TIMELINES                |
|                                                             |
|   Warm Season (Summer: Soil > 20°C / 68°F):                 |
|   - Soft greens & coffee grounds: 6 to 8 weeks              |
|   - Tough rinds & root scraps: 8 to 12 weeks                |
|                                                             |
|   Cool Season (Spring / Autumn: Soil 10-15°C / 50-60°F):    |
|   - General breakdown timeline: 3 to 5 months               |
|                                                             |
|   Winter Dormancy (Frozen / Cold Soils < 5°C / 40°F):       |
|   - Material preserves safely; breaks down rapidly in spring|
+-------------------------------------------------------------+
Can you plant immediately over a trench?
Wait 8 to 12 weeks before planting shallow-rooted crops directly above the trench, or plant immediately in the parallel adjacent rows while the buried trench breaks down. Planting heavy feeders directly into a freshly buried trench risks temporary nitrogen immobilization and uneven soil settling as the organic volume decomposes.
To understand the broader factors influencing breakdown rates across all composting methods, read our comprehensive analysis on how long does compost take.
To evaluate soil texture and structure when preparing garden beds, compare soil types in our guide on topsoil vs garden soil.