Key takeaways
- A cold frame can extend your growing season by four to eight weeks, allowing for earlier planting and later harvests in regions like USDA zone 6.
- Salvaged windows, including casements and double-hung sashes, are excellent, cost-effective materials for cold frame lids, often available at low cost.
- Proper design, including a south-facing angle of 15 to 30 degrees, maximizes solar gain and protects plants from winter winds.
- Ventilation matters; opening the lid 2 to 6 inches on sunny days when temperatures exceed 40°F prevents overheating and plant damage.
- Using scrap lumber for the frame and readily available hardware can keep construction costs low for a 2 ft by 4 ft unit.
- Cold frames can increase internal temperatures by 10 to 20°F compared to outside air, protecting tender seedlings from frost.
Quick answer: A cold frame can be built from salvaged windows and scrap lumber to extend the growing season by creating a passive solar microclimate. This cost-effective DIY project allows for earlier planting and later harvests, especially in regions like USDA Zone 6.
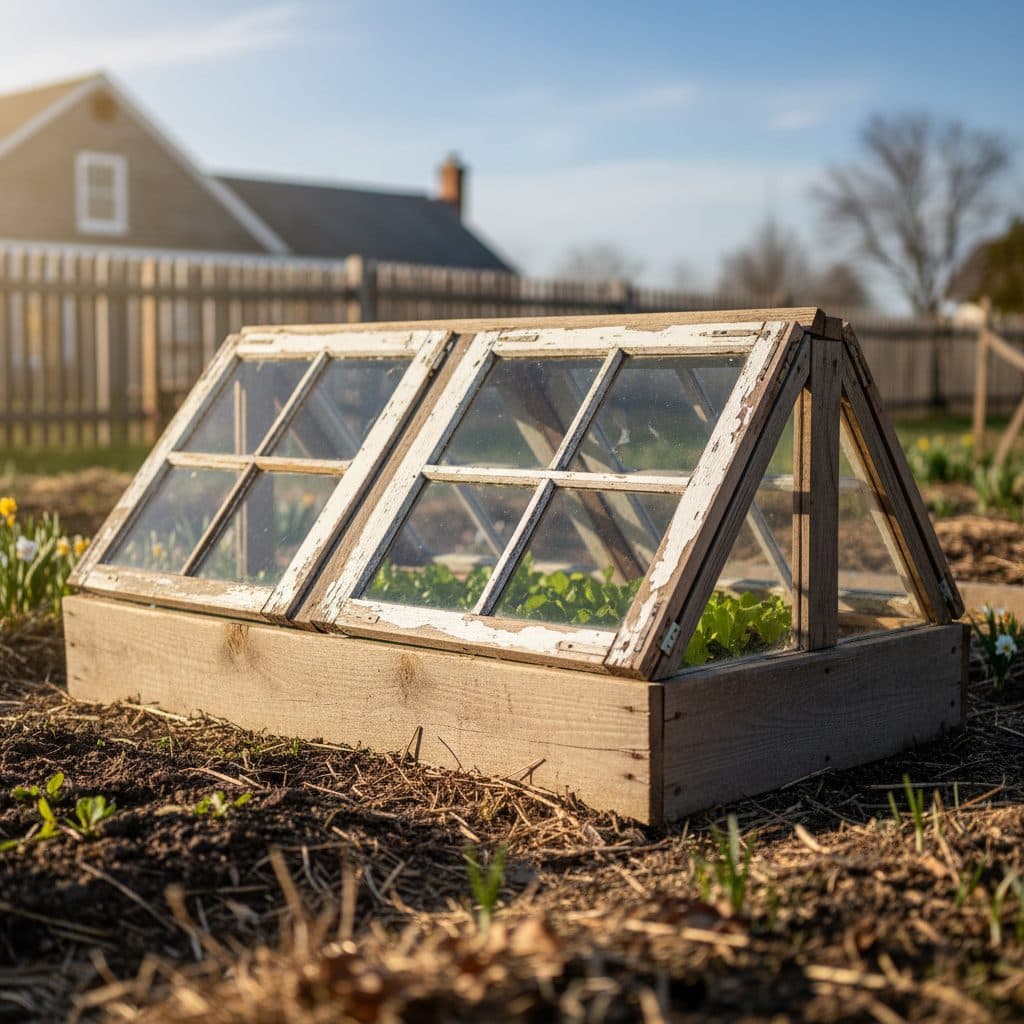
In the high desert of Eastern Oregon, where spring frosts can linger into May and autumn arrives with a sudden chill in September, extending the growing season by even a few weeks makes a significant difference for homesteaders. A cold frame, essentially a bottomless box with a transparent lid, gives a simple, passive solar solution to this challenge. It acts as a miniature greenhouse, trapping solar energy to warm the soil and air inside, protecting tender plants from frost and cold winds. Building one from salvaged windows and scrap lumber is a practical, cost-effective project that can expand your garden’s productivity without a large investment of cash.
Many homesteaders across the United States, from USDA zone 4 in the northern plains to zone 8 in the Pacific Northwest, find cold frames indispensable. This article will guide you through constructing a sturdy cold frame using materials that are often discarded, turning old windows and lumber into a useful asset for your garden. We’ll cover everything from sourcing materials to design principles and ongoing maintenance, potentially adding six to eight weeks to your harvest window.
The cold frame advantage for season extension
A well-built cold frame is a powerful tool for any grower looking to push the boundaries of their local climate. In regions like USDA zone 6, where the average annual minimum temperature ranges from -10°F to 0°F, a cold frame can extend the growing season by four to eight weeks, allowing for earlier spring plantings and later fall harvests. This means you can sow seeds for cool-season crops such as lettuce, spinach, and kale in late February or early March, weeks before the last frost date, and continue harvesting well into November or December. The internal temperature of a cold frame can be 10 to 20°F warmer than the ambient air temperature, creating a microclimate that shields delicate seedlings from harsh conditions.
Maximizing your harvest window
The primary benefit of a cold frame is its ability to provide frost protection and warmth, which translates directly into a longer harvest period. For example, in parts of Michigan (USDA zone 5b), a cold frame allows for a second planting of radishes in late fall, yielding a harvest in early winter when outdoor gardens are dormant. This extended season contributes significantly to food self-sufficiency and reduces reliance on store-bought produce during colder months. The passive solar design requires no electricity, making it an excellent fit for off-grid homesteads, complementing other solar solutions like solar panels for off-grid living or off-grid living setups. It also helps to harden off seedlings that were started indoors, gradually acclimating them to outdoor conditions before transplanting, reducing transplant shock.
- Earlier spring planting: Start cool-season crops like spinach and kale six weeks before the last frost.
- Later fall harvests: Continue picking lettuce and Swiss chard well into early winter.
- Seedling protection: Shield young plants from unexpected frost and strong winds.
- Hardening off: Acclimate indoor-started plants to outdoor conditions gradually.
- Year-round greens: Grow hardy greens in milder climates (USDA zone 7 and up) through winter.
Scouting for salvaged materials
The foundation of a cost-effective cold frame lies in sourcing materials that would otherwise be destined for the landfill. The most critical component is the transparent lid, and salvaged windows are ideal for this purpose. According to building material experts, common types of wooden windows, such as casements, double-hung sashes, and cased frame windows, are excellent candidates for repurposing [1]. You can often find these at architectural salvage yards, demolition sites, or even through online classifieds for a low cost per window. Look for windows with intact glass, as replacing panes can add unexpected cost and complexity to your project. Double-pane windows offer superior insulation, helping to keep the interior warmer on cold nights.
Finding the right lumber and hardware
For the frame itself, scrap lumber is your best friend. Construction sites, pallet recycling centers, and even local sawmills often have offcuts or damaged pieces of lumber that are perfectly suitable for a cold frame. Common dimensions like 2x4s, 2x6s, or even 4x4s can be used, depending on the desired height and robustness of your frame. Aim for lumber that is at least 1.5 inches thick for good structural integrity. For example, a 2 ft by 4 ft cold frame might require approximately 20 linear feet of 2×6 lumber. Hardware such as hinges, screws, and latches can often be found in salvage bins at hardware stores or reused from old projects. A few heavy-duty hinges, typically available at low cost for a pair, will allow the lid to open and close easily, and a simple prop stick can be fashioned from a 1-inch dowel or scrap wood.
- Architectural salvage yards: Best source for diverse window types and sizes.
- Demolition sites: Often have windows and lumber available for free or low cost.
- Online classifieds: Check for local listings of free or cheap building materials.
- Construction sites: Ask for permission to take scrap lumber offcuts.
- Habitat for Humanity ReStores: Excellent source for affordable used building materials.
Designing for solar gain and plant health
The effectiveness of your cold frame hinges on its design, particularly its ability to capture and retain solar heat. The ideal placement for a cold frame is a south-facing location that receives at least six to eight hours of direct sunlight during the winter months. In northern latitudes, like those found in USDA zones 4-7, angling the lid matters. A slope of 15 to 30 degrees, with the higher side facing north, allows sunlight to penetrate more directly, maximizing solar gain. For a cold frame that is 2 feet deep, this might mean the back wall is 12 inches high and the front wall is 8 inches high, creating a 4-inch drop over 24 inches. This angle also helps shed rain and snow, preventing water accumulation on the lid.
Dimensions and ventilation strategies
Consider the size of your salvaged windows when determining the dimensions of your cold frame. Building the frame to fit your windows minimizes cutting and waste. A common size is 2 ft wide by 4 ft long, which can accommodate several rows of plants and is manageable for a single person to move if needed. Good ventilation is paramount to prevent overheating on sunny days, even in winter. Temperatures inside a closed cold frame can quickly soar above 80°F when the outside temperature is 40°F, potentially cooking your plants. Incorporate a simple prop stick or an automatic vent opener that opens the lid when temperatures reach a set point, typically around 50°F. For manual venting, opening the lid 2 to 6 inches for several hours on sunny days is often sufficient. The USDA Natural Resources Conservation Service provides guidance on sustainable land management practices that match these principles [5].
- South-facing orientation: Ensures maximum sun exposure throughout the day.
- Angled lid (15-30 degrees): Optimizes solar gain and sheds precipitation.
- Match window size: Reduces material waste and simplifies construction.
- Adequate depth: Allows for root growth and protects taller plants.
- Ventilation: Essential to prevent overheating; open lid when internal temperature exceeds 50°F.
Constructing the frame: from foundation to finish
With your materials gathered and design finalized, the construction phase begins. Start by preparing your site. Level the ground where the cold frame will sit to ensure stability and prevent heat loss through gaps. For a more permanent installation, you might consider a simple foundation of gravel or concrete blocks, raising the frame 4 to 6 inches off the ground to improve drainage and deter pests. Cut your salvaged lumber to size for the front, back, and side walls so the back wall is taller than the front to create the necessary slope for your window lid. For a 2 ft by 4 ft frame with a 20-degree slope, the back board might be 12 inches high, and the front board 8 inches high. Assemble the box using exterior-grade screws, at least 2.5 inches long, pre-drilling pilot holes to prevent wood splitting, especially with older, drier lumber.
Attaching the windows and sealing the gaps
Once the basic box is assembled, it’s time to attach your salvaged window lid. Position the window on the higher, back edge of the frame and secure it with two to three heavy-duty hinges. This allows the lid to open fully for access and ventilation. Ensure the hinges are strong enough to support the weight of the window, which can be considerable for older, solid-wood frames [1]. Next, focus on sealing any gaps between the window and the frame. Weatherstripping or foam insulation tape, available at most hardware stores, can be applied along the edges where the lid meets the frame, preventing heat loss and drafts. You can also use silicone caulk to seal any small cracks in the window frame itself. A simple prop stick, made from a 1-inch diameter dowel or a piece of scrap wood, can be drilled with holes at 2-inch intervals to allow for adjustable ventilation. Building a simple frame can be done with basic lumber and hand tools, making this a highly accessible project for most homesteaders.
- Level the site: Ensures stability and prevents heat loss.
- Cut lumber to size: Create front, back, and side walls with appropriate height differences.
- Assemble with screws: Use exterior-grade screws for durability, pre-drill pilot holes.
- Attach hinges: Secure the window lid to the back wall of the frame.
- Seal gaps: Use weatherstripping or caulk to minimize heat loss and drafts.
Operating and maintaining your cold frame
Once your cold frame is built, proper operation and maintenance determine its success. The most critical task is managing ventilation. On sunny days, even when outside temperatures are in the 30s or 40s°F, the interior of your cold frame can quickly reach 70°F or 80°F, which is too hot for most cool-season crops. Open the lid 2 to 6 inches to allow excess heat to escape. Close the lid before sunset to trap the day’s warmth and protect plants from nighttime frosts, which can drop to 20°F or lower in USDA zone 5. Consistent monitoring is essential, especially during periods of fluctuating weather. Consider adding a simple, inexpensive thermometer inside the cold frame to help you gauge internal temperatures accurately.
Watering, pest control, and hardening off
Watering in a cold frame requires a different approach than in an open garden. The enclosed environment means less evaporation, so plants generally need less frequent watering. Check the soil moisture every few days, and water thoroughly when the top 1 inch of soil feels dry. Overwatering can lead to fungal diseases in the humid, enclosed space. While cold frames offer some protection from larger pests, smaller ones like aphids or slugs can still find their way in. Inspect your plants regularly and address any pest issues promptly, using organic methods where possible. Finally, when it’s time to transplant seedlings from the cold frame into the main garden, use the cold frame for hardening off by gradually increasing the exposure to outdoor conditions over 7 to 10 days. This process helps plants adapt to wind, direct sun, and cooler temperatures, reducing transplant shock. For more information on growing specific crops like beans, you might find our article on Can You Grow Common Beans (Phaseolus vulgaris) in Your Zone? useful.
- Ventilate daily: Open lid 2-6 inches on sunny days to prevent overheating.
- Monitor temperature: Use a thermometer to guide ventilation decisions.
- Water sparingly: Check soil moisture; overwatering can cause disease.
- Inspect for pests: Address any pest issues promptly to protect plants.
- Harden off seedlings: Gradually expose plants to outdoor conditions before transplanting.
Cold Frame Material Comparison: Salvaged vs. New
Feature | Salvaged Materials (DIY) | New Materials (Store-bought kit) |
|---|---|---|
Initial Cost | Typically $20-$75 (windows often $5-$10 each) | Often $150-$400+ |
Lid Material | Repurposed glass windows (single or double pane) | Polycarbonate panels or new glass |
Frame Material | Scrap 2x4s, 2x6s, or pallet wood | Treated lumber, cedar, or aluminum |
Customization | High – built to fit available windows and space | Limited to standard kit sizes |
Environmental Impact | Low – diverts waste from landfills | Higher – new resource consumption |
Durability | Depends on material quality and construction (can last 10+ years) | Generally good, often 5-15 years |
Season Extension: A cold frame can extend your growing season by four to eight weeks, allowing for earlier spring planting and later fall harvests in USDA zone 6.
Temperature Boost: Internal temperatures within a cold frame can be 10 to 20°F warmer than the outside air, protecting plants from frost down to 0°F.
References
- Wooden windows casements and solid frames, double hung sashes, and cased frame windows. (2023).
- Build an Open-frame Robot Body (2018).
- Insulating Windows with Integrated Frame from Composite Material (2015).
- Drone State Estimation Based on Frame-to-Frame Template Matching with Optimal Windows (2025).
- USDA Natural Resources Conservation Service (2024).