Key takeaways
- Winter sowing utilizes natural cold stratification, leading to stronger, more resilient seedlings adapted to local conditions.
- Many vegetables, including brassicas, leafy greens, and root crops, thrive with winter sowing, often germinating weeks earlier than direct-sown seeds.
- Perennial herbs like mint and chives, along with numerous native wildflowers, benefit from the cold-moist treatment provided by winter sowing.
- Using recycled containers with proper drainage and a high-quality seed-starting mix supports successful winter sowing projects.
- Seedlings started through winter sowing typically require minimal hardening off, saving growers up to two weeks of acclimatization time.
- This method cuts seed-starting costs sharply compared with indoor setups requiring grow lights and heating mats.
Quick answer: Winter sowing is a method of planting seeds in protected outdoor containers during colder months, allowing natural cold stratification to occur. This process extends the growing season by weeks, reduces equipment costs, and produces more resilient seedlings.
In the frigid winters of the Upper Midwest, from USDA zone 3 to 5, many growers are already planning their spring gardens, not by ordering grow lights, but by preparing containers for winter sowing. This method, which involves planting seeds in protected outdoor containers during the colder months, allows nature to handle the critical cold stratification process. It’s a practical approach that gives plants a head start in regions like northern Michigan or central New York, yielding robust plants that are better adapted to local conditions.
Winter sowing offers distinct advantages over traditional indoor seed starting, particularly for species that benefit from a period of cold. It eliminates the need for expensive equipment like heating mats and artificial lighting, cutting initial setup costs substantially. Seedlings grown this way are also naturally hardened off, so they can be transplanted directly into the garden without the usual one-to-two-week acclimatization period, saving time and effort for the busy grower [2].
Understanding the principles of winter sowing for resilient plants
Winter sowing capitalizes on the natural cycles of dormancy and germination, mimicking how seeds behave in the wild. Seeds are planted in containers and left outdoors, exposed to winter weather. The fluctuating temperatures and moisture levels provide the necessary cold stratification, a process where seeds require a period of cold and dampness to break dormancy, often needing temperatures between 32°F and 40°F for several weeks [1]. This natural conditioning results in stronger, more resilient seedlings that are inherently better suited to the local climate.
The benefits of starting seeds outdoors
One primary benefit is the significant reduction in labor. There’s no need to harden off seedlings, a process that can take up to two weeks for plants started indoors under controlled conditions. This method also often leads to higher germination rates for many cold-hardy species, particularly for plants like milkweed and coneflower. Moreover, it frees up valuable indoor space, allowing growers in smaller homes or apartments to start hundreds of plants without converting a room into a nursery. The cost savings are also considerable, as you can avoid purchasing specialized grow lights, which can cost upwards of $100 per unit, and heating mats, typically priced at $20 to $50 each.
- Eliminates the need for indoor grow lights.
- Removes the separate hardening-off step.
- Frees up indoor growing space.
- Promotes natural cold stratification.
- Cultivates more robust, weather-tolerant plants.
Ideal vegetables for a winter sowing start
Many common garden vegetables are excellent candidates for winter sowing, particularly those that tolerate cold and benefit from early spring planting. Leafy greens like spinach, lettuce, and kale are well-suited, often germinating when soil temperatures reach 40°F to 50°F. In USDA zone 6, these can be sown as early as December, with seedlings ready to move to the bed once the ground thaws in early spring. Celery is one to skip. Young celery plants that sit through several weeks below about 55°F are vernalized and bolt to seed instead of forming stalks, so start celery indoors in warmth and set it out only once nights are reliably mild.
Cold-hardy crops for early harvests
Brassicas such as broccoli, cabbage, and Brussels sprouts are also prime candidates. Their seeds can withstand freezing temperatures and will germinate once conditions are favorable, usually when daytime temperatures consistently reach 45°F. Beets transplant well from winter-sown containers. Carrots and radishes do not — their taproots fork or stall once disturbed — so direct sow those into the bed as soon as the ground can be worked. For instance, carrot seed will germinate in soil around 40°F, but growth is slow until temperatures rise above 50°F. Consider using a 24-Cell Seedling Propagation Tray with Dome to provide extra protection for these early crops.
- Spinach, lettuce, and kale for early spring salads.
- Broccoli, cabbage, and Brussels sprouts for robust brassica harvests.
- Beets for early roots — carrots and radishes are better direct sown.
- Swiss chard and collard greens for continuous picking.
- Peas and fava beans for nitrogen-fixing benefits and early pod production.
Herbs and native plants that thrive with cold stratification
Beyond vegetables, many herbs and native plants benefit significantly from winter sowing, particularly those requiring a period of cold to germinate. Perennial herbs such as chives, oregano, and thyme are excellent candidates. Mint germinates this way too, but plant it only into a sunken pot or a container — it spreads by runners and will take over a bed within a season or two. Their seeds often have hard coats or internal dormancy mechanisms that are best overcome by several weeks of cold, moist conditions, typically 4 to 8 weeks at temperatures below 40°F. Starting these in winter allows them to establish strong root systems by the time spring arrives, leading to vigorous growth and earlier harvests. For more details on starting herbs, see Starting a herb garden.
Natives for ecological resilience
Native wildflowers and grasses also flourish with winter sowing. Species like milkweed (Asclepias syriaca), coneflower (Echinacea purpurea), and various native grasses often require 60 to 90 days of cold stratification before they will germinate at all. By sowing these seeds in recycled milk jugs or similar containers in December or January, you allow nature to provide the exact conditions needed for successful germination. This method supports biodiversity and ecological restoration, providing food and habitat for local wildlife. Always source native seeds from reputable suppliers to ensure genetic integrity for your region, such as those adapted to the specific conditions of the Great Plains or the Pacific Northwest.
- Mint, chives, and oregano for culinary use.
- Thyme, lavender, and hyssop for aromatic gardens.
- Milkweed and coneflower for pollinator support.
- Lupine and columbine for beautiful native blooms.
- Little bluestem and switchgrass for native grass landscapes.
Setting up your winter sowing containers for success
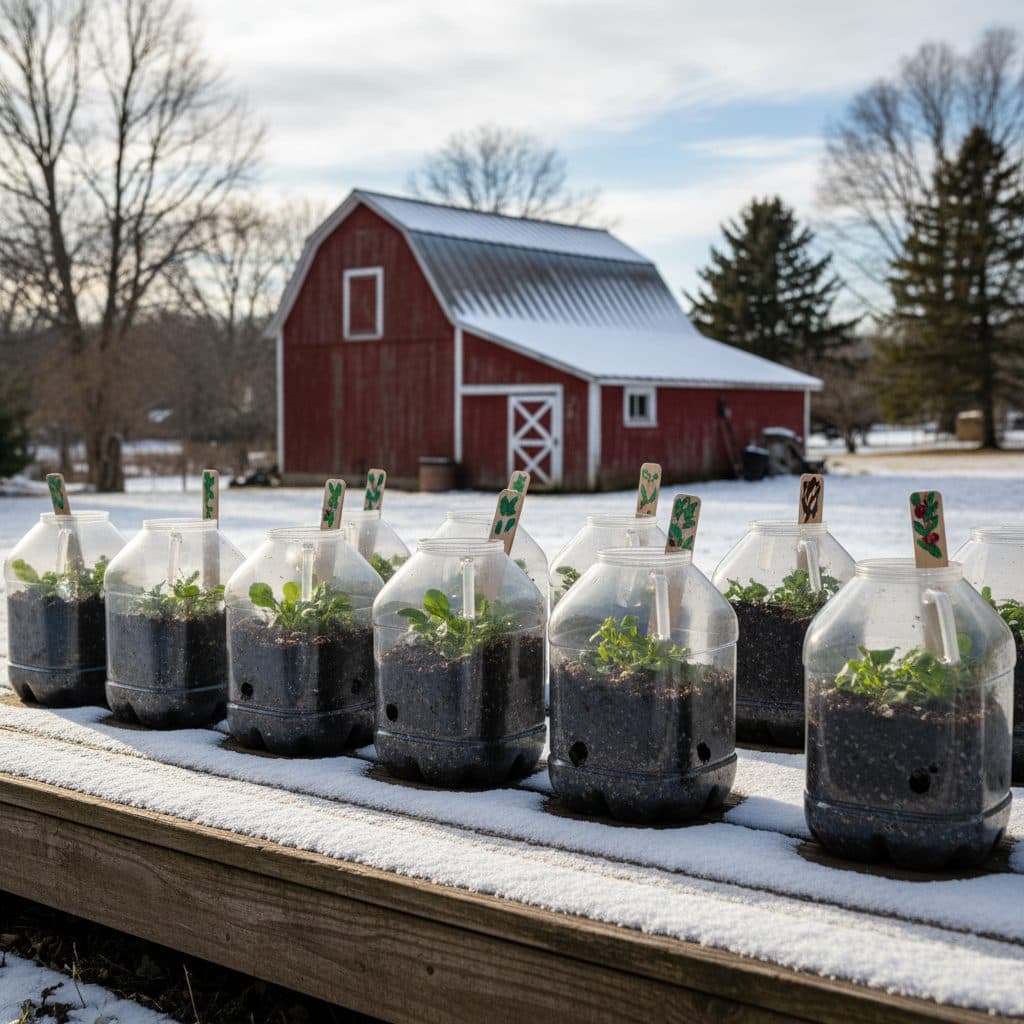
The foundation of successful winter sowing lies in proper container selection and preparation. Recycled plastic containers, such as gallon milk jugs or two-liter soda bottles, are ideal. They are readily available, cost nothing, and create a mini-greenhouse effect. Ensure each container has ample drainage holes—at least six to eight 1/4-inch holes drilled into the bottom and sides to prevent waterlogging, which can lead to seed rot. A sharp utility knife or drill can be used for this task. The containers should be at least 6 inches deep to allow for adequate root development and soil volume, preventing rapid drying out during warmer spells.
Soil and seed placement techniques
Fill your prepared containers with about 4 to 5 inches of a high-quality, sterile seed-starting mix. Avoid garden soil, as it can compact and harbor weed seeds and pathogens. A good mix will retain moisture while allowing for proper drainage; many commercial mixes are formulated for this purpose and contain perlite or vermiculite. Sow seeds according to package directions, typically at a depth two to three times their diameter. For small seeds, a light dusting of soil is sufficient. After sowing, water thoroughly until water drains from the bottom holes. Label each container clearly with the plant name and sowing date using a permanent marker, as fading can occur over a 6-month period. For more detailed guidance, refer to Seed starting for beginners.
- Select clear, recycled plastic containers (e.g., milk jugs, soda bottles).
- Drill 6-8 drainage holes, 1/4 inch in diameter, in the bottom and sides.
- Use a sterile, well-draining seed-starting mix, filling 4-5 inches deep.
- Sow seeds at the recommended depth, usually 2-3 times their diameter.
- Water thoroughly and label containers clearly with permanent markers.
Ongoing care and transplanting winter-sown seedlings
Once your winter-sown containers are placed outdoors, they require surprisingly little attention until spring. The sealed containers create a microclimate that protects seeds from harsh winds and heavy snow, while allowing natural precipitation to provide moisture. However, during prolonged dry spells (especially in late winter or early spring when temperatures might rise above 45°F for several days), it’s wise to check the soil moisture. If the soil feels dry to the touch, add a small amount of water, perhaps 1/4 cup per gallon container, to prevent desiccation. The goal is to keep the soil consistently moist, not waterlogged, throughout the stratification period, which can last 8 to 12 weeks for many species [1].
From container to garden bed
As spring progresses and temperatures consistently rise above 50°F, you will begin to see germination. Once seedlings develop two to three sets of true leaves and daytime temperatures are reliably above freezing, it’s time to prepare for transplanting. In USDA zone 6, this often occurs in late April or early May. Gently remove the entire block of soil and seedlings from the container. You can then separate individual seedlings or small clumps, depending on the plant type, and plant them directly into your prepared garden beds. Because these plants have already experienced outdoor conditions, they are typically much tougher than indoor-started seedlings and will establish quickly, often showing visible growth within a week or two of transplanting.
- Monitor soil moisture during dry periods, adding water if needed.
- Observe for germination as spring temperatures consistently rise above 50°F.
- Transplant seedlings when they have 2-3 sets of true leaves.
- Separate individual plants or small clumps carefully to minimize root disturbance.
- Plant directly into garden beds without a separate hardening-off period.
Comparing Seed Starting Methods for a Typical US Gardener
Feature | Winter Sowing | Indoor Starting (with lights) | Direct Sowing (Spring) |
|---|---|---|---|
Equipment Cost | $0-$10 (recycled containers) | $100-$300+ | $0 (basic tools) |
Hardening Off Needed | No (0 days) | Yes (7-14 days) | No (0 days) |
Germination Time | Natural, variable (weeks) | Controlled (days) | Soil dependent (days-weeks) |
Seedling Resilience | Very High (weather adapted) | Moderate (needs acclimatization) | High (if conditions are right) |
Space Required | Outdoor patio/yard (minimal indoor) | Dedicated indoor space (10 sq ft+) | Garden bed (outdoor) |
Best For | Cold-hardy vegetables, herbs, natives | Warm-season vegetables, tender annuals | Large seeds, quick-growing crops |
Stratification Time: Many native seeds require 60 to 90 days of cold stratification before they will break dormancy.
Temperature Range: Ideal cold stratification occurs when temperatures fluctuate between 32°F and 40°F for several weeks.
Cost Savings: Winter sowing replaces grow lights and heat mats with free containers, so the outlay is seed and a bag of mix.
Frequently asked questions
When is the best time to start winter sowing?
The ideal time for winter sowing is typically from December through February in most temperate US zones, specifically USDA zones 3 to 7. This timing ensures seeds receive adequate cold stratification, often 8 to 12 weeks, before spring’s warmth triggers germination.
What kind of containers work best for winter sowing?
Recycled clear plastic containers, such as gallon milk jugs, two-liter soda bottles, or clear plastic clam shells, are excellent. They should be at least 6 inches deep and have 6-8 drainage holes, each about 1/4 inch wide, to prevent waterlogging.
Do I need to water winter-sown containers?
Generally, natural precipitation provides sufficient moisture. However, during extended dry spells, especially if temperatures rise above 45°F for several days, you may need to add a small amount of water, about 1/4 cup per gallon container, to keep the soil moist.
How do I know when winter-sown seedlings are ready to transplant?
Seedlings are ready for transplanting once they have developed two to three sets of true leaves and the danger of hard frost has passed in your region. For USDA zone 5, this typically occurs in late April or early May, when soil temperatures are consistently above 50°F.
Can I winter sow warm-season crops like tomatoes or peppers?
No, warm-season crops like tomatoes, peppers, or basil are not suitable for traditional winter sowing. These plants require consistent warm temperatures, typically above 60°F, for germination and growth, and would perish in freezing conditions.
References
- Fruits, vegetables, and herbs (2016). Fruits, vegetables, and herbs.
- Fruits, Vegetables, and Herbs (2016). Fruits, Vegetables, and Herbs.
- Acknowledgments (2016). Acknowledgments.
- Nutrients and Vegetables in Skin Protection (2000). Nutrients and Vegetables in Skin Protection.
- USDA Natural Resources Conservation Service (2024). USDA Natural Resources Conservation Service.