Key takeaways
- An herb spiral creates multiple microclimates within a small footprint, supporting diverse plant needs.
- Strategic placement and material selection help maximize sun exposure and heat retention.
- Layering materials like rubble, cardboard, and soil ensures proper drainage and nutrient availability.
- Match herbs to the specific microclimates created: dry and sunny at the top, moist and shady at the bottom.
- A well-built herb spiral can be as small as 6 ft in diameter, offering significant growing space in urban or suburban yards.
- Regular maintenance, including watering and harvesting, keeps the spiral productive for many years.
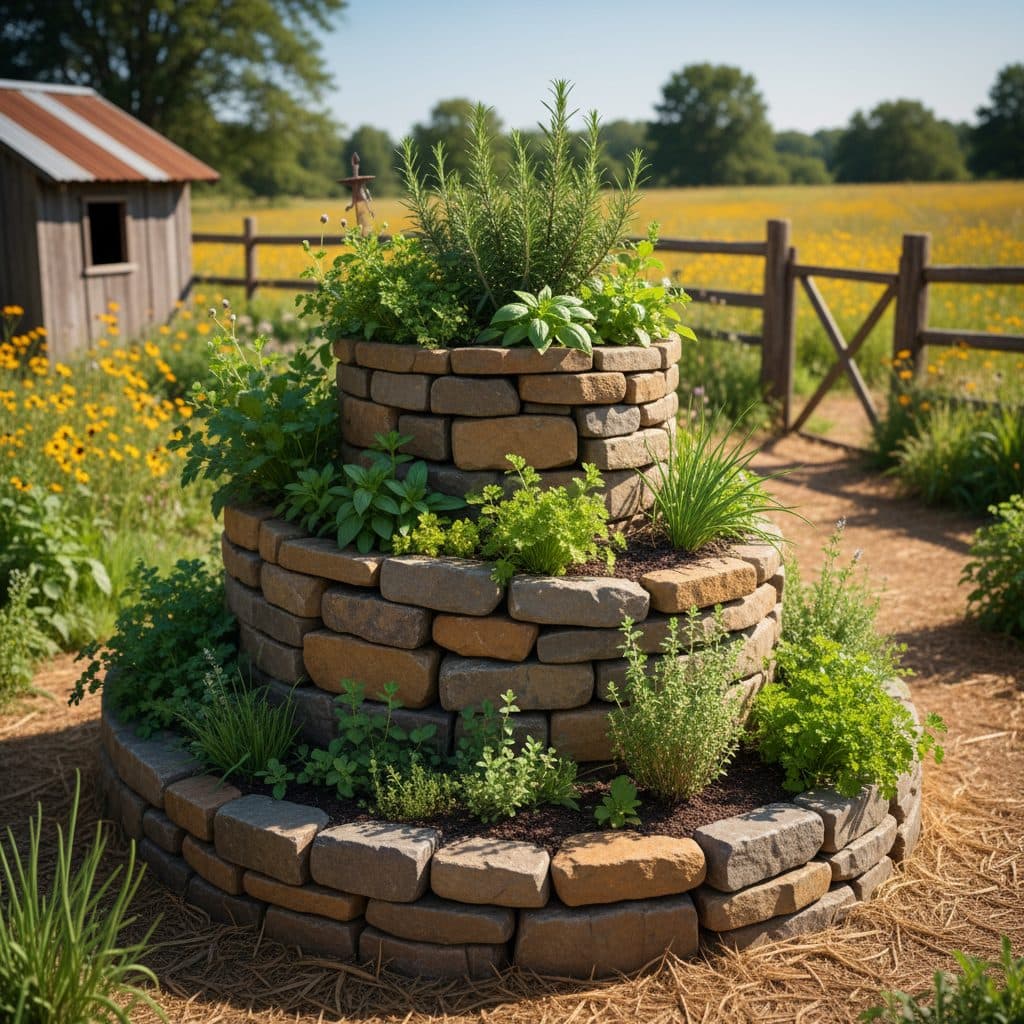
Quick answer: An herb spiral is a three-dimensional garden bed that uses vertical space to create distinct microclimates within a compact area, allowing diverse herbs to thrive. It’s built by spiraling retaining materials upwards, filling with soil, and planting according to sun and moisture needs.
There are plenty of ways to get more growing space out of a tight site. One of the most effective, especially for folks with smaller yards or those looking to expand their growing capacity, is the herb spiral. This permaculture design stacks planting areas vertically and creates a range of microclimates, allowing you to grow a wide variety of herbs that might otherwise require separate beds. Imagine growing drought-tolerant rosemary alongside moisture-loving mint, all within a 6 to 8 ft diameter footprint.
The herb spiral is more than just a raised bed; it’s a living system designed to make the most of sunlight, water, and available space. By carefully selecting materials and understanding the specific needs of your chosen herbs, you can build a highly productive and visually appealing garden feature. Careful planning and planting helps your herb spiral thrive in USDA zone 6 or similar climates, providing fresh ingredients for years to come.
Understanding the herb spiral concept
An herb spiral is a three-dimensional garden bed that uses vertical space to create distinct growing conditions, or microclimates, within a compact area. This design principle is rooted in permaculture, which emphasizes working with natural patterns to create resilient and productive systems. By building up and spiraling inward, you naturally create areas that are warmer and drier at the top, and cooler and moister at the bottom. This allows for a diverse range of plants, from Mediterranean herbs that prefer arid conditions to water-loving varieties, to coexist in a space as small as 6 ft across. For example, a spiral facing south in a USDA zone 7 garden will have significantly warmer spots than one facing north.
Permaculture zones and guilds in a spiral
The herb spiral embodies several permaculture principles, including stacking functions and zone design. While a full permaculture garden might include large-scale zones for food forests and animal systems, the herb spiral brings these concepts down to a manageable scale. You’re effectively creating mini-zones: the sunny, dry top for herbs like thyme and oregano, and the shadier, moister base for plants such as mint or parsley. This multi-layered approach also allows for plant guilds, where different species benefit each other. For instance, planting chives near carrots can deter pests, a principle applicable even in a compact spiral. Consider how a 3 ft wide section at the top gets 8+ hours of sun, while a similar section at the base might only get 4-5 hours.
- Utilize vertical space efficiently, maximizing plant density.
- Create distinct microclimates for diverse plant needs.
- Integrate permaculture principles like zone design and plant guilds.
- Reduce water evaporation through strategic design.
- Provide easy access for harvesting and maintenance.
Planning your herb spiral
Before you start moving rocks, a good plan saves time and effort. The first step is site selection. Choose a spot that receives at least 6 hours of direct sunlight daily, ideally facing south in the Northern Hemisphere, to maximize the warm, dry microclimates at the top. Consider the prevailing winds in your area; a slight shelter can reduce moisture loss. In a typical suburban yard in Ohio, an 8 ft by 8 ft spot with morning sun and afternoon shade will grow parsley, chives, cilantro, and mint well — but it will not give the Mediterranean herbs at the crown the six-plus hours they need, so count the hours before you commit the site. Mark out a circular area, perhaps 6 to 8 ft in diameter, using a string and a stake.
Materials and dimensions for construction
The core materials for an herb spiral are readily available and often free. You’ll need retaining wall materials such as bricks, stones, concrete blocks, or even salvaged broken concrete. For a 6 ft diameter spiral, you might need 150 to 200 bricks, or 1 to 2 cubic yards of stone. You’ll also need fill material for the internal structure, which can include rubble, gravel, cardboard, and good quality topsoil. Ensure your chosen materials are non-toxic and won’t leach harmful chemicals into your herbs. A central drainage pipe, about 2 to 3 in in diameter, can be useful for directing water to the base. Remember to plan for a gentle slope, rising about 2 to 3 ft at its highest point, to create the necessary microclimates. This slope is critical for water drainage and sun exposure differences.
- Choose a sunny location, ideally south-facing, with at least 6 hours of sun.
- Gather non-toxic retaining materials like bricks or stones.
- Estimate 150-200 bricks or 1-2 cubic yards of stone for a 6 ft spiral.
- Collect fill materials: rubble, gravel, cardboard, and quality topsoil.
- Plan for a maximum height of 2-3 ft at the center.
Building the structure
Once your site is prepped and materials are gathered, construction begins. Start by marking the footprint of your spiral on the ground. You can use a rope and a stick to draw a 6 to 8 ft circle, then sketch the spiral path within it. Dig a shallow trench, about 4 to 6 in deep, for your first layer of retaining material to ensure stability. This foundation prevents shifting over time, especially in areas with freeze-thaw cycles like those seen in Michigan’s USDA zone 5. Lay your first course of bricks or stones, following the spiral pattern, gradually building up the height.
Layering for drainage and nutrients
As you build the walls, fill the interior with layers of material. The very bottom layer, especially at the base of the spiral, should be coarse drainage material like gravel or broken concrete, about 6 to 12 in deep. This coarse layer prevents waterlogging, particularly for plants at the lower, moister end of the spiral. Above this, add a layer of organic matter such as cardboard or wood chips, which will break down over time and provide nutrients. You might consider burying a 5-gallon bucket with holes drilled in the bottom at the center, filled with gravel, to act as a slow-release watering point for the upper sections. Finally, fill the remaining space with a rich mixture of compost and topsoil to provide at least 12 to 18 in of planting depth for most herbs. This soil blend, often a 50:50 ratio of compost to local soil, provides the nutrients needed for healthy growth. For more on soil health, consider resources on no-dig beds.
- Mark the spiral footprint and dig a 4-6 in deep trench for the foundation.
- Build retaining walls gradually, following the spiral path.
- Layer coarse drainage material (6-12 in) at the bottom.
- Add organic matter like cardboard or wood chips.
- Fill with a rich blend of compost and topsoil (12-18 in depth).
Planting your spiral
With the structure complete, it’s time for the most rewarding part: planting. A successful herb spiral matches plants to their preferred microclimates. At the very top, where it’s hottest and driest, plant sun-loving, drought-tolerant herbs. Think thyme (Thymus vulgaris), oregano (Origanum vulgare), winter savory (Satureja montana), and garden sage (Salvia officinalis). Rosemary belongs at the top of a spiral in zone 7 and warmer — common rosemary is not reliably hardy below about zone 7, and the crown of a spiral is the most exposed, fastest-draining, most wind-scoured position in the garden. In zone 6, either choose a cold-hardy cultivar such as ‘Arp’ or ‘Madalene Hill’ and mulch its crown, or grow rosemary in a pot you bring under cover. These Mediterranean herbs thrive in full sun and well-drained soil, often requiring less water than other plants, perhaps only 0.5 inches of water per week after establishment. Moving down the spiral, as conditions become slightly cooler and moister, you can introduce herbs like lavender, chives, and marjoram. These plants tolerate a bit more moisture but still prefer good drainage.
Mid-level and base plantings
In the middle sections of the spiral, where conditions are more balanced, consider herbs that appreciate consistent moisture but don’t want to be waterlogged. This is a good spot for parsley (Petroselinum crispum), cilantro (Coriandrum sativum), and basil (Ocimum basilicum). These plants typically need 1 inch of water per week during their growing season in a USDA zone 6 garden. At the very bottom of the spiral, where it’s coolest, shadiest, and most consistently moist, plant water-loving herbs. Mint (Mentha spp.) is a classic choice for this spot, but do not expect the wall to hold it. Mint travels by rhizome, and it will run under a dry-stacked or mortared wall and colonize the rest of the spiral and the ground around it. Sink a bottomless pot or a 5-gallon bucket with the base cut out into the soil at the foot of the spiral and plant the mint inside that. Lemon balm also works at the base, but sink it in a pot like the mint — it seeds itself hard and will come up through the whole spiral. Skip watercress: it escapes readily into waterways and is treated as an invasive in parts of the US, and cress grown in standing water accessible to livestock or wildlife carries a liver-fluke risk. Remember to consider the mature size of your plants; a large rosemary bush can grow 3-5 ft tall and wide, so give it space. For more ideas on easy-to-grow herbs, check out our guide on starting a herb garden.
- Plant drought-tolerant herbs like thyme, oregano, and winter savory at the hot, dry top; in zone 6, keep rosemary to a cold-hardy cultivar or a pot you can move under cover.
- Place herbs needing moderate moisture, such as parsley and basil, in the middle.
- Reserve the cool, moist base for water-loving plants like mint.
- Consider mature plant size and spacing for optimal growth.
- Group plants with similar water and sun requirements.
Maintenance and harvesting
Once your herb spiral is planted, ongoing maintenance is minimal but important for sustained productivity. Watering is perhaps the most critical task. Due to the different microclimates, you’ll likely need to water different sections at different rates. The top, dry sections might only need water every few days during a summer heatwave in Arizona, while the base might need it daily. Observe your plants and the soil moisture; a good rule of thumb is to water when the top 1-2 in of soil feels dry to the touch. A slow, deep watering method, perhaps with a watering can, is often best to ensure water penetrates the soil layers. Do not count on watering the crown alone and letting gravity carry moisture down the spiral. Water drains straight through the mound rather than travelling along the path, so the middle and lower sections still need watering on their own schedule.
Pruning, feeding, and pest management
Pruning is essential to encourage bushy growth and prevent herbs from becoming leggy or going to seed prematurely. Regularly snip off the top 1/3 of your herbs, especially for basil and mint, to promote new growth. For woody herbs like rosemary, lavender, and sage, prune after flowering to maintain shape and vigor — but never cut back into bare old wood. These plants carry no dormant buds there and will not resprout from it, so stay within the green, leafy growth. Feeding can be done annually with a light layer of compost around the base of plants, typically 1 to 2 inches deep in early spring. This replenishes nutrients and improves soil structure. Pest management in an herb spiral is often straightforward; the diversity of plants helps deter many common pests. If you do notice issues, a simple spray of insecticidal soap (1 tablespoon per gallon of water) can often resolve them. Inspect plants weekly for any signs of trouble. A well-maintained spiral in a USDA zone 8 climate can produce fresh herbs for 8-10 months of the year.
- Adjust watering frequency based on plant needs and microclimate zones.
- Prune herbs regularly to encourage bushy growth and prevent bolting.
- Apply 1-2 inches of compost annually in spring for nutrient replenishment.
- Monitor for pests weekly and address issues with organic solutions.
- Harvest frequently to promote continuous production and flavor.
Integrating an herb spiral into larger designs
While an herb spiral is a complete garden in itself, it also fits beautifully into larger permaculture designs. Think of it as a highly productive ‘zone one’ element: the area closest to your home that you visit most frequently. This proximity makes it ideal for daily harvesting of culinary herbs. In a larger backyard in a USDA zone 7 setting, you might place your herb spiral near your kitchen door, adjacent to a patio or a small annual vegetable bed. This strategic placement ensures that the herbs are always within easy reach, encouraging frequent use and observation. For broader site planning, consider how an herb spiral complements other features like rainwater harvesting systems or compost bins, which could be located a few feet away.
Connecting to water and other garden elements
An herb spiral can be designed to interact with other garden elements to improve its efficiency. For instance, you could position the base of your spiral to drain into a small swale or a rain garden, capturing excess moisture for other plants. This thoughtful water management puts runoff to work in the garden instead of losing it off the site. If you’re planning a more extensive permaculture layout, consider how your herb spiral integrates with your overall site design. Perhaps the path leading to the spiral could be made of permeable materials, or a small bench could be placed nearby for easy access and enjoyment. Even a small 6 ft diameter spiral can significantly contribute to the biodiversity and productivity of a 1/4-acre suburban lot, demonstrating how compact designs can have a substantial impact. Remember to consider the flow of traffic and utilities when placing any permanent garden structure.
- Position the herb spiral as a ‘zone one’ element, close to the kitchen.
- Integrate with rainwater harvesting or swale systems for water efficiency.
- Consider its placement within a larger permaculture site design.
- Ensure easy access for daily harvesting and maintenance.
- Increase biodiversity and productivity in a compact footprint.
Herb spiral vs. traditional raised bed
Feature | Herb spiral | Traditional raised bed |
|---|---|---|
Footprint | Compact (6-8 ft diameter) | Variable, often linear |
Microclimates | Multiple (hot/dry to cool/moist) | Generally uniform |
Plant diversity | High, supports varied needs | Limited by uniform conditions |
Water use | Efficient, gravity-fed drainage | Can be less efficient without zoning |
Accessibility | 360-degree access | Often one or two sides |
Visual appeal | Architectural, focal point | Functional, can be less aesthetic |
Space Saver: A 6 ft diameter herb spiral gives roughly 20 linear feet of planting edge from the 28 square feet of ground it occupies, because the bed is folded upward rather than laid out flat.
Water Efficiency: Grouping drought-tolerant herbs at the free-draining crown and moisture-lovers at the base lets you water each plant to its own needs, instead of watering an entire flat bed to suit the thirstiest thing in it.
Temperature Gradient: On a sunny day the soil at the sunlit crown of a spiral runs noticeably warmer and drier than the shaded, north-facing base; that difference, more than air temperature, is what creates the microclimates.
Frequently asked questions
How much space do I need for an herb spiral?
A functional herb spiral can be built in a circular area as small as 6 ft in diameter, though 8 ft is often preferred for more planting room. This compact design makes it suitable for most urban or suburban yards, providing significant growing potential in a small footprint.
What materials are best for building the walls?
Natural stones, bricks, or concrete blocks are excellent choices for the retaining walls. Aim for non-toxic materials that will withstand local weather conditions, such as those found in USDA zone 5, for many years without leaching harmful substances into the soil. You might need 150-200 bricks for a 6 ft spiral.
How do I ensure proper drainage?
Proper drainage is achieved by layering coarse materials like gravel or broken concrete at the base of the spiral, especially in the lowest sections. This layer, typically 6 to 12 in deep, prevents waterlogging and protects the health of your herbs, particularly those at the upper, drier zones.
Can I grow vegetables in an herb spiral?
While primarily designed for herbs, you can certainly grow small, compact vegetables in an herb spiral. Leafy greens like lettuce and spinach, or even radishes, can thrive in the middle and lower, moister sections. Just ensure they have enough soil depth, at least 12-18 inches, and adequate sunlight for their specific needs.
How often should I water my herb spiral?
Watering frequency varies significantly across the spiral’s microclimates. The top, dry sections might only need water every 2-3 days in summer, while the base could require daily watering. Monitor soil moisture by hand; the top 1-2 inches should feel dry before watering again, especially in warmer climates like those in Texas.
What’s the ideal height for an herb spiral?
An ideal herb spiral typically rises to a height of 2 to 3 ft at its center. This elevation is sufficient to create distinct microclimates for sun exposure and moisture retention, allowing for a wide variety of herbs to thrive from the sunny top to the shadier base.
References
- USDA Natural Resources Conservation Service (2024). USDA Natural Resources Conservation Service.