Key takeaways
- The no-dig method was popularised in Australia by pioneering gardener Esther Deans in the 1970s.
- Building upwards with organic matter smothers weeds and lawn without disturbing native soil profiles.
- Layering alternating carbon-rich and nitrogen-rich organic materials mimics natural forest floor decomposition.
- Thick newspaper or unprinted cardboard forms the weed-suppressing base layer over uncultivated ground.
- You can plant immediately into pockets of rich compost created directly inside the top straw layer.
Quick answer: A no dig garden in Australia is built by placing a thick, overlapping barrier of wet newspaper or cardboard directly over lawn or weeds, then alternating thick layers of lucerne hay, aged manure, compost, and clean straw. This creates a fertile, water-retentive growing medium that feeds soil biology and allows immediate planting without tilling.
Australian soils are often either compacted clay or water-repellent sand. Traditional double-digging exhausts the gardener and breaks up fungal networks, exposing organic matter to oxidation under the sun. Building a no-dig garden offers a practical method that builds deep topsoil from the surface downward.
Pioneered in Sydney by Esther Deans during the 1970s, the Australian no-dig method suits regional climate extremes. By stacking organic materials above ground, the system insulates the root area, retains soil moisture during summer heatwaves, and creates active soil biology within weeks.
The Esther Deans method: why no-dig works in Australia
Esther Deans developed her layered system to make gardening accessible without heavy digging, back strain, or chemical reliance. Her work influenced sheet mulching and permaculture garden design internationally.
In the harsh Australian climate, turning over the soil causes severe ecological disruption:
- Preserves soil structure and mycorrhizal fungi: Digging tears apart fungal hyphae that transport water and trace minerals to vegetable roots. Leaving the ground untilled allows fungal networks and earthworms to flourish undisturbed.
- Suppresses dormant weed seeds: Soil contains thousands of dormant weed seeds. Turning the soil brings those seeds up into the light where they instantly germinate. No-dig smothers existing weeds and keeps weed seeds buried deep in darkness.
- Improves water retention: Australian sandy soils suffer from rapid drying and hydrophobicity. Layering rich organic matter creates a sponge that captures and holds irrigation. For complementary soil moisture tactics, see our guide on sandy soil water retention.
To explore broader ecological layouts and site planning, review our guide on permaculture gardening.
Step-by-step layering formula for Australian beds
Building an authentic Australian no-dig bed is like assembling an organic lasagne. The goal is to balance carbon-rich brown materials (straw, cardboard) with nitrogen-rich green materials (lucerne hay, manure, compost) to fuel rapid biological breakdown.
+---------------------+-----------------------+---------------------------------------+
| Layer Order         | Material Choice       | Thickness & Function                  |
+---------------------+-----------------------+---------------------------------------+
| 1. Base Layer       | Newspaper / Cardboard | 5 mm wet paper (40-60 sheets) / board |
| 2. Nitrogen Pad     | Lucerne Hay           | 10 to 15 cm (high protein / nitrogen) |
| 3. Nutrient Layer   | Aged Manure / Compost | 3 to 5 cm (feeds microbes & biology)  |
| 4. Carbon Cushion   | Pea Straw or Oaten    | 10 to 15 cm (aeration and structure)  |
| 5. Planting Pockets | Rich Mature Compost   | Handfuls placed per seedling          |
+---------------------+-----------------------+---------------------------------------+
Step 1: Define edges and lay the base
Choose a sunny location receiving at least six hours of direct sunlight. You can construct free-standing mounds or frame the bed using untreated hardwood sleepers, corrugated iron, or rocks.
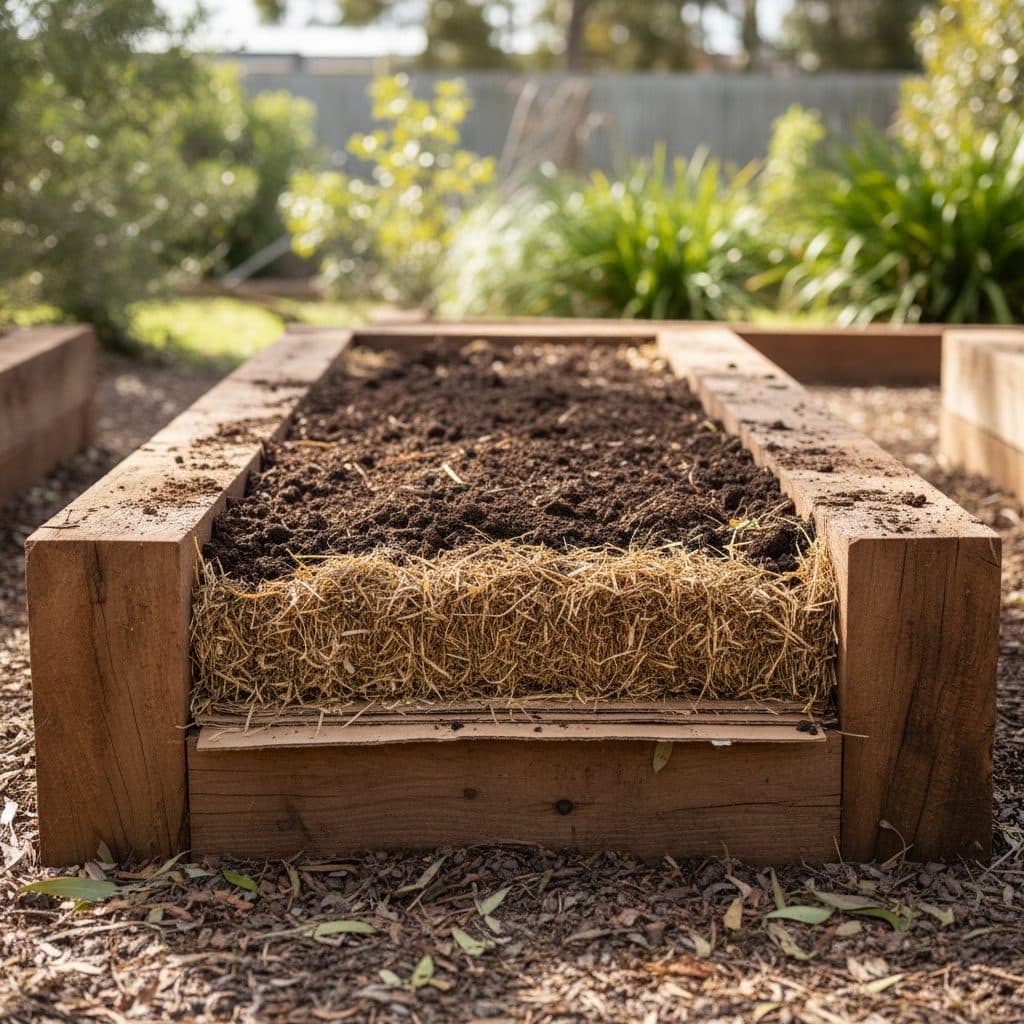
Do not dig up the existing lawn or weeds. Simply flatten tall vegetation and lay down about 5 mm of packed wet newspaper (roughly 40 to 60 sheets), or a single layer of unprinted corrugated cardboard across the entire footprint. Ensure all edges overlap by at least 15 cm so persistent couch grass or kikuyu cannot find gaps. Soak the base layer thoroughly with water using a hose nozzle.
Step 2: Lay down the lucerne hay layer
Lucerne (Medicago sativa, also called alfalfa) is a deep-rooted legume packed with nitrogen, calcium, potassium, and natural plant growth stimulants (triacontanol).
Break open lucerne hay biscuits and spread a continuous 10 to 15 cm layer over the wet newspaper base. Soak this layer thoroughly with water. As lucerne decomposes, it generates gentle warmth and releases nitrogen that accelerates the breakdown of surrounding carbon layers.
Step 3: Add aged manure and organic fertilisers
Spread a 3 to 5 cm layer of well-aged cow manure, sheep manure, or composted poultry manure over the lucerne. Lightly dust the surface with a handful of blood and bone and a sprinkling of rock minerals or agricultural lime if your regional soil is naturally acidic.
Ask your supplier whether the paddock the hay, straw or manure came from was sprayed with a pyridine herbicide (aminopyralid, clopyralid, picloram). These residues survive composting and the animal gut and will deform tomatoes, potatoes, beans, peas and lettuce for a season or more. If in doubt, run a bioassay: sow a few broad bean or pea seeds in a pot of the finished mix and watch for cupped, fern-like new growth before you plant the bed out.
For gardeners making their own biological inputs, explore the dynamics between hot vs cold composting.
Step 4: Add clean straw and finishing compost
Add a 10 to 15 cm layer of clean pea straw, oaten straw, or sugarcane mulch. Water it down thoroughly until the entire mound is moist like a wrung-out sponge. The complete bed should stand roughly 35 to 45 cm high; over the following weeks, it will naturally compress to approximately 25 cm as decomposition proceeds.
How to plant immediately into a new no-dig bed
A major advantage of the Esther Deans method is that you do not need to wait months for the bed to rot down before planting.
Planting seedlings:
- Part the top straw layer with your hands to create a small hollow roughly the size of a rockmelon.
- Fill the hollow with two to three generous handfuls of mature, weed-free compost or premium potting soil.
- Plant your vegetable seedling directly into the compost pocket, firming it gently around the root ball.
- Draw the surrounding straw back around the seedling stem to act as a protective mulch, ensuring the mulch does not directly touch the tender green stem.
The seedling establishes its early roots in the fertile compost pocket. By the time roots grow outward, the surrounding lucerne and manure layers have begun breaking down into rich, cool humus. Hardy, productive crops like growing silverbeet thrive remarkably well when planted into newly built no-dig beds.
Sowing seeds directly:
In the first season, direct-sow only quick, shallow crops (radish, rocket, Asian greens, spring onions) into a 5 cm band of fine compost, and keep it moist until germination. Leave carrots, parsnips and long beetroot until the second season, once the lucerne and straw have broken down into a deep, uniform bed; sown into fresh straw layers they fork and stall.
Ongoing maintenance in the Australian climate
Maintaining a no dig garden in Australia is simple and reduces weekly garden labour:
- Never step on the beds: Design beds no wider than 1.2 metres so you can easily reach the centre from either side without compacting the loose, aerated structure.
- Top up mulch annually: As the organic layers decompose and feed the earthworm population, the bed level will drop. At the start of each spring and autumn planting season, add a 5 cm layer of fresh compost and a top blanket of clean lucerne or pea straw.
- Water deeply and infrequently: Because no-dig layers act as a thermal sponge, moisture stays trapped in the lower root area far longer than in bare soil. Water deeply at the base to encourage roots to search downward into the cooling layers.