Key takeaways
- Carrots store best at 0°C to 4°C (32°F to 39°F) with high relative humidity between 90 and 95 percent.
- Twist or cut off leafy green tops immediately upon harvest to prevent moisture loss from the root.
- Do not wash carrots before long-term storage in sand or sawdust; allow soil to dry naturally.
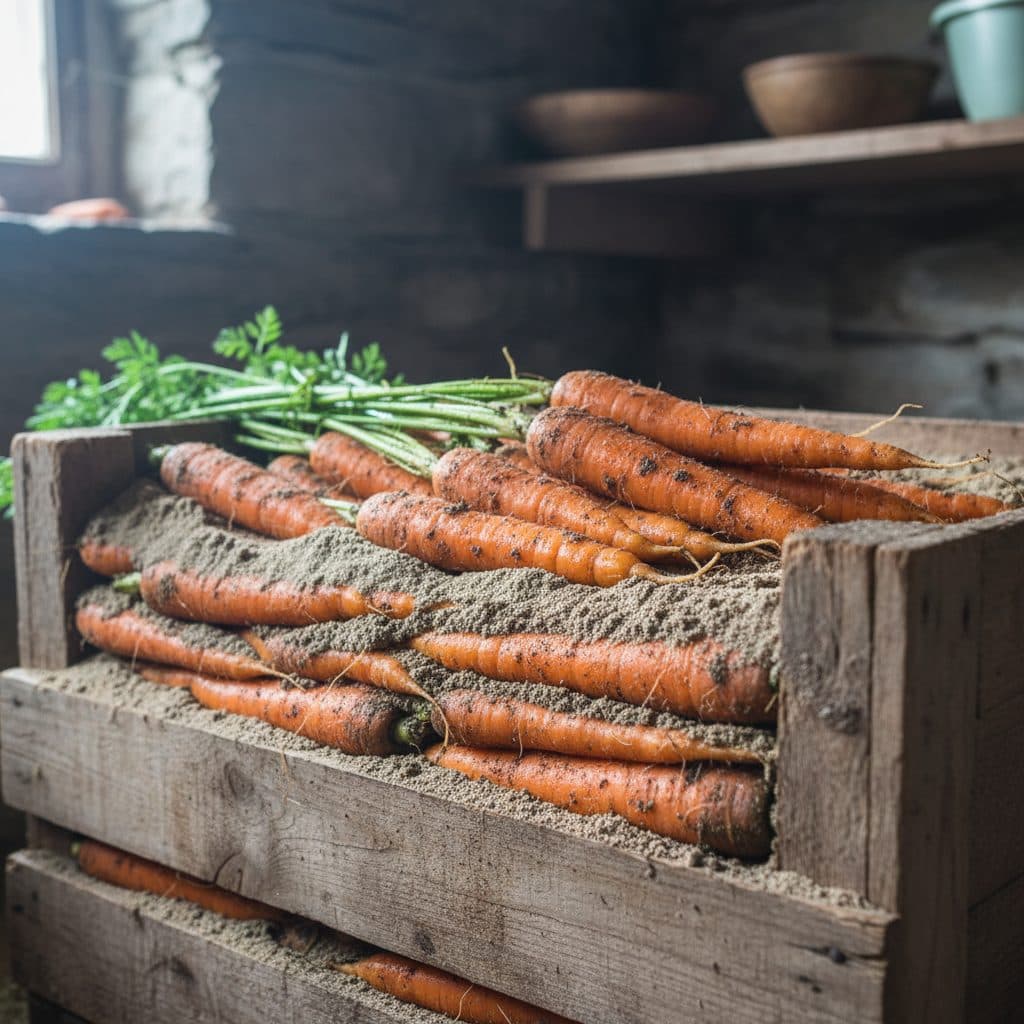
- Storing roots layered in damp sand, sawdust, or shredded leaves preserves crispness for five to seven months.
- In cold climates with deep snow, carrots can be left in the ground under heavy straw mulch for late winter digging.
Quick answer: To store carrots for winter, harvest mature roots after the first light frosts, twist off the green tops right at the crown, and let the outer skins air-dry without washing. Pack the unwashed carrots in alternating layers of damp sand, sawdust, or peat moss inside breathable wooden crates or plastic bins kept between 0°C and 4°C with 90 to 95 percent humidity.
Carrots are among the most versatile, nutrient-dense root crops a gardener can harvest. A successful autumn yield often produces dozens of kilograms of firm, sweet roots all at once. Knowing how to store carrots properly keeps your homegrown harvest crisp, sweet, and firm through five to seven months of winter instead of rotting or turning rubbery.
Unlike fruit that continues to ripen after picking, harvested carrots are living dormant roots that slowly consume stored sugars through respiration. Preserving their eating quality requires managing three main storage parameters: near-freezing temperature, high humidity to prevent dehydration, and darkness to stop green sprouting.
Harvesting and post-harvest prep for storage
Long storage life begins with the harvest process. Handling carrots gently prevents microscopic bruising and fungal entry wounds that cause rot in storage.
+---------------------+---------------------------------------------------------------------------------+
| Post-Harvest Step   | Correct Technique                                                               |
+---------------------+---------------------------------------------------------------------------------+
| Harvest Timing      | After first light frosts; cold raises sugar concentration                       |
| Lifting Method      | Loosen soil with garden fork 15 cm away; pull gently                            |
| Top Removal         | Twist or slice tops off flush (leave < 5 mm)                                    |
| Washing             | DO NOT WASH roots destined for sand or cellar storage                           |
| Surface drying      | Let surface soil dry briefly in deep shade, then cool roots as fast as possible |
+---------------------+---------------------------------------------------------------------------------+
1. Time the harvest after frost
Whenever possible, harvest maincrop carrots after they have experienced two or three light autumn frosts (-1°C to -3°C). Cold soil slows respiration and raises the concentration of sugars (mainly sucrose) already stored in the root. These act as a natural antifreeze and noticeably improve flavour.
2. Remove the green tops immediately
As soon as carrots are lifted from the ground, remove the green foliage. If left attached, the leafy tops continue photosynthesising and transpiring, drawing moisture and sugars straight out of the root core within 24 hours. Twist the tops off with your hands or slice them off with a sharp knife just above the crown (leaving 2 to 5 mm of stem).
3. Do not wash cellar carrots
For long-term storage in sand or sawdust, leave the natural garden soil on the roots. Washing strips away protective microflora and introduces excess surface moisture that promotes fungal decay (Botrytis and Sclerotinia). Gently brush off large soil clumps with soft cotton gloves and let the surface dry briefly in a cool, shaded spot, then get the roots into cold storage the same day; carrots are not cured, and time spent warm costs shelf life.
To ensure your crop develops sturdy, disease-free roots during the growing season, review our guide on carrot root crop stages thinning watering.
Storing carrots in damp sand or sawdust
Packing carrots in damp, clean sand or hardwood sawdust is the time-tested traditional method for root cellars, unheated basements, and cold garages.
+-----------------------------------------------------------------------------------+
|  [Layering Carrots in Sand]                                                       |
|                                                                                   |
|  [=========================== Top 5 cm Damp Sand Layer =========================] |
|  [  Carrot  ]    [  Carrot  ]    [  Carrot  ]    [  Carrot  ]    [  Carrot  ]     |
|  [-------------------------- 2.5 cm Damp Sand Cushion --------------------------] |
|  [  Carrot  ]    [  Carrot  ]    [  Carrot  ]    [  Carrot  ]    [  Carrot  ]     |
|  [========================= Bottom 5 cm Sand Base Layer ========================] |
+-----------------------------------------------------------------------------------+
Packing procedure:
- Select containers: Use wooden bushel crates, sturdy cardboard boxes, or five-gallon food-grade plastic buckets with a few ventilation holes drilled in the lid.
- Base layer: Spread a 5 cm (2 inch) layer of slightly damp play sand, coco peat, or clean hardwood sawdust across the bottom of the container. The medium should feel like a wrung-out sponge: cool and barely moist to the touch, but releasing no water when squeezed into a tight ball.
- Arrange the roots: Place a layer of carrots on the sand, arranging them in single files so that individual carrots do not touch one another. Leaving a small gap prevents rot from spreading if a single root spoils.
- Cover and repeat: Spread a 2.5 cm layer of damp sand over the carrots, ensuring all roots are completely buried. Add another layer of carrots, repeating the process until the container is full.
- Top seal: Finish with a generous 5 cm layer of damp sand on top. Place the container in your cold storage location.
For cellar design and passive cooling rules, see our guides on root cellaring and root cellaring with no power.
In-ground overwintering: storing carrots in the garden bed
In cold climates, gardeners can store mature carrots directly in the ground where they grew, harvesting crisp, sweet roots throughout winter.
+-----------------------------------------------------------------------------------+
|  [In-Ground Overwintering Cross Section]                                          |
|                                                                                   |
|   *** Deep Snow Pack (Natural Thermal Blanket) ***                                |
|  ~~~~~~~~~~~~~~~~~~~~~~~  |
|  [================== 30 to 45 cm Clean Straw or Dry Leaves ===================]   |
|  [======================== Heavy Tarp / Plastic Sheeting ======================]  |
|  -------------------------------- Soil Surface ---------------------------------  |
|      |||               |||               |||               |||                    |
|    Carrots           Carrots           Carrots           Carrots                  |
|    in Soil           in Soil           in Soil           in Soil                  |
+-----------------------------------------------------------------------------------+
In-ground method steps:
- In late autumn, before the ground freezes solid, cut the carrot tops back to soil level.
- Cover the carrot bed with a 30 to 45 cm (12 to 18 inch) thick blanket of dry straw, shredded autumn leaves, or wood shavings.
- Place a waterproof tarp or dark plastic sheet over the straw mulch, weighing down the edges with bricks or timber. The tarp keeps autumn rain from soaking the straw, preserving its insulating air pockets.
- Snow settling on top of the tarp adds an additional layer of natural insulation.
- To harvest during midwinter, pull back the tarp, brush aside the straw, and dig the fresh, crisp roots out of the unfrozen soil beneath.
For cold-climate crop scheduling, coordinate with our regional overview on zone 3 gardening.
Refrigeration and indoor cold storage options
If you lack a root cellar or open garden bed, household refrigeration can store carrots for up to three to four months:
- Perforated plastic bags: Place unwashed, topped carrots into plastic storage bags with several small ventilation holes punched through. The plastic holds humidity around the roots while the perforations prevent condensation buildup that triggers mould.
- Water submersion method (small batches): For carrots used over two to four weeks, wash and trim the roots, place them in a glass container filled with clean cold water in the refrigerator, and change the water every three to four days to maintain crispness.
Troubleshooting common carrot storage problems
- Rubbery, limp carrots: Caused by low humidity in the storage environment. Rehydrate limp carrots by submerging them in ice water for an hour before cooking.
- Sprouting white root hairs or green leaves: Indicates the storage temperature is too warm (above 5°C). Move the storage bins to a cooler area closer to 0°C.
- Rotting, slimy, foul-smelling roots (bacterial soft rot, Pectobacterium carotovorum): Caused by bruised roots, excess surface moisture, or contaminated packing sand. Grey furry growth is Botrytis cinerea; white cottony growth with hard black sclerotia is Sclerotinia sclerotiorum. Inspect stored bins monthly, discarding any deteriorating roots immediately.