Key takeaways
- Kitchen scraps make up more than half of what most Indian households throw out, and nearly all of it can be composted at home instead of going to landfill.
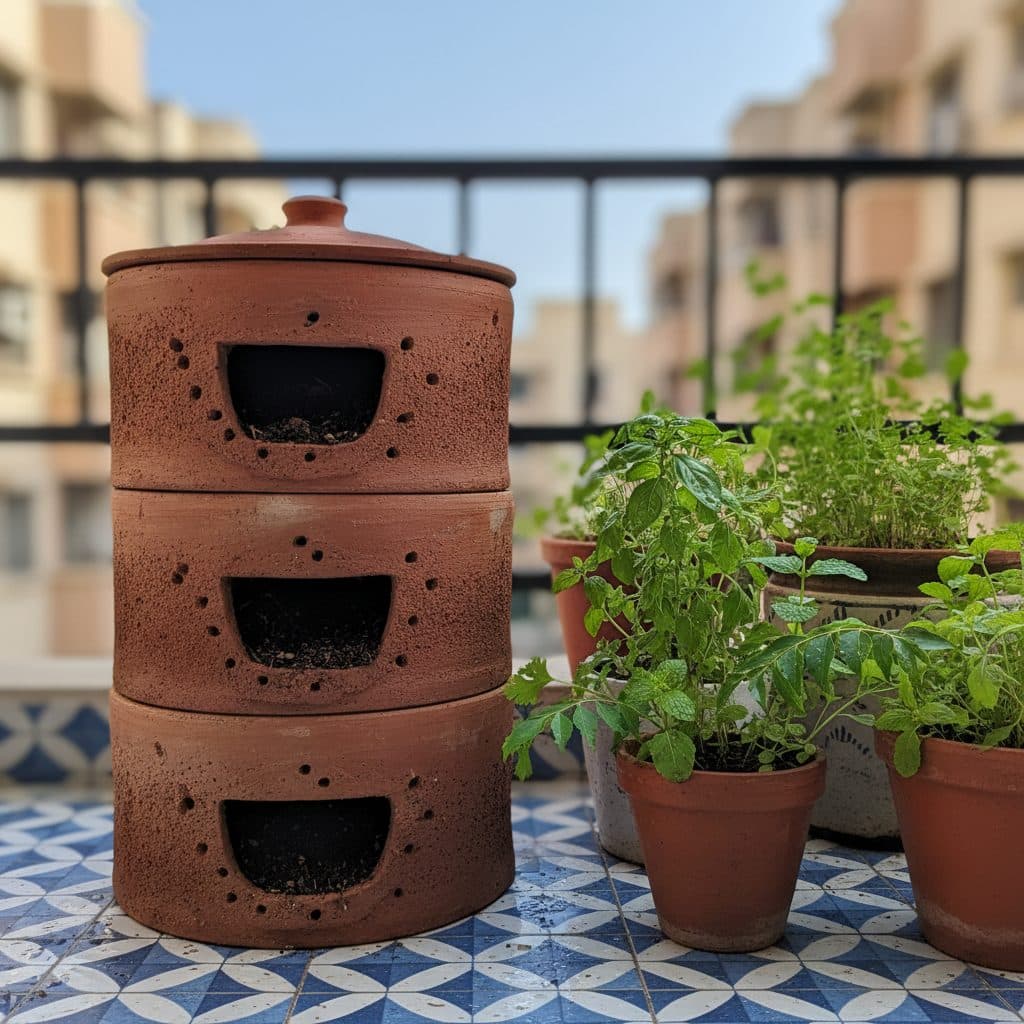
- The three-tier terracotta pot system (khamba or matka) utilizes breathable clay to maintain aerobic conditions without foul odours.
- Balancing wet nitrogen greens (vegetable peels, tea leaves) with dry carbon browns (coco peat, dry leaves, cardboard) maintains steady decomposition.
- Natural Indian accelerators like sour buttermilk, jaggery water, and neem powder speed up microbial breakdown.
- Terracotta composters generate liquid leachate that can be diluted and applied to soil or recycled back through the top pot.
Quick answer: Composting at home in India is easily done using a three-tier terracotta stack (khamba) or perforated plastic buckets. Layer wet kitchen waste (greens) with equal parts dry leaves, coco peat, or shredded cardboard (browns), adding a dash of sour buttermilk or aged compost to jumpstart beneficial microbes. The porous clay aerates the pile, yielding dark, sweet-smelling compost in six to eight weeks.
In urban Indian households, over half of daily domestic waste consists of organic kitchen scraps: vegetable trimmings, fruit peels, used chai leaves, and coriander stems. Sending this moisture-rich organic waste to city landfills generates potent methane gas and toxic leachate that pollutes groundwater. Composting at home turns daily kitchen discards into nutrient-rich compost for terrace pots and balcony planters.
While open compost piles are common on rural farms, apartment balconies and compact urban rooftops require closed, odour-free, pest-proof systems. Traditional terracotta stack composters (widely known as the khamba method) and simple clay matka pots suit the warm Indian climate, using natural clay porosity to accelerate aerobic decomposition.
The terracotta three-tier khamba system explained
The khamba (meaning terracotta pillar or stack) is a home composting system designed specifically for Indian urban spaces.
+-----------------------------------------------------------------------------------+
|  [Terracotta 3-Tier Khamba Stacking Flow]                                         |
|                                                                                   |
|  +--------------------+                                                           |
|  |  TOP UNIT (A)      | ===> Daily Kitchen Scraps + Browns added here             |
|  +--------------------+                                                           |
|  |  MIDDLE UNIT (B)   | ===> Maturing Stage: Moved down when Top fills            |
|  +--------------------+                                                           |
|  |  BOTTOM UNIT (C)   | ===> Final Curing Stage: Yields finished black compost    |
|  +--------------------+                                                           |
|  |  Collection Tray   | ===> Captures liquid leachate draining from pots          |
|  +--------------------+                                                           |
+-----------------------------------------------------------------------------------+
How the khamba cycle operates:
- Daily filling: You begin by adding daily kitchen waste and dry carbon materials into the top terracotta unit (Unit A).
- Rotating tiers: When Unit A is full (typically after two to three weeks for an average family), move Unit A to the middle position (Unit B) and place the empty unit on top.
- Curing and harvest: By the time the third unit is filled, the organic matter in the bottom unit has broken down into rich, crumbly, earthy compost ready for garden use.
- Breathable clay dynamics: The porous terracotta walls allow air exchange throughout the pile, maintaining aerobic conditions that prevent foul anaerobic odours.
To compare this method with worm-based bin setups, read our guide on vermicomposting at home and explore small space composting with no odor.
The golden ratio: greens vs browns in Indian kitchens
The single most common mistake in home composting is dumping only wet kitchen waste into the pot. Pure wet scraps turn into a slimy, foul-smelling, anaerobic sludge that attracts swarms of fruit flies.
A healthy compost system demands a balanced 1:1 volumetric ratio of wet nitrogen greens to dry carbon browns:
+---------------------+-----------------------+---------------------------------------+
| Category            | Acceptable Materials  | Prohibited Materials                  |
+---------------------+-----------------------+---------------------------------------+
| Greens (Nitrogen)   | Vegetable trimmings   | Cooked oily curries, dal with oil     |
|                     | Fruit rinds & peels   | Dairy items, whole milk, paneer       |
|                     | Spent tea leaves/chai | Meat, fish, chicken bones             |
|                     | Fresh coriander stems | Plastic, glossy printed paper         |
+---------------------+-----------------------+---------------------------------------+
| Browns (Carbon)     | Crushed dry leaves    | Diseased plant leaves                 |
|                     | Coco peat blocks      | Pet feces / dog / cat litter          |
|                     | Shredded cardboard    | Chemically treated wood shavings      |
|                     | Sawdust / wood chips  | Non-biodegradable food packaging      |
+---------------------+-----------------------+---------------------------------------+
Step-by-step daily composting routine
- Collect kitchen scraps: Chop vegetable peels and fruit rinds into small 2 to 3 cm pieces. Smaller particles decompose significantly faster. Rinse spent chai leaves to remove excess milk and sugar before adding.
- Base layer: Start your composter with a 5 cm base layer of dry leaves or coarse coco peat to absorb moisture.
- Add daily waste: Empty your daily kitchen scraps into the top pot.
- Cover completely with browns: Immediately cover the fresh green scraps with an equal volume of dry coco peat or crushed dry leaves. Ensure no food scraps remain visible on the surface.
- Aerate weekly: Gently turn the top layer with a small hand trowel once a week to introduce fresh oxygen.
To compare temperature phases, see our guide on hot vs cold composting.
Natural Indian microbial accelerators
In warm Indian weather (25°C to 35°C), composting proceeds rapidly. You can accelerate decomposition and suppress bad bacteria using common kitchen inputs:
- Sour buttermilk (Khatta chaas): Dilute two tablespoons of sour curd or buttermilk in a glass of water and sprinkle over the compost once a week. The lactic acid bacteria acidify the surface layer, which suppresses the anaerobic bacteria responsible for foul smells.
- Jaggery water (Gur water): Dissolve a teaspoon of jaggery in warm water and sprinkle over dry carbon layers. The simple sugars provide immediate energy to kickstart dormant microbes.
- Neem cake powder (Neem khali): Dust a handful of neem cake powder into the pot every fortnight. Neem cake repels maggots and fruit flies while enriching the finished compost with organic nitrogen; see our guide on neem cake for plants.
Managing monsoon moisture and fruit flies
During the southwest monsoon (roughly June to September), high ambient humidity can make compost piles overly wet.
- Move under shelter: Place your terracotta composter under a balcony roof, terrace chajja, or covered porch to prevent rainwater from soaking the clay pots.
- Increase dry browns: Add extra dry coco peat or shredded cardboard to soak up excess moisture.
- Fruit fly control: If tiny fruit flies appear, it means fresh greens are exposed. Add a 2 cm blanket of dry coco peat over the top and dust lightly with wood ash or neem powder. Keep the top terracotta lid firmly closed.
Managing compost leachate collection
Liquid draining from an actively rotting pile is leachate, not compost tea. It comes off partly decomposed material, is often anaerobic, and can scorch roots if used neat. Dilute one part leachate to at least ten parts water, pour it onto the soil rather than onto leaves you plan to eat, and use it within a day. If it smells sour or sulphurous, tip it back into the top pot instead.
Harvesting and using finished compost
When the bottom pot contains dark brown, crumbly material that smells like fresh monsoon rain on dry earth (geosmin), your compost is ready.
Spread the fresh compost on a newspaper sheet in the shade for two days to cure and air-dry. Sift through a coarse wire mesh sieve to remove unrotted mango pits or avocado skins, which can be tossed back into the top pot.
Mix this finished compost at a 30 percent ratio into your terrace potting mixes for vegetables, herbs, and flowering plants to boost water retention and soil fertility.